
The first step in creating a strong and long-lasting raised bed garden begins with choosing and preparing the right spot. The selected area should receive enough sunlight throughout the day, as most vegetables and herbs thrive in full sun. Once you’ve picked the location, it’s time to clear it. Remove weeds, grass, stones, or any unwanted plants from the surface. A clean base ensures your raised bed will be stable and prevents weeds from competing with your plants later.
After clearing, level the ground by lightly turning the top layer of soil with a shovel or hoe. You don’t have to dig deep—just loosen the surface so water can move freely once the bed is ready. Then, mark the shape and size of your raised bed using a stick or a rope. You can make it rectangular, square, or even slightly curved, depending on the available space and your garden’s layout.
Marking the area properly helps keep everything symmetrical, ensuring the bed looks neat and is easy to manage. A standard size for small home gardens is around four feet wide and eight feet long. However, there’s no fixed rule—you can adjust it to your space and needs.
Creating the Frame Using Bamboo
Once the area is prepared, the next step is to build the frame that will hold the soil in place. Instead of buying wooden boards or metal sheets, you can easily make the boundary using old bamboo sticks. Bamboo is one of the best materials for garden construction because it’s lightweight, strong, flexible, and lasts long even in outdoor conditions.
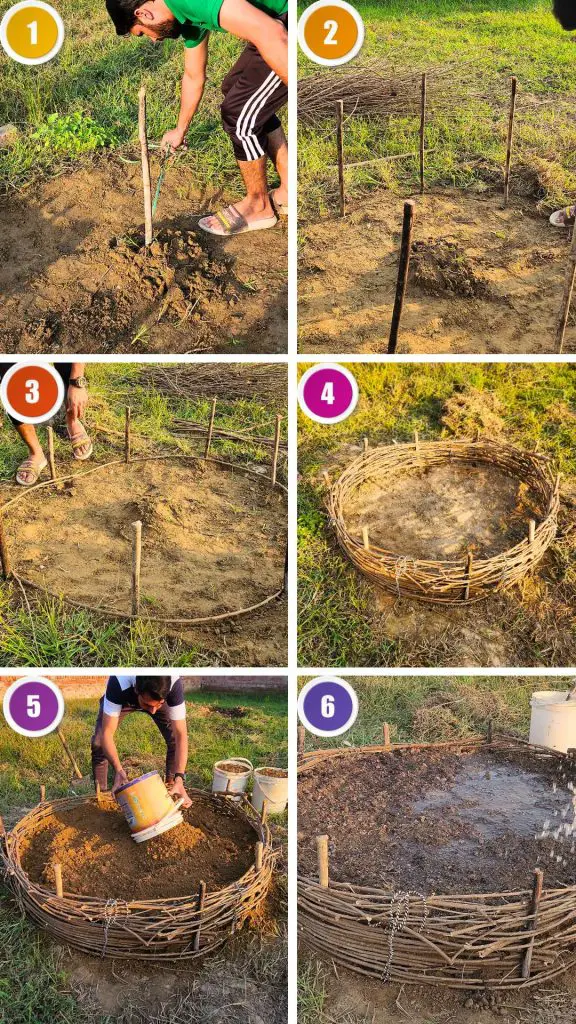
If you have leftover bamboo from old trellises or other garden structures, reuse them here. Begin by placing the bamboo sticks along the marked boundary. Push each stick slightly into the soil to anchor it, and place a brick next to it for additional support. This will create a simple but solid foundation for your raised bed.
Spacing the sticks evenly ensures the frame is stable and looks organized. Bamboo also gives your garden a rustic and natural appearance, which blends beautifully with other plants. Another great benefit of bamboo is that it’s eco-friendly and completely biodegradable.
Using Mulberry Branches for the Bed Walls
Now that the base structure is in place, it’s time to complete the sides of the raised bed. This is where mulberry tree branches come in. Mulberry branches are ideal for this purpose because they are naturally flexible and can bend without breaking. Their strength allows them to hold soil firmly, while their flexibility makes shaping the bed easy.
Start by collecting branches of medium thickness — not too soft and not too hard. Trim off any leaves or side twigs. Then, position them vertically or horizontally along the bamboo frame, depending on your design. Bend them slightly to form a rounded shape and tie them in place with rope or twine.
If you don’t have mulberry trees, you can also use willow or guava branches. Willow branches are known for their smooth texture and excellent flexibility. They can bend easily and form clean, natural curves. Guava branches, on the other hand, are stronger and provide a firm boundary that lasts for a long time. Both options work just as well as mulberry and are commonly available in most gardens.
When tying the branches, make sure the rope is tight enough to hold everything together but not so tight that it cuts into the branches. You can also weave smaller branches horizontally between the main ones to strengthen the sides. This simple weaving technique not only adds support but also gives your raised bed a decorative, handcrafted look.
Securing the Structure with Rope
Once all the branches are placed, the next step is to secure them properly. For this, any strong rope or garden twine will do the job. Start at one corner and wrap the rope around the branches, pulling it tight as you go. You can tie the rope at intervals, looping it between the bamboo sticks and the branches for extra strength.
Securing the frame is one of the most important parts of the process. A loose structure might fall apart when you fill the bed with soil. Make sure everything feels firm and doesn’t move when lightly pushed. Once tied securely, the frame will be ready to hold a good amount of soil and moisture without bending or collapsing.
The combination of bamboo and flexible tree branches creates a very strong and natural-looking raised bed. It’s durable enough to last several growing seasons and can be easily repaired or adjusted when needed.
Filling the Bed with Soil
Now comes the most satisfying part — filling the raised bed. This bed doesn’t require layers of organic waste, compost, or other fillers. The process is kept simple and practical. First, fill the bed with garden soil from your own yard. The soil should be loose, clean, and free of large stones or roots.
Once the bed is about 80% full, spread a top layer of fully decomposed manure. This manure is rich in nutrients and provides all the essential elements plants need to grow. Since it’s already decomposed, it won’t burn the roots or release excess heat. It mixes easily with the soil and starts improving fertility immediately.
This combination of garden soil and manure gives your plants the perfect start. The soil provides structure and support, while the manure ensures steady nourishment. It’s a simple yet effective way to prepare a fertile growing space without using expensive fertilizers or compost mixes.
Leveling and Watering
After filling the bed, use a shovel or rake to level the surface. Leveling is crucial because uneven soil can cause water to collect in one area, leading to poor drainage or waterlogging. A smooth surface helps water distribute evenly, ensuring that every plant gets the same amount of moisture.
Once the soil is leveled, give the bed a good watering. The first watering helps the soil settle and compacts it slightly, filling any air pockets that might have formed during filling. You’ll notice that the soil level may drop a little after watering — this is normal. If it drops too much, you can add a little more soil or manure to bring it back to the desired height.
Watering also helps the manure blend naturally with the soil, creating a soft, nutrient-rich base that’s perfect for planting.
Planting in the Raised Bed
Once the water has soaked in and the soil has settled, your raised bed is ready for planting. You can grow almost anything in it — from leafy greens and root vegetables to herbs and flowering plants. The raised design keeps the soil warm and well-drained, which helps plants grow faster and healthier.
Because the bed is elevated, it’s also easier to maintain. You can water, weed, and harvest without bending too much, which makes it perfect for anyone who enjoys gardening but wants to avoid the strain of working on the ground.
Plant spacing is important when working in a raised bed. Try to plant vegetables or herbs close enough to shade the soil but not so close that they compete for nutrients. A properly spaced bed will stay moist longer and support more growth per square foot compared to traditional ground planting.