
Building a raised bed garden does not need to be expensive. Many people spend a lot of money buying wooden boards, metal sheets, or even ready-made raised bed kits, but the truth is you can create a productive and beautiful garden bed using nothing but recycled and old materials that you already have lying around.
In this article, we are going to walk through the full step-by-step process of building a circular raised bed using bamboo, rope, cardboard, and natural soil layers. This method not only saves money but also recycles waste into something useful, making your garden eco-friendly and cost-effective.
Why Raised Beds Are a Great Choice
Raised beds have become very popular among gardeners, and for good reason. They offer several benefits compared to growing directly in the ground. By creating a raised bed:
- You improve drainage and prevent waterlogging.
- Soil warms up faster in spring, which means you can start planting earlier.
- It is easier to control weeds and keep your plants healthy.
- Raised beds reduce strain on your back since you don’t need to bend too low.
- You can design them in different shapes and sizes according to your garden space.
But the biggest advantage is that you get to control what goes into the bed. By layering organic matter and soil properly, you create a nutrient-rich growing environment for your vegetables, herbs, and flowers.
Step One: Marking the Area
The very first step is to decide where your raised bed will be located. Choose a spot that gets at least 6–8 hours of direct sunlight every day. Most vegetables and herbs need full sun, so this is important. Once the location is chosen, mark the shape of your bed.
While most raised beds are rectangular, here we are building a circular bed. Circular beds look attractive, give equal access from all sides, and are perfect for small gardens. You can use stones, sticks, or simply draw a line in the soil to mark the circle. This outline will guide you when setting up the border.
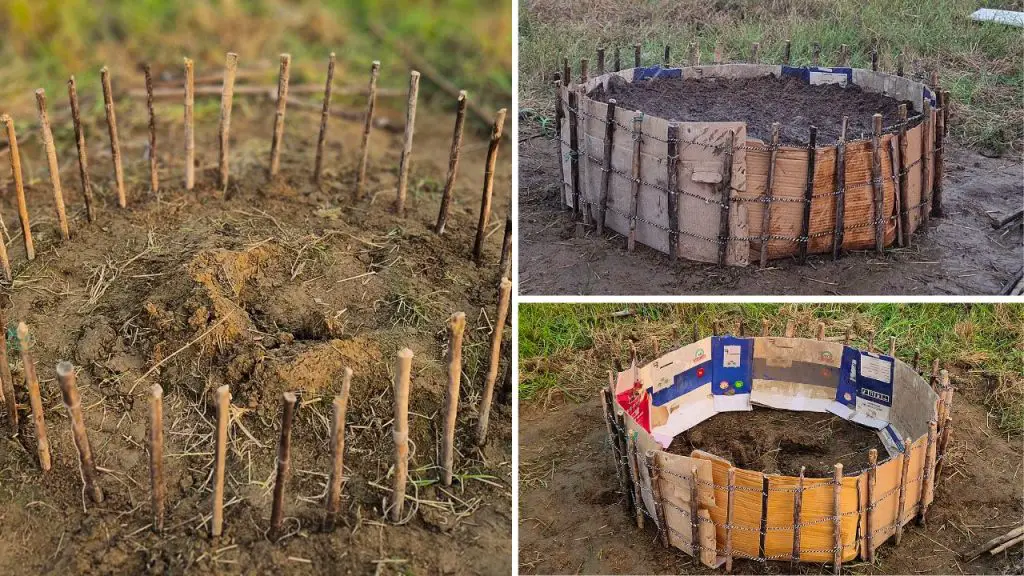
Step Two: Building the Bamboo Border
Instead of buying new wood planks or bricks, we are recycling old bamboo branches. These were used as trellises in the previous gardening season but now serve a new purpose.
Take each bamboo branch and push it firmly into the soil along the circular line. If the soil is hard, use a heavy stone or hammer to drive them in. Space them closely so there are no big gaps. The bamboo will act as the vertical posts of your garden wall.
After fixing the bamboo into the ground, the next step is to tie them together. Use old rope or twine and wrap it around the bamboo poles, securing them into a strong structure. This will prevent them from leaning outward when the bed is filled with soil. The bamboo border gives a natural rustic look and is strong enough to last multiple seasons.
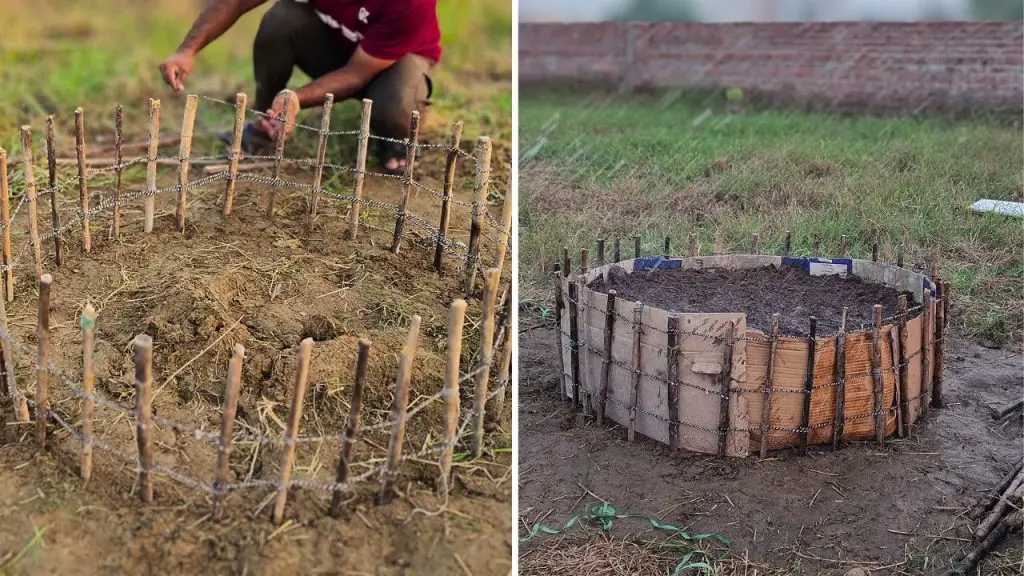
Step Three: Strengthening with Cardboard
Even though bamboo makes a good wall, soil can sometimes leak out through small gaps. To prevent this, we use old cardboard containers as an extra layer. Place flattened cardboard sheets inside the bamboo circle, overlapping them so no soil escapes.
Cardboard is cheap, easy to find, and eco-friendly. Over time, it will break down naturally and become part of the soil, adding organic carbon. This step also helps to suppress weeds from growing inside the raised bed. By reusing cardboard, you are also reducing waste that might otherwise end up in the trash.
Step Four: Filling the Raised Bed in Layers
Now comes the most important part—filling the bed with soil and organic matter. The way you layer the materials will decide how healthy your plants will grow. We are going to use four main layers:
- Loamy Garden Soil
- Dried Grass and Organic Matter
- Another Soil Layer
- Fully Decomposed Manure
Let’s break down the benefits of each layer.
Loamy Soil: The Foundation Layer
The first layer is a thick base of garden loamy soil. Loam is considered the best type of soil for gardening because it has the right mix of sand, silt, and clay. It holds water well but does not stay soggy, and it provides excellent aeration for plant roots.
By starting with loamy soil, you are giving your plants a strong foundation. Roots can grow deep and spread easily, while also having access to both nutrients and oxygen. This layer will act as the bedrock of your garden, supporting all the layers above it.
Dried Grass: Adding Organic Matter
The second layer is dried dead grass or grass clippings. Instead of throwing grass away after cutting the lawn, we can recycle it inside the raised bed. Grass is rich in nitrogen, which is one of the three most important nutrients plants need.
When dried grass decomposes, it enriches the soil with nitrogen, improves soil structure, and increases microbial activity. It also acts as an internal mulch, helping to keep the soil soft and moist. Worms love feeding on decaying grass, and their activity will further improve the fertility of your raised bed.
Another Soil Layer: Locking the Organic Matter
After adding dried grass, we place another layer of garden soil on top. This step is crucial because it locks the grass inside, preventing it from attracting pests or drying out too quickly.
This soil layer also ensures that when you plant crops, the roots will immediately be in contact with soil instead of directly touching the decomposing grass. Later, as roots grow deeper, they will reach the grass layer and benefit from the nutrients being released. This mimics the natural way forests recycle organic matter under layers of soil.
Fully Decomposed Manure: The Final Top Layer
Finally, we add a rich layer of fully decomposed manure. Manure is often called “black gold” for gardeners because it is packed with nutrients. It provides nitrogen for leafy growth, phosphorus for strong root development, and potassium for disease resistance and overall strength.
Because it is already decomposed, it is safe to use directly and will not burn plants. This manure layer also improves soil texture, making it crumbly and easy to work with. It slowly releases nutrients over time, ensuring your plants are fed for months without the need for chemical fertilizers.
Step Five: Watering the Raised Bed
After building the layers, the final step is to give the bed a good watering. Water helps settle the soil, removing any hidden air pockets, and allows the different layers to start mixing naturally.
Moisture also activates microbes in the soil and manure. These tiny organisms are the invisible workers of your garden. They break down organic matter, release nutrients, and improve soil fertility. A raised bed full of microbial life will always grow healthier, stronger plants compared to lifeless soil.