
When you think of British Cottage Gardens, you think of the Holy Hawks. Their long, high stems can line the path, stand on either side of the door, or you can grow them as border plants, they will make the view more eye-catching.
They can create a lovely vertical element to your garden as they grow taller than other plants. They are wonderful plants to grow, they will bloom during summer and no garden style is complete without them. They will make your garden more stunning.

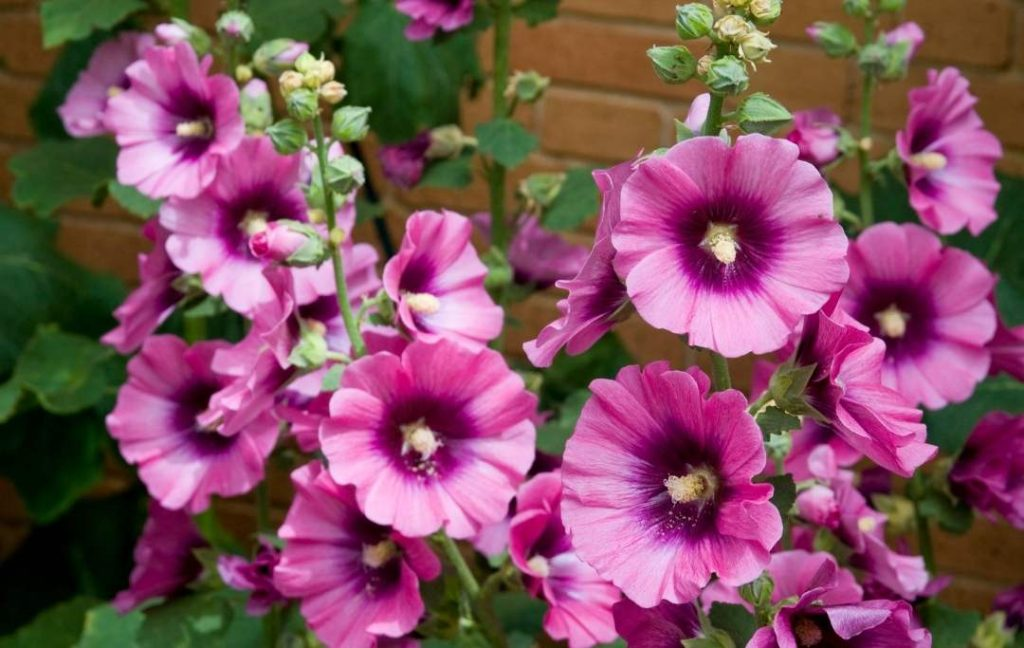
Their open, saucer flowers are sprinkled all over the stem of the plant, they are compactly arranged around the stem. They will look like butterflies in their full bloom. Hollyhocks are fully rugged and flower in the second year after sowing as they are biennial. Most varieties are short-lived perennials and are available in both single and double flowers.
Suitable Time for Plantation:
As they bloom well along summer so the best time for plantation is the start of summer so plant them in April or May. You can sow seeds directly outside in May and June. If you have purchased Holly Hawks as potted plants or picked them from seed, they can be planted from May to July. Flowers appear next year after planting.
Where to Plant Hollyhock?
Holy hawks prefer well-drained soil. Place your pot in a bright sunny spot. They also tolerate some shade. Planting them along a fence or wall will protect them and make them less likely to fly in high winds or provide them support when they become mature.
How to Plant Hollyhocks?
If you are planting seeds indoors, sow them outside about a week before the last frost. If you are planting outside, wait about two to three weeks after the last frost.
Do not press your seeds deeply into the soil, as it causes difficulty in seed germination. When these plants get mature they need proper space as they spread along, so place them at least two feet apart from each other.
They can also grow from seedlings, or you can buy potted plants from necessary. Do not plant hollyhocks in too dry soil, as adequate moisture is necessary.
Planting Hollyhocks in Pots?
The important thing to know about Hollyhocks to grow in containers is that they need a lot of space, so choose a pot that is large enough to support the plant growth or transplant your plant into a larger pot before maturity.
Hollyhocks have a good root system as primary or tap root has many lateral branches so they need large space to get established. Select a pot that is deeper than wide.
A barrel-shaped container is a good selection for these plants. Remember that your hollyhock plant will establish its roots and foliage in the first year, and flowers appear in the second year of the plantation.
Propagation:
Hollyhocks are easy to grow from seed and will readily self-seed in your garden. The new plants that are produced by seeds are not exact replicas of the parent plant if the plant is a hybrid.
Self-seeding plants can be picked up at a young age and transplanted into your garden where you want them to grow. In this way, in very few years you will have so many plants in your garden.
Growing From Seeds:
Spring and autumn are the best time to start with the Hollyhocks seeds. The whole process from sowing to planting takes about nine weeks.
Preparation of Seeds for Germination:
Water treatment is usually used on hard-shelled seeds. As it softens the seed structure, breaks dormancy from the inside out, and encourages germination.
Because hollyhocks seeds are large and have a very hard seed coat, soaking them in warm water or hot water before sowing increases the seed germination percentage, otherwise seed will take a long to germinate.
Sowing Hollyhock Seeds:
Sow Hollyhocks seeds in biodegradable containers, such as peat pots, newsprint pots, or paper towels and toilet tissue rolls.
So seeds in individual pots, as it could be a better start for them. Sow the seeds into the pot by mixing a little sand in the seed starting mix, and then cover it lightly with soil and water your pot. Place the pot in a sunny spot as the seed needs light to germinate.
Place pots on a sunny window, under rising lights or in a cool frame. Water your pot frequently to keep the soil moist throughout the germination process. As slight moisture is required by seeds to germinate.
Transplanting Hollyhocks Seedling:
When seeds germinate transplant your seedlings or young plants into containers. Arrange some support for your plants. Water them two or three times a week, and regularly in hot dry spells as the containers dry out quicker than the ground.
Care for Hollyhocks:
Hollyhocks require minimum care to grow well. This includes:
Size of Container:
The size of the container is very important because how your plant thrives largely depends upon the container you select. Hollyhocks require a large container, like a whiskey barrel which provides adequate space for its roots to grow. Although if you choose dwarf species they have quite smaller root systems, the more space you give them, the happier they will be.
You can also use a bucket or anything from your house to grow plants, but in the case of hollyhocks choose one that is at least 12 to 16 inches deep and 24 inches in diameter.
Soil:
Lightweight soil that resists compaction allows hollyhock roots to easily penetrate the soil to access water and nutrients. Use good quality potting mix as a mixture of one part peat moss, one part perlite, and one part garden loom in containers makes the best soil for Hollyhocks to grow.
This mixture is ideal because it retains the necessary moisture, water drain out quickly from it and it allows proper air circulation between roots.
Water:
Water newly planted holly hawks regularly, until they get an established root system. Plants grown in containers require more frequent watering than those in the soil because water is lost through the bottom of the pot with each watering, moreover, containers hold less soil.
Water the soil thoroughly when it looks dry. During hot, dry spells, your Hollyhocks may need water daily, And in mild temperatures water once or twice a week.
Always water until water drains freely from the drainage holes in the bottom of the pot to ensure proper hydration for the roots. Drainage is necessary as wet or soggy soil increases the fungal attack.
Once the plant is established, you can reduce the water but make sure they are watered in drought, as drought causes damage to your plants, and cause wilting of leaves.
Fertilizing:
If your soil is nutrient-rich then there is no need to add extra fertilizers. But when you grow Hollyhocks in containers they will need to be fed regularly. Nutrients drain out through the bottom of the pot with each watering. For this reason, use water-soluble fertilizers specially designed for pot grown plants.
Stalking:
Hollyhocks grow tall so arrange support for the, as a protection against wind. If you attach them to a wall or fence, they should be well protected. But if there is no such spot place your pot to provide support by means of stalking, add a stick to support the top of each flower.
Light preferences:
Holly Hawks need full sun to thrive well, but they also withstand partial shade. But if there is no exposure to light it will affect the blooms. These charming flowers create a natural backdrop for small flowers.
Consider placing your container on the border or behind your flower arrangement, as these plants grow taller, it will produce a catchy look and makes your garden more eye-catching.
Deadheading:
Hollyhocks can easily self-seed if you let the flower heads go into the seed. But if you do not want to have seeds you can cut the spikes as flowers wither.
Trimming:
A special or regular pruning is not required. Just cut the infected leaves to minimize the infection. And cut the spikes if you don’t want seeds or more self-grown hollyhocks in your garden, make a cut after fading of flowers.
Mulching:
Another great way to improve your hollyhocks plant is the use of mulch, place 2-3 inches of mulch around the base of every plant. It helps to keep the soil moist
Disease and management:
Hollyhocks are susceptible to many fungal diseases mainly rust. You can use strong fungicides to deal with rust, but you can also think to manage the issue organically, as fungicides may cause environmental hazards. You should pick up the infected leaves as soon as you see them.
Make sure there is good air circulation around the plants and water the soil from the base as the spores are spread by water spray as well. You can also make your own natural fungicide with a tea tonic, dissolve chia leaves in water and spray your plant with it.
Pests:
Young plants are also susceptible to slugs and caterpillars. Flea beetles can occasionally cause significant leaf damage. These can be controlled biologically or by using insecticides, biologically by using slugs and caterpillar eaters.
Best Varieties of Hollyhocks
Alcea Rosea
Alcea rosea is the most common type of holly hawk. It grows best in USDA zones 4 to 10. It usually opens in the summer months from June to August. It attains a height of five to eight feet when fully mature.
Once you plant a flower, it will bloom again each year without the need for seeds, as it is a self-seeded plant. So do not cut the spikes after the death of the flowers.
Alcea rosea comes in a variety of colors, it produces blooms of white and yellow to pink and red and attracts hummingbirds and butterflies to the garden, that increase the charm of your garden.
Alcea Ficifolia
It has fig leaves; is not well-known species of hollyhocks. The flowers are white or cream in color while the leaves are dark-colored.
It blooms from May to October; it is a strong variety that produces many flowering stems on a plant basis. The most common type of Alcea ficifolia is known as “Happy Lights”.
Alcea Nigra
While most Holly Hawks bloom in pastel or vibrant colors, alcea Nigra blooms in dark purple color which looks red in appearance, but they need full light to bloom because low light affects blooming.
Featuring a light purple centerpiece, this type helps bring some contrast to your colorful garden. Some of the most popular varieties of Alcea nigra include Arabian Nights, the Watchman, Nigra Erfurter, Black Beauty, After Midnight, and Jet Black.
Alcea rugosa
It produces bright yellow flowers that look beautiful when planted together with other plants or in the group. But if you have limited space single plantations are preferred. This plant is native to Russia, and its soft buttery yellow strains make it strong enough to thrive anywhere. And it looks amazing in full bloom.
This plant is easy to grow and its seeds germinate quickly. It thrives in both full sun and partial shade. It needs well-drained soil and 1 inch of water per week. It loves acidic soil so ph should be within 5.5 to 6.
Recent Posts
Sansevieria, or snake plants, are highly valued for their visually arresting greenery and ability to filter pollutants from the atmosphere. We'll introduce you to 12 lovely snake plant species...
Top Domestic Low-Light Plants That Can Survive In Shadowy Spaces:
As any individual who has ever eradicated a common houseplant will attest, it's not simple maintaining foliage healthy. We domestic plant predators prefer to think alike, that's why we choose...