
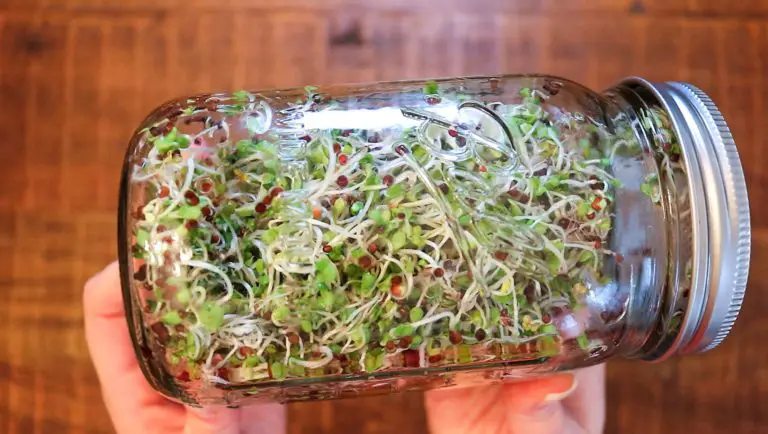
You can enhance the taste of your sandwiches after adding alfalfa broccoli or bean sprouts. You can buy these sprouts at any grocery store. But with a little endeavor, you can grow them for yourself at your home and eat fresh sprouts anytime you want.
You should not worry about the sunlight and soil to grow them. Now we are going to discuss with you how to grow fresh sprouts in a jar at home.
What Is Sprouting?
This is a natural process by which you can easily grow healthy and fresh microgreens in a jar. Your selected seeds germinate and put out shoots.
The seeds are soaked in water and keep the jar in a warm and moist environment so they can easily sprout. You can grow a new batch of sprouts every week and get homegrown sprouts without affecting your pocket.
Why Are Sprouts Good For You?
This is an interesting question: why do we grow sprouts? The answer is that
- They are rich in vitamins, digestible energy minerals, phytochemicals, amino acids, and proteins.
- These nutrients are good for human health. The breakdown of complex compounds into simple forms during the sprouting period makes sprouts predigested food.
- When you soak the seeds the metabolic activity increases due to the presence of water. During sprouting, complex biochemical changes occur. Enzymes break down starch, protein, and lipids into simple compounds.
WHEN IS THE BEST TIME TO MAKE A SPROUTING JAR?
This is the most convenient and popular method for sprouting seeds. when you grow at home then you will get fresh and organic vegetables.
This is the best way to save money and you can avoid store-bought produce. The best location for placing the jars of sprouts is in the kitchen.
When you place the jars on the shelf of your kitchen then they will be unaffected by the weather. It means you can grow sprouts any time of the year. Whenever you need, you can use delicious sprouts in your soups and salads.
Things You Need To Make Sprouts In Jars
You can harvest the sprouts after just a few days. Sprouts are a treasure of vitamins, minerals, and fibers. Small sprouts are grown quickly in a jar. You don’t need much space or equipment for growing sprouts in the jar. The following are the things you need for this purpose.
1- JAR
- The first thing you need is jars. Make sure the jar you are using must be wide-mouthed. You can also reuse canning jars but clean and sanitize them before using. A mason jar can hold 500 to 750 ml of water.
- The suitable height of the jar for growing sprouts is about 15 cm. Most jars come with a lid. You can make holes or use mesh or cheesecloth for covering the jar.
- Usually, you need a stand to place your jar in an inclined position. This will help excess water to drain out. Special sprouting jars have plastic or metal lids and holders.
2- MESH OR CHEESECLOTH
- The next thing you need is mesh or cheesecloth for securing the jar. In case, your jar has a lid then you can make holes in the lid so the air can enter the jar and excess water can be removed easily. Place the mesh on the top of the jar and secure it on the ring part of the lid.
3- SEEDS
- The last thing you need is seeds.
Selection Of Seeds To Grow Sprouts In A Jar
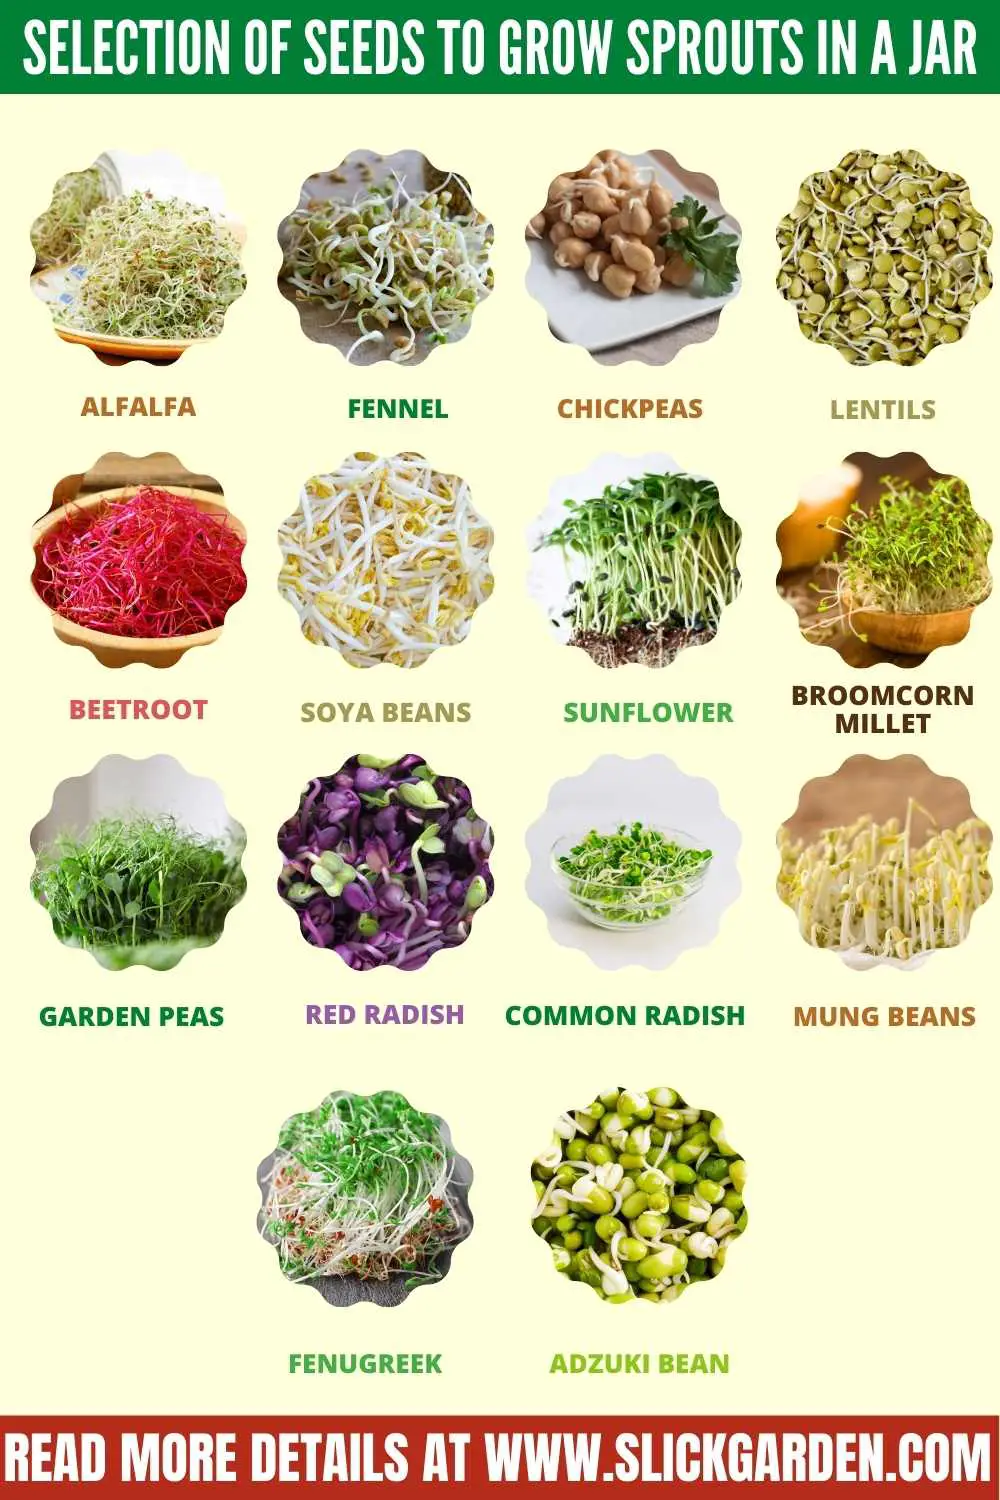
Seeds of vegetables, pulses, and grains can be used for growing sprouts. The germination time, size, and taste of the sprouts depend upon the species you choose for growing in the jar.
When you are purchasing seeds then make sure they are specifically for sprouting. If the seeds are chemical free they are cleaned and pathogen-free. Following are the specials that are ideal for growing in sprouting.
1- ALFALFA
Alfalfa seeds sprout within 7 to 8 days. You must soak the seeds in water for 6 to 8 hours. The taste of the sprouts of alfalfa is slightly sourish and nutty. When you add these sprouts to your salad and sandwiches they taste great.
2- FENNEL ( Foeniculum vulgare)
The taste of sprouts is slightly milder. You can use these sprouts to enhance the taste of your fish dishes, salads, and soups. You must soak the seeds for about 10 hours and wait for them to sprout for 8 to 12 days.
3- CHICKPEAS ( Cicer arietinum)
The taste of the sprouts of chickpeas is slightly nutty. You must soak the chickpeas for 12 to 18 hours and after 3 days you will get sprouts.
4- LENTILS
Soak lentils for 12 hours and wait for sprouting for 3 to 4 days. These sprouts of lentils can be used in salads and sandwiches.
5- GARDEN PEAS (Pisum sativum)
The sprouting period of garden peas is 8 to 12 days. You must soak the seeds for 10 hours before leaving them for sprouting. The taste of the sprouts of garden peas is slightly milder. The sprouts enhance the taste of soups and salads. You can also use them in fish dishes.
6- RED RADISH (Raphanus sativus var)
The taste of red radish sprouts is very hot and spicy. You can make your salads, sandwiches, and dips more delicious after adding them. The soaking period of red radish seeds is about 6 to 8 hours and the sprouting period is 4 to 6 days.
7- COMMON RADISH (Raphanus sativus)
If you want to make your salad, dips, and sandwiches spicy and hot then you must use sprouts of common radish. The soaking period of common radish seeds is about 6 to 8 hours and the sprouting period is 4 to 6 days.
8- MUNG BEANS (Vigna radiata)
The taste of the sprouts of mung beans is very sweet and mainly it is used in Asian dishes. The soaking period of seeds is about 6 to 8 hours and the sprouting period is 4 to 6 days.
9- COMMON BEETROOT (Beta vulgaris)
The color of the sprouts of beetroot is red and the taste is light earthy. They will be perfect for making your salads tastier. The soaking period of seeds is about 8 hours and the sprouting period is 4 to 6 days.
10- SOYA BEANS (Glycine max)
The addition of sprouts of soya beans makes your soup yummy and tasty. The sprouting period of seeds is 4 to 5 days and the soaking period is 15 hours.
11- SUNFLOWER SEEDS (Helianthus Annuus)
The taste of sunflower sprouts is mildly nutty. You must soak the seeds for 2 to 4 hours and leave them for 1 to 3 days. After 3 days you will see the yummy sprouts.
12- BROOMCORN MILLET (Panicum miliaceum)
The soaking time of seeds of broomcorn millet for sprouting is 4 to 8 hours. After 2 to 3 days you will see the sprouts are ready to eat. You can make your salads more appetizing after adding these sprouts.
13- FENUGREEK (Trigonella foenum – graecum)
When growing sprouts of fenugreek then you must be careful if they grow longer than they taste bitter. The soaking period of seeds is about 8 hours and the sprouting period is 2 to 3 days.
14- ADZUKI BEAN (Vigna angularis)
These sprouts are used to make Asian rice dishes more delicious. The soaking period of seeds is about 6 to 8 hours and the sprouting period is 3 to 5 days.
Keep Reading:
- How To Make Diy Mason Jars Herb Garden
- How To Keep Fruit Fresh In Mason Jars?
- Planning A Surviving Garden For Food And Medicine
How To Grow Sprouts In A Jar?
The following are the simple steps for growing sprouts in a jar. If you follow them you can easily grow them.
1- SOAK THE SEEDS
Place one tablespoon of seeds in your desired jar. Fill your jar about 2 inches to cover the seeds with water. The soaking period of the seeds must be 8 hours.
If your jar doesn’t have a proper lid that has holes then you can use cheesecloth. For securing you can use a rubber band. The soaking process must be done for almost all types of sprouts. Only cress and flax seeds do not require soaking.
2- RINSE AND REPEAT
After 8 hours pour the water out and if you see any non-swollen seeds then remove them. Place the jar in such a way that the remaining water easily drains from the jar.
Set your jar at an angle so the seeds have enough room to grow. Now place your jar in a cool and dark location. It is suggested that you should rinse and drain your seeds twice daily. When you see light yellow leaves start growing then stop rinsing.
3- GET A LITTLE SUN
When your seeds start sprouting and yellow leaves appear then it is that time to place your jars in a well-lit area. As you know, for the growth of seeds, light plays a very important role.
4- SERVE
Now you are thinking about when the sprouts are ready for harvesting. After germination of seeds, within 3 to 4 days the sprouts are ready to eat or when yellow leaves turn green then your sprouts are ready for use.
Rinse them well and eat. If you don’t need them right now then you can also refrigerate them for future use. If you want to start new sprout cycles then before using these jars again wash them thoroughly with hot water.
How To Properly Care For Sprouting Jars?
Although growing sprouts in a jar are very easy, one thing you should keep in your mind to get complete success is daily rinsing. You need fresh water to rinse your sprouts daily in the morning and evening.
After rinsing, set your jars back in the holder so the excess water drains out easily. This will help to protect your sprouts from bacteria and mould.
During rinsing, you should carefully examine the sprouts. If you find the presence of mould then you must restart the germination process. As you know inside the jar there is a warm and moist environment that also encourages the growth of toxic bacteria, fungi, and other microorganisms.
If you buy sprouts from any store then they are highly contaminated with germs. It means you must grow your fresh sprouts at home. So you will get healthy nutrients from them.
Recent Posts
Don't Throw Away Expired Bread: Turn It Into a Simple Homemade Fertilizer
Most people throw away expired bread without thinking twice. While bread is no longer safe to eat once it has spoiled, it can still be useful in the garden. Instead of adding it to the trash, you can...
I Mixed Dish Soap, Vinegar & Oil and Sprayed My Plants… The Results Shocked Me
Many home gardeners look for simple and affordable ways to keep their plants healthy without relying on strong chemical pesticides. One popular method is a homemade plant spray made from everyday...