
Creating a garden bed without spending any money is not only possible but can also produce healthier soil than many store-bought mixes. With a few simple steps and natural materials from your home and backyard, you can build a raised bed that feeds your plants continuously while saving water and improving soil structure.
This method uses sunlight, soil layering, kitchen waste, compost, and basic shaping techniques to create a nutrient-rich growing space for vegetables, herbs, or flowers. The goal is to use natural decomposition and smart bed design to produce a system that stays fertile for months with very little effort.
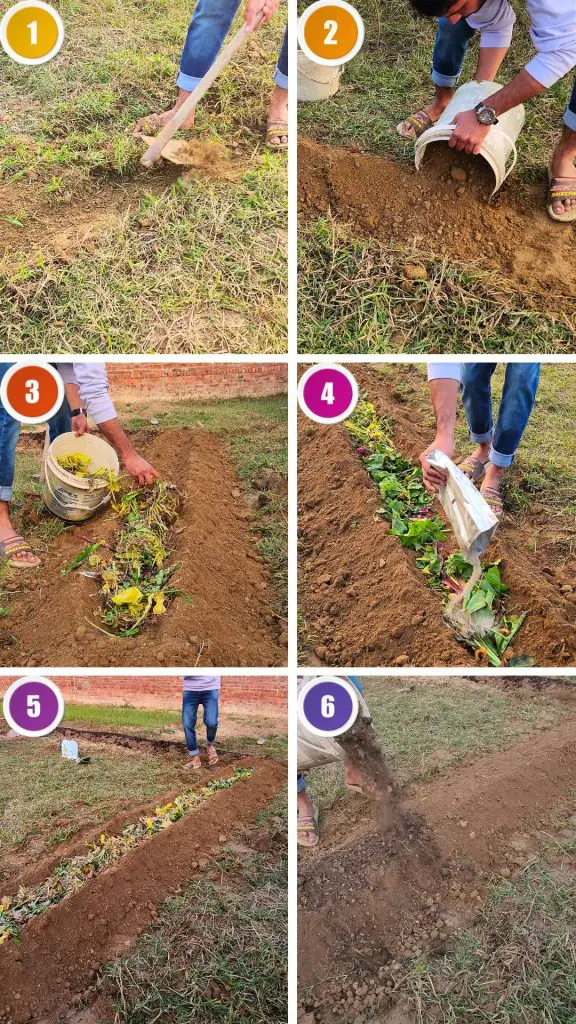
Choosing the Right Location
Every successful garden bed starts with choosing the best spot. Plants depend heavily on sunlight, and most vegetables grow best in full sun. Select a place in your garden that receives at least six to eight hours of direct light every day. Sunlight influences plant height, leaf size, stem strength, and fruit production, so picking a bright area guarantees strong growth.
After selecting the location, the next step is cleaning it. Remove weeds, grass, stones, dry leaves, or anything that can interfere with bed formation. Cleaning ensures your raised soil sits on a smooth surface and blends well with the ground underneath. Loosening the top inch of soil also helps improve aeration and allows the bed to bond naturally with the earth below.
Forming the Raised Soil Bed
Once the space is clear, gather soil from your backyard. You don’t need special tools or additional materials. Simply bring enough soil to form a raised structure. The height of this bed can vary, but raising it a few inches above ground level is usually enough.
Raised soil warms faster in spring, drains better during heavy rains, and stays loose enough for roots to move easily. Shape the soil into a long, neat rectangle or any shape that fits your space. Creating smooth edges makes watering easier and gives your bed a tidy appearance. The raised form also prevents waterlogging while still storing enough moisture for steady plant growth.
Making Water-Holding Ridges
Water management is one of the key features of this free garden bed method. To make your bed more efficient, shape ridges along both sides. These ridges act like walls that catch and hold water instead of letting it run off. When it rains or when you water the bed manually, the ridges trap moisture, allowing it to slowly seep into the soil for hours.
This slow release ensures the roots always have access to moisture, which is especially valuable in hot climates. The side ridges also help reduce soil erosion, keep nutrients in place, and create a micro-environment where beneficial microbes thrive. When these microbes stay active, they break down organic matter faster and improve soil fertility naturally.
Adding Kitchen Waste for Fertility
Once the side ridges are ready, the next major step is preparing the nutrient core of the bed. Make a smaller ridge right in the center of your raised soil bed. This ridge will hold kitchen waste, which acts as long-term fertilizer. Use materials like vegetable peels, fruit scraps, tea waste, leftover greens, and crushed eggshells.
These waste materials are rich in organic compounds that break down slowly and release nutrients that your plants can absorb over time. Avoid cooked food, oily leftovers, and meat, as they decompose differently and may attract pests.
Spread your kitchen waste evenly along the central ridge. This buried organic matter becomes the heart of the bed, boosting microbial activity and creating a warm environment that speeds up decomposition. As the waste breaks down, it produces natural compounds that improve soil texture, water-holding capacity, and nutrient levels.
Boosting Soil Nutrition
If you already have soil amendments at home, such as rock phosphate powder or mustard cake powder, sprinkle a small amount on top of the kitchen waste. These materials enrich the soil without requiring any additional purchases. Rock phosphate supports strong root systems, while mustard cake adds slow-release nutrients that enhance plant growth.
Even a small quantity is enough to improve the soil significantly. After adding amendments, place a layer of compost over the waste. The compost contains microorganisms that begin the decomposition process quickly and efficiently. This step speeds up the breakdown of the kitchen waste below and mixes beneficial microbes into the upper soil layers.
Sealing the Ridge and Final Layering
Now cover the middle ridge with soil. This step buries the waste completely, keeping the bed clean and preventing insects from reaching the organic material. Spread the soil evenly and press it lightly to help the layers settle without compacting them too much.
Airflow through the soil is still important for decomposition. Once the ridge is sealed, add a thin layer of compost across the entire top of the bed. This will become the growing layer where you plant your seeds or seedlings. Compost on top also prevents the soil from crusting, keeps moisture inside, and provides a soft environment for seedlings to push through.
Planting or Waiting Period
There are two options after finishing the bed. You can plant immediately, or you can wait about two weeks. Waiting helps the materials inside settle, warm up, and begin breaking down, but planting right away also works because plants grow slowly at first and the nutrients release gradually over time.
If you plant immediately, make shallow lines in the top compost layer, sow your seeds, and gently cover them with a little soil. Seeds sprout easily in this soft surface.
Watering and Moisture Retention
Water the bed thoroughly. When you add water, you’ll notice how the side ridges hold the water instead of allowing it to run off. This captured water seeps down slowly, keeping the bed moist for a longer time and reducing the need for frequent watering.
Moist soil helps decomposition, nutrient movement, and root development. As days pass, the kitchen waste inside begins to break down and release nutrients directly into the soil structure. The bed stays fertile for weeks without adding any store-bought fertilizers.