
We have plenty of leaves in our garden, and instead of throwing them away, we’re going to use them to make a homemade liquid fertilizer. We only need a few more ingredients, and you can get most of them without spending any money.
I like making fertilizers this way because there’s always some garden waste left after harvesting vegetables or cleaning the beds. We can put those leaves to good use instead of throwing them away. This fertilizer can be used for vegetables, fruit trees, and even houseplants. But if you’re growing onions and garlic, it’s worth trying during their active growing period, when the plants are developing their green tops.
For this recipe, we’ll need about half a kilogram of fresh leaves, some clean wood ash, a little organic compost, and water. We also need a container that can hold around 15 litres. Let’s make it.
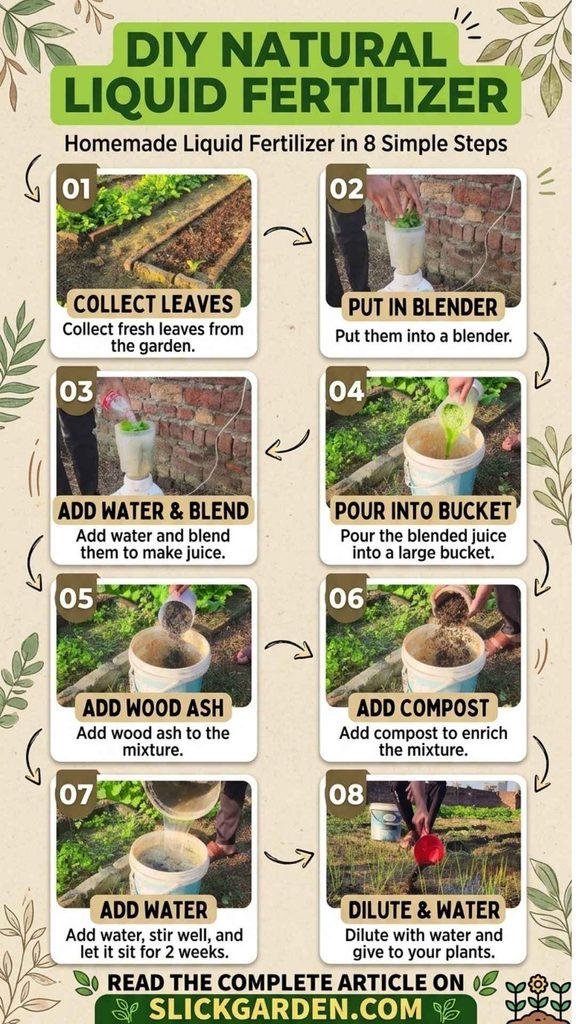
Collect Fresh Leaves From Your Garden
First, collect about half a kilogram of fresh green leaves. I prefer vegetable leaves because they’re easy to find in the garden. If you’ve recently harvested cabbage, cauliflower, or other vegetables, you might already have enough leaves lying around.
Use healthy leaves rather than material covered with serious plant diseases. We don’t want to spread plant problems around the garden while trying to make fertilizer.
Now, chop the leaves into smaller pieces with your hands and put them in a blender. Add about one cup of water and blend everything into a green mixture. It doesn’t have to be perfectly smooth. We just want to break the leaves down a little before putting them in the container.
Green leaves contain nitrogen, which plants need to grow healthy foliage. This is useful for onions and garlic because their leaves collect sunlight and help the plants build up the energy they need for bulb development.
Of course, that doesn’t mean the more leaves we add, the better the fertilizer will be. We’re using a reasonable amount for this batch, and we’ll dilute the finished liquid before giving it to our plants.
Add Wood Ash to the Mixture
Transfer the blended leaves into your 15-litre container. Now add two to three cups of clean wood ash and give everything a good stir.
Wood ash contains potassium and calcium, along with smaller amounts of other minerals. These nutrients have different jobs in the plant. Potassium helps plants manage water and supports normal growth, while calcium is needed for healthy plant tissues.
But be a little careful with wood ash. It can raise the pH of your soil, making it more alkaline. If your garden soil is already alkaline, adding more ash can make some nutrients harder for plants to absorb. Onions and garlic generally prefer soil close to neutral, so you don’t want to keep adding ash without considering your soil.
Only use ash from clean, untreated wood. Don’t use ash from painted wood, coal, or burned rubbish.
If your soil is already alkaline, I’d leave the ash out or use much less. You can still make the liquid using the leaves, compost, and water. There’s no need to use every ingredient if it doesn’t suit your garden.
Add a Few Handfuls of Compost
Next, add a few handfuls of mature organic compost. If you already make compost at home, this is an easy ingredient to collect.
Compost adds organic material and a mixture of nutrients to the recipe. It also contains microorganisms that help break down the leaves. As the mixture sits, some nutrients can be released into the water.
The quality of your compost makes a difference here. Compost made from a mixture of vegetable scraps, leaves, and other garden materials can have a different nutrient content from compost made mostly from dry leaves.
Use mature compost rather than fresh manure or unfinished compost. We want to use material that’s already well decomposed, not something that might damage the plants when applied incorrectly.
You don’t need to fill the container with compost. A few handfuls will do for this batch. Once you’ve added it, stir everything together so the ingredients are mixed.
Fill the Container With Water
Now fill the container with rainwater or suitable water that doesn’t contain excessive chlorine or salts. I prefer rainwater when it’s available.
Bring the mixture up to around 15 litres, but leave a little space at the top. Stir it once more, then cover the container loosely.
Don’t seal it airtight. As the organic material breaks down, gas can build up inside the container. Keep it in a shaded place, away from children and pets, and use a separate tool for stirring.
That’s all the preparation we need to do. The leaves, compost, and water will sit together while the organic material starts breaking down.
Leave It for at Least Two Weeks
Leave the container for a minimum of two weeks. If your batch needs a little longer before you’re ready to use it, that’s fine, but waiting longer doesn’t guarantee that the fertilizer will be stronger or safer.
We actually prepared a batch about a month ago, so we’ll use that one rather than making another batch today.
As the mixture breaks down, its colour and smell may change. It might develop a strong smell, which isn’t surprising when you’re working with decomposing leaves and compost. Still, smell alone can’t tell us how many nutrients are available or whether the liquid is free from harmful microorganisms.
I wouldn’t spray this mixture over the leaves of vegetables, especially those we’re going to eat soon. Apply it to the soil instead, and avoid splashing it onto edible parts of the plants.
Remember that this is homemade fertilizer, not a tested commercial product. Its nutrient content will change depending on the leaves, compost, ash, and conditions inside the container.
How to Use the Finished Fertilizer
Our batch has been sitting for about a month, so the next step is to prepare it for the garden.
If there are large pieces of leaves floating in the liquid, strain them out so the fertilizer is easier to pour. The leftover solid material can go into a properly managed compost pile.
Now dilute the liquid before applying it. Since we don’t know its exact strength, start with one part fertilizer to ten parts water. Try this mixture on a few plants first rather than using it across the entire garden straight away.
Pour the diluted liquid onto the soil around the plants. Don’t pour concentrated fertilizer directly onto the roots, and don’t apply it when the soil is already waterlogged.
For onions and garlic, I’d use it during active leafy growth, when the plants are still developing their green tops. Those leaves are important because they help the plants produce the energy needed for growing bulbs.
Once the bulbs begin maturing, don’t keep feeding the plants in an attempt to force more growth. Too much nitrogen late in the season can delay maturity or encourage leaves when the bulbs should be finishing their development.
You can also try this mixture around other vegetables and established fruit trees. For houseplants, start with an even more cautious approach because a pot contains much less soil than a garden bed. If you notice leaf scorching or unusual wilting after applying it, stop using the mixture.
Recent Posts
You don't need to buy a lot of compost or fertilizer to prepare a good garden bed. If you have leaves, kitchen scraps, and other plant waste, you can use them to improve your soil and feed future...
I had an old rice storage sack that I wasn't using anymore, so I decided to turn it into two small raised garden beds. I cut the sack in half, used some bamboo sticks to hold everything in place, and...