
A raised bed that has just finished a successful radish crop is one of the most satisfying sights in a kitchen garden. The roots come out clean, the harvest basket fills quickly, and the remaining plants begin to send up flowers that add a soft beauty to the space.
But once the harvest is done, the real value of that bed is just beginning. Instead of letting it sit idle or stripping it down completely, this is the perfect moment to turn it into a self-feeding, self-improving growing space for the next crop.
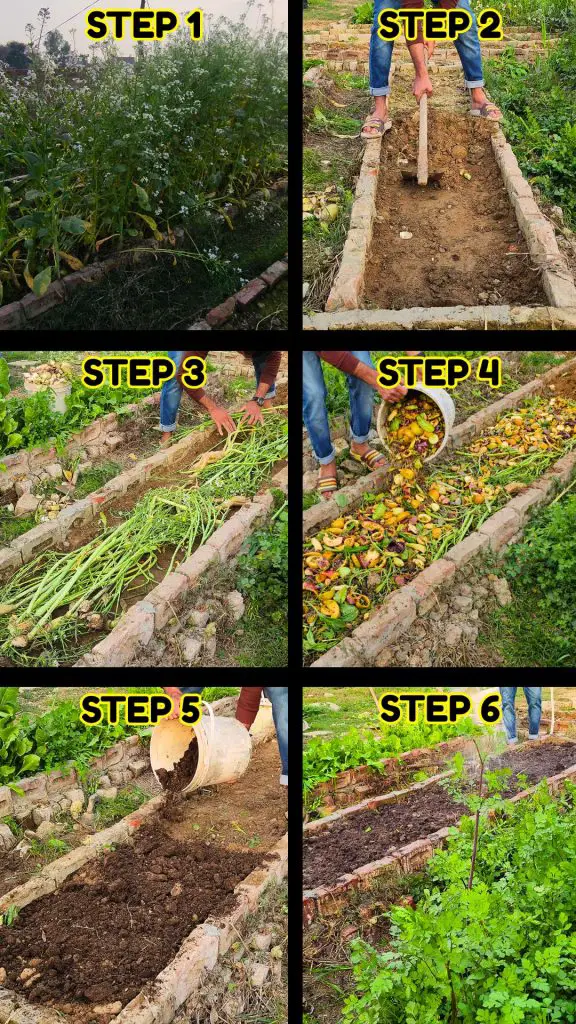
Clearing the Bed Without Wasting a Thing
The first step is simple but important: clear the bed of all the remaining plants and weeds. Every radish plant that has gone past its harvest stage, every leaf, every stem, and every bit of weed growth is removed carefully. Nothing is thrown away. As you pull out the radishes, you can see how deep they have gone into the soil.
These roots have already done half the work for you by loosening the ground naturally. They break compacted layers and create channels that allow air and water to move more freely. This is why radishes are often called natural soil tillers. By the time the bed is cleared, the soil is already in a better condition than before the crop was planted.
Using the Top Layer of Soil as a Living Cover
After clearing the bed, the next step is to remove the top layer of soil. This is not deep digging, just a shallow layer that can be lifted and kept aside. This soil is alive with microbes and nutrients, so it is handled gently and preserved. Removing this layer creates a space inside the bed where organic material can be added and allowed to break down. The soil that has been set aside will soon go back on top, acting as a natural cover that holds everything together.
Turning Plant Waste into Soil Food
All the plant material that was collected during clearing is now brought back to the bed. Radish leaves, stems, roots, and even extra vegetable scraps from the garden are spread across the surface. This layer becomes the feeding ground for the soil. What looks like waste is actually future nutrition. As it breaks down, it releases nutrients slowly and improves the structure of the soil. This method keeps everything in the same place, reducing effort and making sure nothing valuable leaves the bed.
Covering the Organic Layer and Restoring the Bed
Once the organic material is spread evenly, the soil that was removed earlier is returned on top. This step seals the organic layer inside the bed. The soil acts like a blanket, keeping moisture locked in and protecting the plant material from drying out. If the bed looks slightly lower than before, a little extra soil can be added to level it. The surface should be smooth and ready for the next layer.
Adding Compost to Boost Life in the Soil
A final layer of finished compost is added on top of the soil. This compost brings in a fresh supply of beneficial microbes and ready-to-use nutrients. These microorganisms move down into the buried plant material and speed up the decomposition process. The top compost also improves the immediate fertility of the bed, giving a strong start to the next crop. With this step, the bed now has a layered system of nutrition from top to bottom.
Watering to Activate the Decomposition Process
Water is what brings this entire system to life. A deep watering ensures that the compost, soil, and buried plant material all become moist. This moisture activates microbial activity and begins the natural process of decomposition. The bed should be watered thoroughly so that the moisture reaches down into the lower layers. Once watered, the surface may look simple, but underneath, a rich process of breakdown and renewal has already begun.
Why In-Bed Composting Works Faster
Composting directly inside the bed is faster than traditional compost piles for several reasons. The organic matter is already in contact with living soil, which means microbes and earthworms can begin working on it immediately.
The soil covering keeps everything warm and moist, creating ideal conditions for decomposition. There is no need to turn piles or move materials from one place to another. Everything happens right where the nutrients will be needed. This saves time, reduces effort, and keeps the cycle of fertility within the same growing space.
Resting Period That Builds Rich, Living Soil
After watering, the bed is left undisturbed for about four weeks. This resting period is when the real transformation happens. The buried plant material softens and breaks down into humus. Microorganisms multiply and spread through the soil. Earthworms may enter and help mix the layers naturally. Over these weeks, the soil becomes darker, softer, and more crumbly. The smell changes too, becoming rich and earthy, a clear sign of healthy soil life.
Preparing for the Next Crop with Strong Foundations
When the resting period is complete, the bed is ready for planting again. The soil will feel light and airy, yet rich in nutrients. Seeds planted in this environment germinate quickly and establish strong roots. The improved structure allows roots to travel deeper and access moisture more easily. This results in healthier plants and better yields in the next crop cycle. What started as a simple radish harvest has now turned into a full soil renewal process.
A Sustainable Cycle That Improves Every Season
This method creates a continuous cycle of growth and renewal in the raised bed. Each crop prepares the soil for the next one by contributing organic matter back into it. Instead of depending heavily on external inputs, the garden becomes more self-sustaining. Over time, the soil grows richer, more fertile, and more resilient. The need for extra fertilizers reduces, and the bed becomes easier to manage with each passing season.