
In-bed composting is a simple and efficient way to enrich your garden soil directly by decomposing organic waste in the spot where your plants grow. Unlike traditional composting that requires large bins or turning piles, this method allows kitchen scraps, garden waste, and other organic materials to break down naturally right in the garden bed. It creates a continuous cycle of nutrients moving from compost to soil and back to plants.
This method is particularly useful for small gardens, urban spaces, or any area where space is limited. By keeping the compost inside the garden bed, there is no need to transport it from one place to another. It also encourages earthworms, microbes, and beneficial insects to interact with the compost, accelerating decomposition and improving soil fertility.
Materials Needed
The materials needed for in-bed composting are minimal and usually items you already have at home. Two sturdy containers or pots are the main components. These can be plastic buckets, old storage boxes, or large bottles. The key is that they must hold compost for a long time without collapsing when buried.
A terracotta pot can also be used, even if it is slightly broken. Terracotta is naturally porous, which allows water to seep through the walls. This is helpful because compost moisture is crucial for microbial activity. A drainage hole at the bottom is ideal to prevent excess water from pooling inside.
Other items include a hot iron rod or sharp tool for making holes, zip ties to attach containers, and mulch for covering the top. Organic waste such as vegetable scraps, fruit peels, leaves, and partially decomposed compost is required for layering.
Preparing the Composting Structure
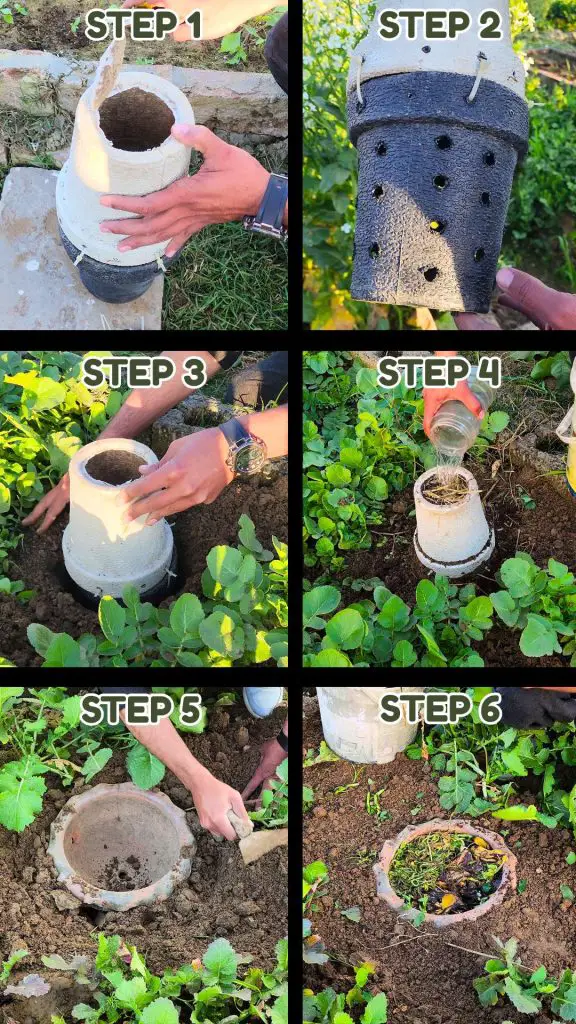
The first step in building the composting structure is to stack the two containers on top of each other. They must be attached securely so they act as one unit once buried. Using a hot iron rod or similar tool, make holes where the containers overlap. Thread zip ties through these holes and tighten them to hold the containers together firmly.
After securing them, remove the bottoms of both containers. This allows the compost to directly interact with the soil, letting nutrients, microbes, and water flow freely between the compost and the surrounding bed.
For the bottom container, create large holes on the sides. These holes should be wide enough for earthworms to pass through easily. Earthworms play a critical role in composting, moving soil microbes in and out of the compost while carrying nutrients back to the surrounding soil.
Installing the Composting Unit
Once the structure is ready, it is placed into a hole in the garden bed. The hole should be just big enough to accommodate the composting unit comfortably. Wet soil is preferable because it packs tightly around the containers and stabilizes them. This is especially helpful after rainfall.
Place the unit in the hole, fill soil around the sides, and gently press it down so the structure stays in place. This ensures that the composting process begins immediately without gaps between the container and the soil.
Layering the Compost
The most effective way to add materials to the compost is by layering. Start with a base layer of partially decomposed compost. This introduces microbes and beneficial bacteria into the fresh organic waste that will be added.
Next, add a layer of kitchen scraps or garden organic material. Vegetable peels, fruit skins, leaves, and small branches are perfect for this. Continue alternating layers of compost and fresh organic material until the container is nearly full.
The final layer should be mulch. Mulch helps retain moisture inside the compost, allows rainwater to filter through, and prevents pests, including mosquitoes, from entering the composting unit. Proper layering ensures even decomposition and a constant flow of nutrients into the garden soil.
Using Terracotta Pots
Terracotta pots offer an alternative to stacked containers. Even if slightly broken, the porous walls allow water and nutrients to seep slowly into the soil. This encourages natural microbial activity and improves soil fertility around the plants.
The installation process is the same: dig a hole, place the pot inside, and fill it with alternating layers of compost and organic waste. Cover the top with mulch. Over time, nutrients from the compost leach into the surrounding soil, nourishing nearby plants naturally.
Benefits of In-Bed Composting
In-bed composting offers numerous benefits. First, it reduces the need to transport compost, saving time and effort. Second, it improves soil fertility directly in the garden bed, creating healthier plants and higher yields.
Earthworms and microbes thrive in this system, breaking down organic waste faster than traditional compost piles. Soil structure improves, water retention increases, and plants receive a steady supply of nutrients.
This method also minimizes kitchen waste. Fruit and vegetable scraps, leaves, and other biodegradable materials are transformed into nutrient-rich compost instead of ending up in a landfill.
Low Maintenance and Sustainability
One of the biggest advantages of in-bed composting is how low-maintenance it is. Once the system is set up, it requires only occasional addition of organic waste and monitoring of moisture. Earthworms and microbes do the majority of the work.
Because it recycles organic material directly in the garden, it supports sustainable gardening practices. There is no need for chemical fertilizers, and soil fertility improves naturally over time. It also reduces household waste, making it an eco-friendly solution for urban and rural gardeners alike.
Choosing the Right Organic Material
For best results, a mix of green and brown materials works well. Green materials include kitchen scraps like fruit and vegetable peels, tea leaves, coffee grounds, and fresh garden clippings. Brown materials include dry leaves, small twigs, straw, and shredded paper.
Avoid adding meat, dairy, or oily food, as these can attract pests and slow down decomposition. Chopping larger pieces into smaller bits speeds up the breakdown process. Layering green and brown materials also helps maintain a balance of moisture and nutrients, preventing foul odors.
Earthworms and Soil Life
Earthworms are the backbone of in-bed composting. They move through the compost, consuming organic matter, and depositing nutrient-rich castings into the soil. Their activity aerates the soil, making it easier for plant roots to grow.
Other soil organisms, such as bacteria, fungi, and insects, also play a vital role. They break down complex materials, recycle nutrients, and create a healthy ecosystem inside the composting unit. A diverse and active soil ecosystem is essential for long-term garden health.
Mulch and Moisture Management
Covering the top layer of the compost with mulch is crucial. Mulch helps retain moisture, which is necessary for microbial activity. It also acts as a protective layer, preventing pests from entering and reducing the risk of the compost drying out.
Depending on the climate, check the compost occasionally and water lightly if the materials seem dry. Proper moisture ensures that decomposition continues smoothly and nutrients are transferred to the surrounding soil efficiently.