
A raised bed is a great way to grow vegetables and flowers, especially when the natural soil is hard or not fertile enough. Many people think they must buy wood, bricks, or blocks to build a raised bed, but there are simple and almost free methods that work just as well.
Building a raised bed directly with soil and natural materials saves money, improves the land, and is friendly to the environment. This method can be done with items already found in most gardens, making it perfect for beginners and home gardeners who want healthy plants without a big budget. Here is a complete method to create a long raised bed that performs extremely well and continues improving over time.
Choosing the Right Location
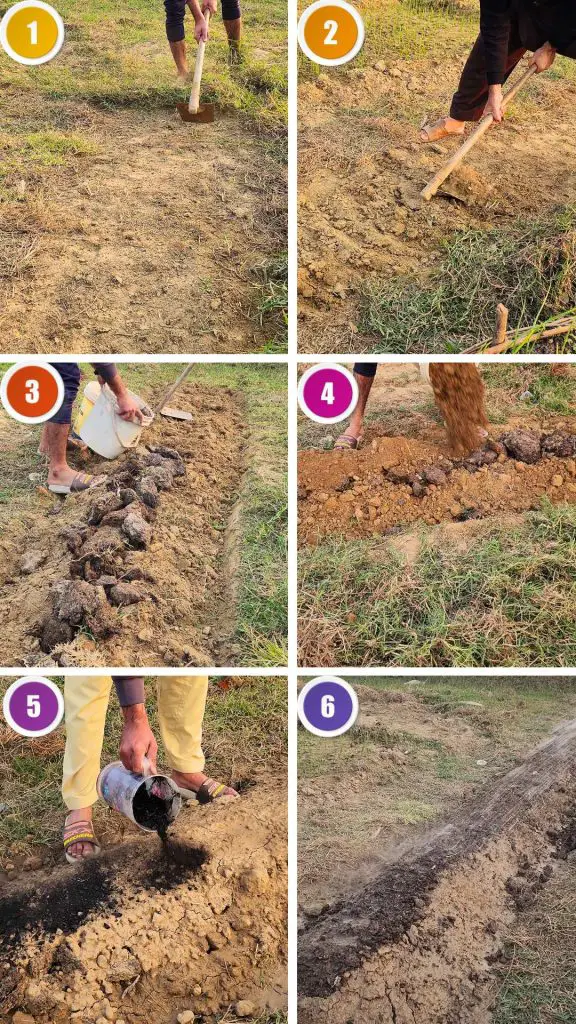
The first step is selecting a suitable spot. Plants need sunlight to grow, so a sunny place is the best choice. Ideally, the bed should receive at least six hours of sunlight daily. It should also be located where water does not stand after rain. A slightly higher area is good because drainage helps roots breathe. A long, narrow shape makes planting and watering easier. Once the location is picked, the real work begins.
Cleaning the Area
The surface must be cleaned before building the bed. Weeds and unwanted grass must be removed because they compete with vegetables for nutrients, space, and water. Stones, branches, and debris need to be taken out so the bed is smooth. Using a shovel to scrape the upper thin layer helps remove weed roots hiding just below the surface. This step prepares the area and gives crops a weed-free and comfortable place to grow.
Loosening the Soil
Many gardens have compacted soil due to walking, heavy rain, or years of neglect. Compacted soil blocks the movement of water and air. Roots struggle to grow in such hard ground. Therefore, digging the upper layer of soil is very important. We loosen the soil by turning it with a shovel or digging fork. This breaks the hard crust and creates soft, airy ground below the bed. Looser soil allows roots to grow deep, which means stronger and healthier plants.
Adding Decomposed Cow Dung Chunks
Cow dung is an excellent natural fertilizer, full of nutrients that support plant growth. However, sometimes it dries into hard pieces that are difficult to break apart. Instead of trying to crush them into powder, we place the chunks directly on the dug-up bed.
Cow dung chunks act like slow-release food. As they slowly break down under the soil, they feed plants for a long time. They also improve soil structure by adding organic matter. Earthworms and microbes love cow dung and will spread through the bed, making the soil more fertile and alive.
Covering With Soil
After placing the cow dung chunks evenly over the bed, we cover them with a thick layer of garden soil. This protects the chunks from drying out in the sun. Beneath the soil, they remain moist and decompose steadily. Special microbes and fungi inside the soil will break down organic material, creating rich, dark soil full of plant nutrients. Covering the chunks also makes the top layer clean and easy to plant in later.
Watering to Settle the Soil
Watering the bed at this stage helps the soil settle naturally. The water fills empty spaces and allows soil to cling around the cow dung chunks. After watering, it is good to let the bed rest for a few hours. During this time, the soil becomes stable and firm enough for the next layers. The water also activates microbial life and starts the process of decomposition inside the bed. This step is like the early start of soil life.
Adding Crushed Charcoal
Crushed charcoal is a powerful soil amendment. It does more than people usually expect. It keeps nutrients from washing away by holding them in tiny pores, so plants can use them later when needed. It balances the soil and improves drainage.
It creates a better home for microorganisms. Gardeners in many places use charcoal to make soil fertile for long periods. Adding it on top of the bed before final mixing gives long-lasting benefits to growing plants.
Introducing Natural Soil Amendments
To make the raised bed even richer, we add a few more natural amendments. Neem cake is one of the best organic additions for soil because it keeps harmful soil pests away. It also adds nutrients and improves soil structure. It is friendly to beneficial insects and harmless to humans. Adding neem cake means you can grow healthy crops with fewer problems from bacteria and root pests.
Bone meal is another useful amendment. It provides phosphorus and calcium. Phosphorus helps strong root development, making plants more stable and better at absorbing water and nutrients. Calcium keeps plant cells strong and helps prevent common problems like blossom-end rot in vegetables such as tomatoes and peppers. Both of these amendments support healthy plant growth from the very beginning.
Topping With Fully Decomposed Manure
Now the bed gets a layer of fully decomposed manure. This time, we use fine manure without chunks. This top layer acts like fresh food for young plants and seeds. Seedlings need easy-to-absorb nutrition when they start growing.
Well-rotted manure adds immediate energy for the plants while the cow dung chunks beneath continue their slow-release feeding. This manure also makes the soil soft and provides a dark, fertile layer perfect for planting. When you press your hand into the soil, it should feel light and rich, not too sandy or sticky.
Mixing the Top Layer
After all the amendments are added, we gently mix only the top few inches of the bed. We do not stir too deep so the cow dung remains buried and continues decomposing slowly. Mixing ensures the charcoal, neem cake, bone meal, and top manure blend properly with the loose soil. When mixed, the surface soil becomes fluffy and full of nutrients. It is now ready to welcome new seeds and roots.
Planting the Seeds
Now the most exciting part begins. The soil is soft, fresh, and full of life. Seeds can be planted directly into this raised bed. We choose vegetables according to the season and our climate. Seeds are placed at a suitable depth, usually two to three times their size.
After planting, the seeds must be kept moist. A gentle watering ensures they do not wash away or go too deep. With the perfect growing environment created beneath them, they will sprout faster and healthier.