
Gardening can be one of the most rewarding experiences, and a healthy garden starts with healthy soil. One of the best ways to achieve this is by making your own compost tea. Compost tea is a liquid made from compost that provides nutrients directly to your plants’ roots, helping them grow stronger and healthier. In this article, we’ll show you how to set up a simple compost tea system in your garden bed using kitchen waste, vermicompost, and a few easy-to-find materials. Let’s get started!
Why Compost Tea is Good for Plants
Compost tea is a natural liquid fertilizer made from compost. It’s filled with nutrients that plants need, such as nitrogen, phosphorus, and potassium. But the best part about compost tea is that it also contains beneficial microbes and microorganisms that help improve soil health. These microbes break down organic matter in the soil, making nutrients more available to your plants. It’s like giving your plants a nutritious drink every time you water them!
Compost tea is also a sustainable way to recycle kitchen waste and organic matter. Instead of throwing away food scraps or garden waste, you can turn it into something that helps your garden thrive. With just a few simple steps, you can create a system that continually feeds your plants while also improving the health of your soil.
What You Will Need
Before we begin, gather the following materials:
- A container – This can be a plastic bucket, an old paint container, or any container that’s big enough to hold kitchen waste and water.
- A drill or any tool to make holes – You’ll need to make holes in the container for drainage and air circulation.
- Kitchen waste – This includes vegetable peels, fruit scraps, tea bags, coffee grounds, eggshells, and more.
- Vermicompost – This is compost that contains worms and microbes, which will help break down the waste faster.
- Water – You’ll need a good amount of water to moisten the contents.
- A lid or cloth – To cover the container and protect it from insects.
Step-by-Step Guide to Making Compost Tea
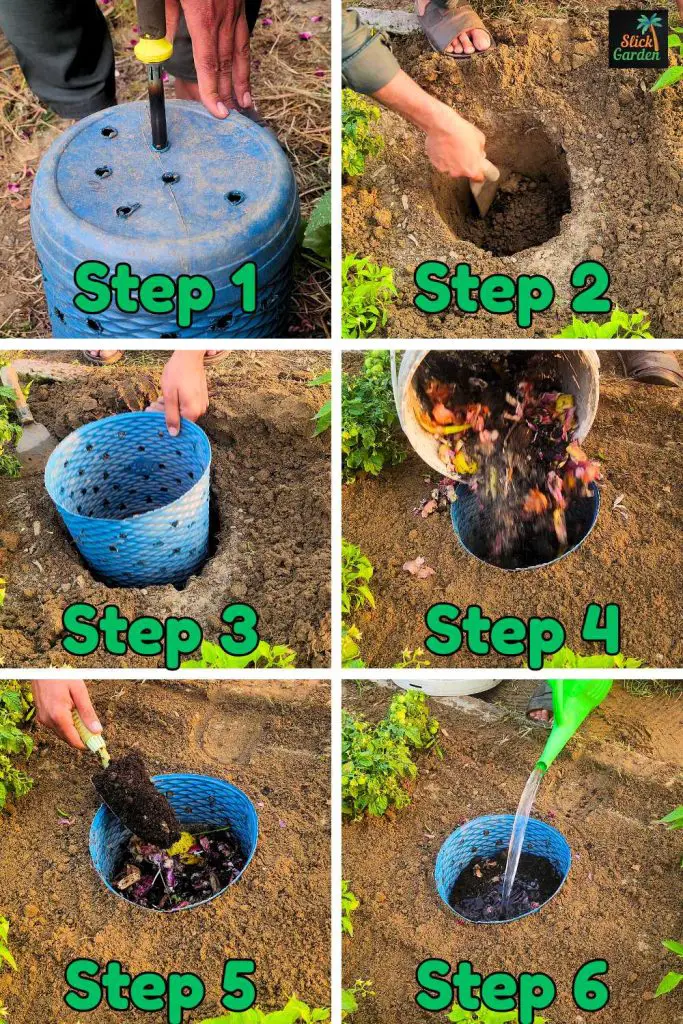
Step 1: Choosing the Right Container
The first thing you need is a container. Look for one that you no longer use, such as a plastic bucket or large bottle. It should be large enough to hold kitchen waste and have enough space for worms to move around. If your container is not big enough, your system might not work properly, so choose one that’s at least 5-10 liters in size.
Once you have your container, the next step is to make holes in it. Using a drill, screwdriver, or any sharp tool, make holes all over the container—on the sides, at the bottom, and on the lid if you plan to cover it. These holes are essential because they allow air to enter and help the compost tea drain out. The air flow will also help the microbes and worms inside the container work efficiently.
Step 2: Prepare the Hole in the Garden Bed
Now, go to your garden bed and choose a spot where you want to set up your compost tea system. Dig a hole that is about the size of your container. The hole should be deep enough so that most of the container goes into the ground, with only the top part sticking out. This ensures that the compost tea can drain into the soil around your plants.
Once the hole is ready, place your container in it and gently add soil around the sides to hold it in place. Press the soil down to make sure the container stays stable. This will allow your compost tea to seep directly into the soil, where it can nourish your plants’ roots.
Step 3: Fill the Container with Kitchen Waste
Next, you need to fill the container with kitchen waste. You can use all kinds of organic waste, such as vegetable peels, fruit scraps, tea bags, coffee grounds, eggshells, and even leftover bread. Make sure you avoid adding meat, dairy, and oily foods because they can cause bad smells and attract pests like rats or flies.
As you add the kitchen waste, try to chop or tear large pieces into smaller bits. This will help the waste break down faster, allowing the worms and microbes to get to work sooner. Fill the container about three-fourths of the way up with the waste.
Step 4: Add Vermicompost
Once your container is full of kitchen waste, it’s time to add vermicompost. Vermicompost is made up of organic matter that has been broken down by worms and other microorganisms. These tiny creatures are the key to creating rich, nutritious compost tea.
Add a layer of vermicompost on top of the kitchen waste. The worms in the vermicompost will begin to break down the organic matter and produce compost tea. They will also help speed up the composting process by digesting the waste and turning it into nutrient-rich compost.
Step 5: Water the Compost Tea System
After you’ve added the vermicompost, the next step is to water the container. This is crucial because moisture is needed for the composting process to work. Pour enough water into the container to make the contents moist, but not soaking wet. The right level of moisture is similar to a sponge that has been wrung out—damp but not dripping.
Watering will help the microbes and worms work more efficiently. The compost tea will start to form as the waste breaks down. You can also add a little more water every few days to keep the compost moist. The key is to keep the system damp, not too dry and not too wet.
Step 6: Cover the Container
Now that your container is filled with waste, vermicompost, and water, it’s time to cover it. You can use a lid or a cloth to cover the top of the container. This will keep pests like mosquitoes and flies away, preventing them from laying eggs in the compost. It will also help retain moisture inside the container.
However, don’t cover it completely. The composting process still requires some air, so make sure there’s a bit of space for the container to “breathe.”
Step 7: Maintain the Compost Tea System
Once your compost tea system is set up, you don’t have to do much. Just check on it every few days to make sure it stays moist. You can add new kitchen waste when the container starts to empty out. You can also stir the contents every week or so to make sure the compost is breaking down evenly.
Over time, the worms and microbes will do their job, breaking down the kitchen scraps and turning them into rich, dark compost. The compost tea will slowly seep out of the holes in the container, directly nourishing the roots of your nearby plants.
Step 8: Harvesting the Compost
After a few weeks or months, you’ll notice that the waste in the container has turned into dark, crumbly compost. This means the system has worked and the compost tea is ready to feed your plants.
To harvest the compost, simply open the top of the container and remove the finished compost. You can spread this compost over your garden beds or mix it with your potting soil for container plants. The compost will add nutrients to the soil, improve its texture, and promote healthy plant growth.
Recent Posts
The Secret Homemade Liquid Fertilizer That Can Boost Flowering, Fruiting, and Plant Growth Naturally
Many of the materials we throw away in the kitchen still contain nutrients that can be useful in the garden. Onion peels and potato peels are good examples. Instead of sending them to the trash, you...
I Mixed Yogurt, Molasses & Compost Tea for 24 Hours… The Results Changed My Garden Soil
Healthy soil is much more than a mixture of sand, silt, clay, and organic matter. It is a living ecosystem filled with bacteria, fungi, protozoa, nematodes, and many other microscopic organisms....