
Every healthy and productive garden starts with well-prepared soil. If the soil is alive, rich, and full of organic matter, your plants will thrive, and your harvest will be amazing. But preparing a garden bed is not just about digging and planting—it’s about giving the soil life and feeding it in a way that will support crops for many seasons.
In this blog post, we’ll share three different methods we use to prepare our garden beds. These are not just tips; they are time-tested ways to build long-term soil health, improve fertility, and create a perfect environment for your plants to grow strong.
Each of these three methods is simple, uses easy-to-find materials, and follows natural processes. Whether you are starting a new bed or reviving an old one, these methods will help you build a garden that produces healthy plants without the use of chemicals. Let’s explore them one by one.
Method 1: Transforming an Old Compost Pile into a New Garden Bed
Sometimes we have unfinished compost—half-rotted kitchen scraps, leaves, grass clippings, and plant waste—that’s not ready for the plants yet. Instead of throwing it away or waiting for many months, we turn it into a garden bed.
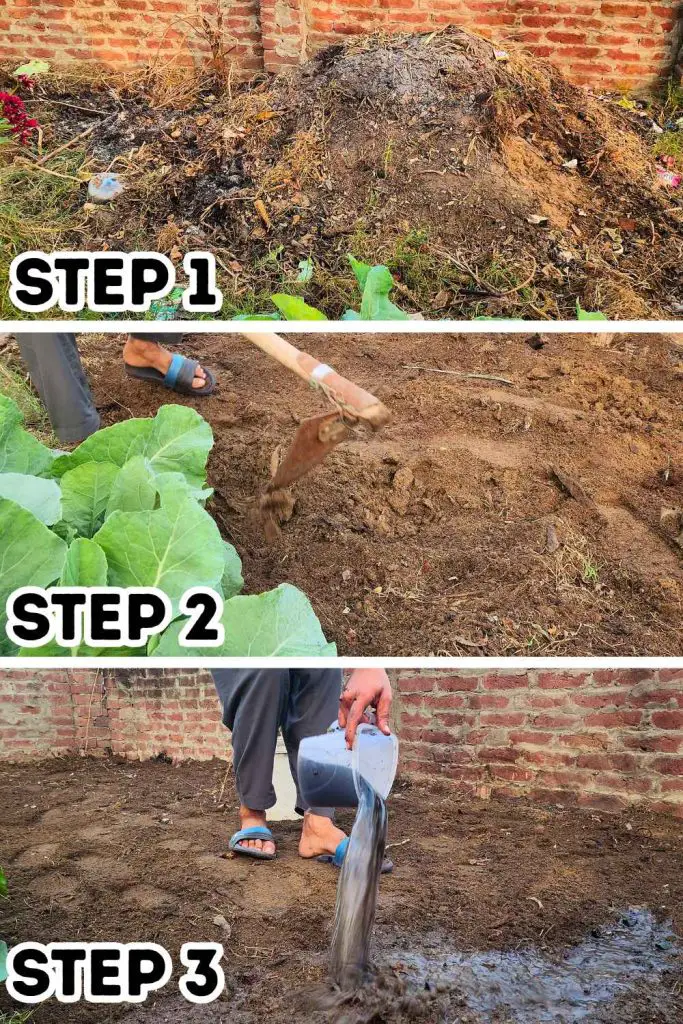
The first thing we do is spread out the compost pile. When it’s in a big pile, the inner parts take a long time to break down. But when we spread it evenly over a flat surface, it breaks down faster because air and microbes can reach every part. Even if your compost is only partially broken down, it will still work. It’s full of life, microbes, and nutrients.
Next, we cover the compost with a layer of loamy soil. This step is very important. The loamy soil acts as a cover and adds even more beneficial microbes that will help finish breaking down the compost. This soil also keeps the compost moist and protects it from drying out in the sun.
Then comes the special touch: activated charcoal. We prepare a liquid mix using activated charcoal and water. This mix is poured over the bed to boost microbial activity. Activated charcoal has tiny holes that hold moisture and give microbes a home. This simple step can speed up the composting process and create a perfect growing environment for plants.
After pouring the charcoal mix, we leave the bed untouched for 4 to 6 weeks. During this time, the compost and soil combine and turn into rich, black earth. We water it gently from time to time to keep it moist but not soggy. When you return after a few weeks, you’ll find a bed that’s full of life, soft, and ready to support any crop you want to grow.
Method 2: Chop and Drop – Recycling Plants and Adding Nutrients

If you’ve had plants growing in your bed before—maybe old vegetables, herbs, or even weeds—you can use them to enrich the soil instead of throwing them away. This method is called chop and drop.
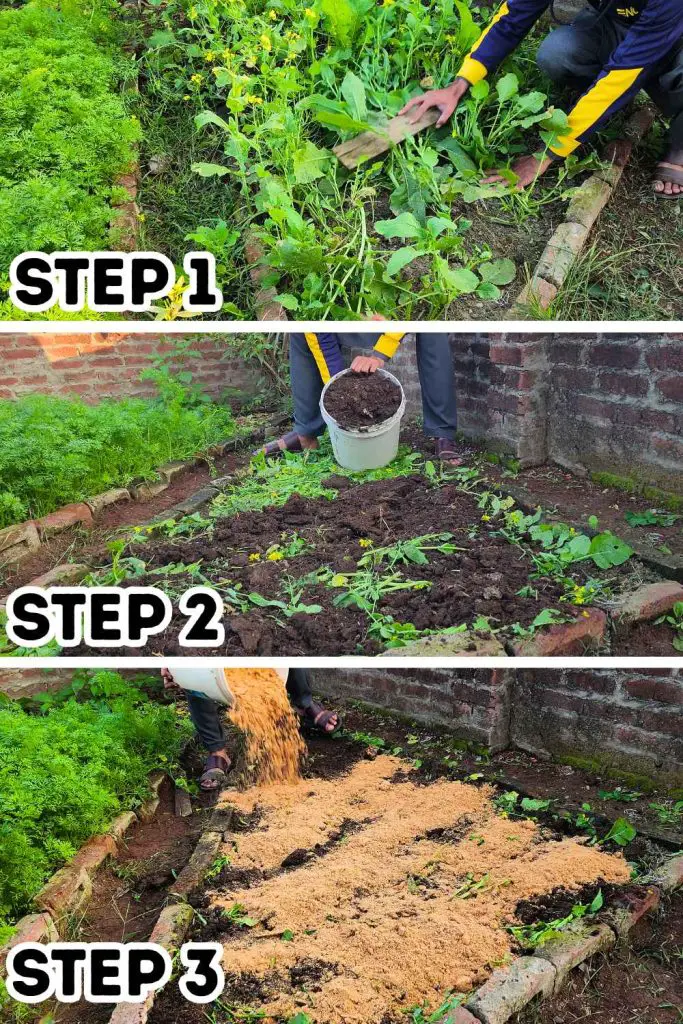
We begin by cutting back any old plants and removing visible weeds. But we don’t pull out the roots too much. Why? Because the roots are full of helpful microbes, and pulling them out can disturb the underground life. Instead, we chop the plants into small pieces and spread them all over the surface of the bed. These small plant pieces will slowly break down and become food for the soil.
Once that layer is down, we add a layer of decomposed compost or manure on top. This adds more organic matter and introduces millions of beneficial microbes. These microbes start breaking down the chopped plants and convert them into rich, dark soil.
Then we sprinkle a generous amount of bone meal. Bone meal is full of phosphorus and calcium, two nutrients that are very important for strong roots and healthy plants. Phosphorus helps young roots grow deep and strong, and calcium keeps plant cells firm, helping them grow tall and fight diseases.
The final layer is mulch, and in our garden, we often use sawdust. It’s easy to find, easy to spread, and works very well. Mulch helps to keep the soil moist, protects microbes from heat or cold, and prevents weeds from growing. Over time, the mulch also breaks down and becomes part of the soil.
This method uses everything from your garden bed, turning waste into treasure. And by spring, your bed will be full of nutrients, microbes, and soft soil—perfect for planting anything from flowers to vegetables.
Method 3: Using Cover Crops Like Mustard for Natural Soil Building
This method is one of our favorites, especially when we are preparing the beds many weeks before planting. Instead of leaving the bed empty, we plant a cover crop, and mustard seeds are our top choice.
Mustard grows fast and fills the garden bed with lush green plants in just a few weeks. These plants do a lot more than just grow. Their roots break up the soil, making it loose and airy. They also pull nutrients like nitrogen from the air and fix them into the soil, which is exactly what your next plants will need.
Mustard plants also suppress weeds by growing thick and strong. They don’t allow sunlight to reach weed seeds, so weeds don’t get a chance to grow. At the same time, the mustard acts like a protective blanket, stopping soil erosion from wind and rain during the off-season.
Once the mustard plants have grown tall and your bed is full, it’s time for the next step. Don’t remove the plants. Instead, chop them down and level them into the soil as much as you can. You can use your foot, a tool, or a flat shovel to press them down.
Now, you add a thick layer of compost or aged manure on top. This helps start the decomposition process. As the mustard plants break down under the compost, they release nitrogen and other nutrients back into the soil.
Finally, cover the entire bed with mulch, such as sawdust or dry leaves. This will keep everything moist and protected. Over time, the mustard, compost, and mulch will all turn into soft, black, nutrient-rich soil.
By spring, you’ll have a powerful garden bed that is full of life. You won’t have to dig or mix. You can just plant directly into this living soil and watch your garden grow beautifully.