
Creating outdoor furniture for your backyard or garden doesn’t always require spending money. With a little creativity and some recycled materials, you can make pieces that are functional, attractive, and even theft-proof. One of the best examples of this is a chair made from a plastic barrel.
Not only is it sturdy, but once filled properly, it becomes impossible for anyone to lift or steal. In this guide, we’ll go step by step to show you how to turn ordinary materials into a heavy-duty garden chair that will last for years.
This project is perfect for people who enjoy DIY, want to reuse old materials, and want to add unique furniture to their outdoor spaces without spending a fortune. Using items like plastic barrels, broken water tanks, soil, and gravel, we can create a chair that combines strength, stability, and style.
Materials Needed
To make this chair, you don’t need fancy tools or new materials. Most of the items can be found lying around your home, garden, or local recycling area. Here’s what you’ll need:
- An old plastic barrel – preferably 50–100 liters.
- A broken water tank – the bottom part will be used.
- Soil – enough to fill the seating area.
- Gravel – for stabilization around the base.
- Tools – a sharp cutting tool (hot iron, saw, or knife), gloves, and optionally sandpaper to smooth edges.
- Optional filling materials – old clothes, wood ash, or foam (if you want a moveable chair).
All of these materials are either free or very cheap, making this a budget-friendly project.
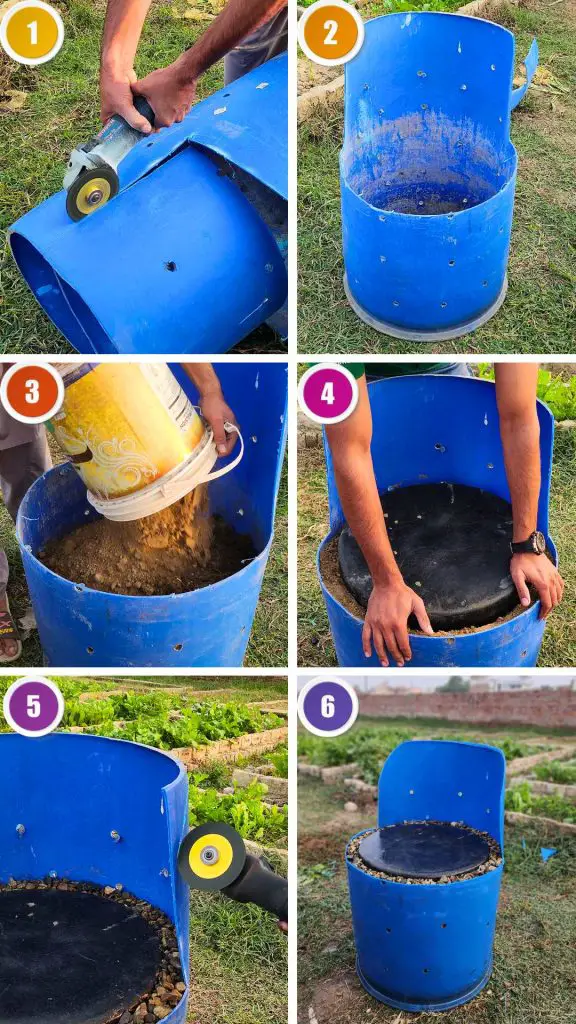
Cutting the Barrel
The first step is to transform the barrel into a chair shape. This involves carefully cutting out a seating area and backrest. It’s important to follow the lines and make smooth, clean cuts so the final shape is both comfortable and safe to sit on.
Start by marking the section you want to remove for the seat. Then, cut the barrel along these lines. The remaining top part can be used as the backrest. Make sure there are no sharp edges left after cutting. If necessary, sand the edges lightly to avoid injury.
Once cut, the barrel should already resemble a chair with a clear seating area and back support. At this stage, it’s a good idea to test the stability and see how it sits on the ground. Adjust cuts if needed to ensure it is level.
Placing the Chair
Unlike typical furniture, this chair will be heavy once completed. It is essential to place it in its final location before filling it. Choose a flat surface in your garden or backyard where you want to enjoy the chair. It could be near a tree, flowerbed, or any area where you like spending time.
Once placed, make sure the chair is steady. If the ground is uneven, dig slightly or add soil to balance it. Proper placement now ensures the chair remains secure and avoids problems later.
Watch complete tutorial here
Filling the Seat
The key step that makes this chair unstealable is filling the seating area. There are two options depending on whether you want the chair to be permanent or moveable:
- Moveable Option: Use lightweight materials such as old clothes, foam, or wood ash. This allows you to relocate the chair easily.
- Permanent Option: Fill the seat with soil. Soil adds significant weight, making the chair almost impossible to lift.
In this project, we are creating a permanent chair. Fill the seating area completely with soil. Press the soil down firmly to compact it, making the seat solid and stable. Compacting is critical; loosely packed soil may settle over time and reduce stability.
Using the Broken Water Tank
After filling the barrel with soil, the next step is to add a flat surface for sitting. This is where the broken water tank comes into play. Take the bottom part of the tank, which would otherwise be discarded, and place it on top of the soil.
Press it down so it fits snugly inside the barrel’s seating area. This serves multiple purposes: it protects the soil from erosion during rain, creates a flat surface for sitting, and adds extra weight and strength to the chair.
Stabilizing with Gravel
Even though soil and the tank bottom make the chair heavy, adding gravel around the base ensures maximum stability. Pour gravel around the bottom part of the tank, filling any gaps between the tank bottom and the barrel.
Press the gravel down firmly. This locks the tank piece in place, prevents lateral movement, and distributes weight evenly. Additionally, gravel aids in water drainage, so the chair doesn’t retain moisture that could degrade the plastic or soil over time.
Shaping and Finishing
Now that the structural part of the chair is complete, it’s time to make it look polished. Trim any uneven sides of the barrel to give it a smooth, finished appearance. Round off edges where necessary for safety and comfort.
You can also paint the chair if you want to match your garden decor. Outdoor paints work well on plastic and can enhance the chair’s appearance while protecting it from sunlight. Adding cushions or a fabric cover is optional, especially if you want extra comfort without compromising the chair’s weight.