
Spring is the best time to get your garden ready for a productive year. A properly prepared garden bed can feed your plants naturally for the whole year, reducing or even eliminating the need for chemical fertilizers or constant compost additions.
The key is to create a bed that builds its own fertility over time. By using materials you already have at home or in your garden, you can make soil that is rich, healthy, and ready to support vegetables, herbs, and flowers throughout the growing season.
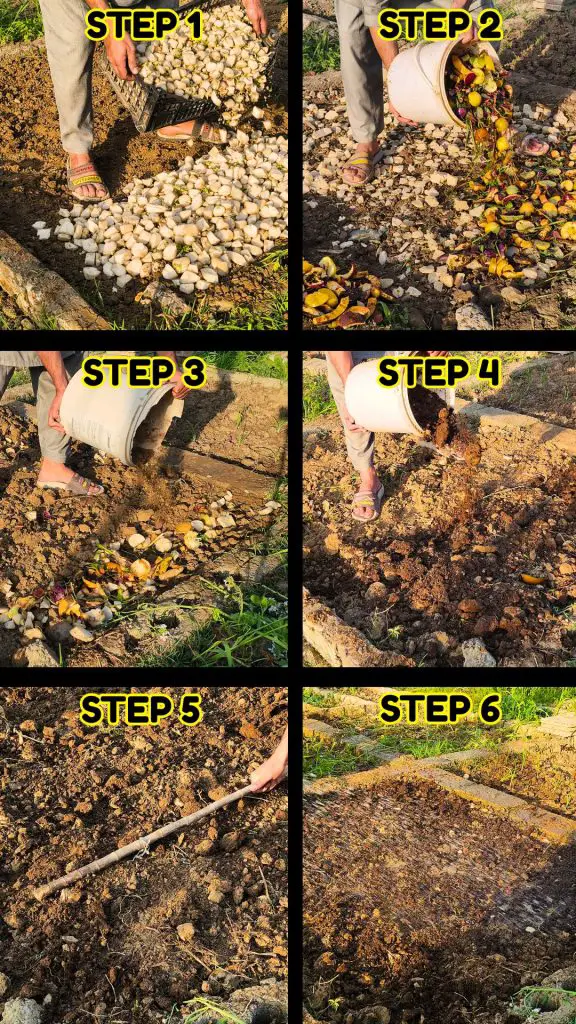
Gather Organic Materials
The first step is to gather all the organic materials you can find. Kitchen scraps such as fruit peels, vegetable tops, and leftover food are perfect. Garden waste like overgrown vegetables, leaves, and plant trimmings can also be used.
Instead of throwing these items away, they can be transformed into natural fertilizer for your plants. Overgrown radishes, carrot tops, leafy greens that have bolted, or vegetables that have become tough are all excellent candidates. Chop larger pieces into smaller chunks to speed up decomposition. The more surface area the materials have, the faster the soil will absorb the nutrients.
Layer Chopped Vegetables
Once you have your organic materials ready, the next step is to layer them into the garden bed. Start with chopped vegetables or overgrown plants. Spread them evenly across the bed to ensure consistent nutrient distribution. Chopping vegetables into smaller pieces allows microbes in the soil to break them down faster, releasing essential nutrients like nitrogen, potassium, and phosphorus into the soil.
Add Fruit Peels and Kitchen Scraps
After the vegetables are spread, add fruit peels and other kitchen scraps on top. Items like banana peels, orange peels, apple cores, and papaya skins are rich in nutrients and will decompose into healthy, plant-friendly matter. While they may look like waste at first, these scraps provide essential minerals and trace elements that enhance soil fertility. Avoid adding meat or oily food scraps, as these can attract pests and slow down the decomposition process.
Cover With Garden Soil
Once the organic material is in place, cover it with a layer of garden soil. This layer helps protect the organic material, reduces odors, and keeps pests away. The soil also provides the right environment for beneficial microbes to start breaking down the materials. A layer of 2–4 inches is usually sufficient, just enough to cover the scraps completely. Proper coverage ensures that the decomposition process occurs evenly across the bed.
Add Fully Decomposed Manure
On top of the soil layer, add a layer of fully decomposed manure. Well-aged manure is rich in nutrients and helps improve soil structure. It also introduces beneficial microorganisms that accelerate the breakdown of vegetables and fruit peels.
If you are using large chunks of manure, break them down to create a level surface. Even distribution of manure ensures that nutrients are available throughout the bed rather than concentrated in certain areas.
Level the Soil and Prepare for Watering
After adding manure, level the soil to create an even surface. This step is important for water absorption and for making the bed ready for planting. Uneven surfaces can lead to water pooling in certain areas and drying out in others.
Once the bed is level, give it a thorough watering. Moisture is essential because it activates the microorganisms in the soil and starts the decomposition process. Without enough water, the organic material will take much longer to break down.
Wait and Maintain Moisture
Once watered, the bed should be left to rest for two to three weeks. During this time, worms, bacteria, and fungi begin the process of breaking down the organic materials into humus, a nutrient-rich soil that plants love. Keep the soil slightly moist throughout this period. Check the bed regularly, and if it begins to dry out, give it a light watering. Consistent moisture ensures the decomposition process stays active and prevents the bed from drying out or becoming compacted.
Understanding the Benefits of a Self-Feeding Bed
A self-feeding garden bed offers several advantages. First, it reduces the need for external fertilizers because the soil produces nutrients naturally. Second, it improves soil structure and aeration, which helps roots grow strong and healthy.
Third, it encourages the presence of beneficial organisms such as earthworms and microbes, which further enhance soil fertility. Finally, it recycles kitchen and garden waste, reducing overall household waste and creating a sustainable gardening system.
Planting in a Self-Fertilizing Bed
After the two to three weeks of decomposition, the bed is ready for planting. You can sow vegetables, herbs, or flowers directly into the bed. Because the organic material is already breaking down, the soil is nutrient-rich and will provide steady nourishment for young plants. You may notice that seedlings establish faster and grow stronger in this kind of bed compared to a bed that relies solely on added fertilizers.