
Weeds are one of those things that seem to appear everywhere in a garden. You remove them from the soil, fill a bucket or bag with them, and usually throw them away. But if the weeds are healthy and have not been treated with herbicides, they can be put to another use.
One simple method is to ferment a mixture of different garden weeds with potatoes, compost, water, and molasses. Over time, the plant material breaks down and releases nutrients and organic compounds into the water. The result is a dark liquid that can be diluted and used around established garden plants.
Using several types of weeds is useful because different plants contain different amounts of nutrients and minerals. Instead of relying on one weed variety, you can collect whatever healthy weeds are available in the garden.
This is not meant to replace properly made compost or a balanced commercial fertilizer in every situation. It is simply a low-cost way to recycle garden material and return some of its nutrients to the soil.
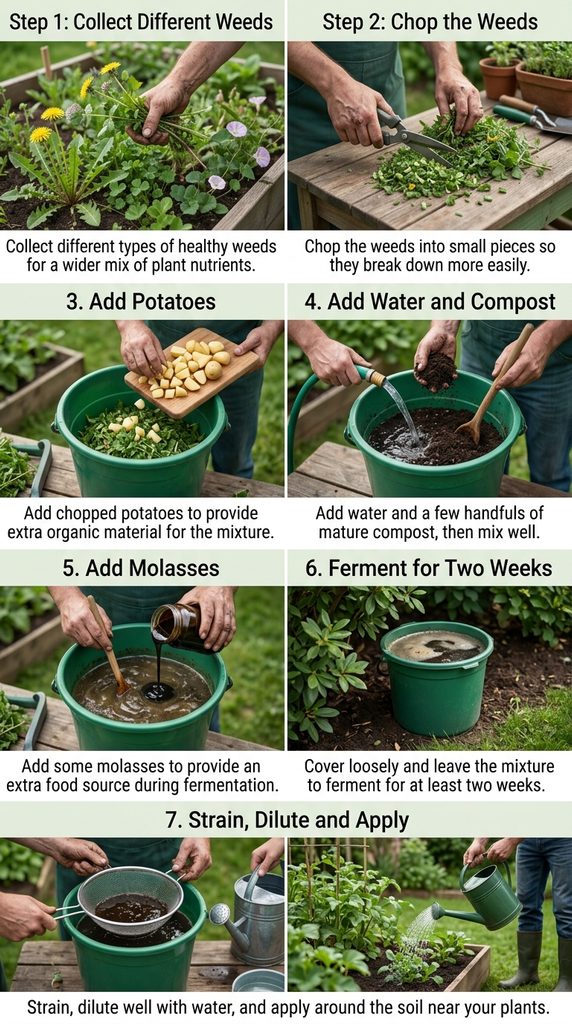
Collect Different Types of Weeds
Start by collecting as many different healthy weeds as you can reasonably find. You do not need to identify every weed by name. The main idea is to use a mixture rather than filling the bucket with only one type.
Collect weeds that are green and actively growing. Avoid weeds that have been sprayed with weed killers, pesticides, or other garden chemicals. You should also avoid plants growing beside roads or other areas where they may have been exposed to contaminants.
It is better to collect weeds before they produce large quantities of mature seeds. If a weed is already covered with seeds, leave it out of the mixture. Fermentation does not guarantee that every seed will be destroyed, and there is no reason to risk spreading unwanted weeds around your garden.
You can use soft stems, leaves, and other green portions of the plants. Shake off excess soil before putting them into the bucket. A little soil is not a problem, but there is no need to add large amounts of dirt.
The amount of weeds you collect depends on the size of your bucket. Fill a reasonable portion of the bucket with chopped plant material while leaving enough room for water and mixing.
Chop the Weeds Into Small Pieces
Once you have collected the weeds, chop them into smaller pieces. Garden shears work well for this job, although a knife can also be used if you are careful.
The pieces do not have to be extremely small. Cutting them into roughly a few-centimeter pieces is enough. Smaller pieces have more exposed surface area, which helps microorganisms break down the plant material more easily.
Put the chopped weeds directly into your bucket as you work.
Do not worry if the mixture contains leaves, soft stems, and different textures. The whole point is to use a variety of garden weeds and allow them to break down together.
If you have a very large amount of weeds, you can make several batches instead of trying to force everything into one bucket.
Add Chopped Potatoes
Now add a few potatoes to the mixture. Chop or crush the potatoes into small pieces before putting them into the bucket.
There is no need to peel them. If you have potatoes that are old or no longer suitable for eating, they can be useful for this purpose as long as they are not contaminated with chemicals or rotten in a way that creates a separate problem.
Potatoes provide organic material and carbohydrates that can be used by microorganisms during decomposition and fermentation. They also add another type of plant material to the mixture.
You do not need a huge amount of potatoes. A few chopped potatoes are enough for a normal-sized bucket of weeds.
Mix the potatoes through the chopped weeds so they are spread throughout the bucket rather than sitting in one layer.
Add Water and Compost
After adding the weeds and potatoes, fill the bucket with water. Leave some empty space at the top so you have room to stir the mixture without spilling it.
Rainwater is a good option if you have it available. You can also use other non-chlorinated water. If your tap water contains chlorine, allowing it to stand for some time before using it can reduce some of the chlorine.
Next, add a few handfuls of mature compost.
Compost is useful because it contains microorganisms and partially decomposed organic material. These microorganisms can help with the breakdown of the weeds and potatoes.
You do not need to empty half a bag of compost into the bucket. A few good handfuls are enough to get the mixture started.
Use a stick or another suitable tool to stir everything thoroughly. Try to get the weeds, potatoes, compost, and water mixed together rather than leaving the ingredients in separate layers.
Add Molasses to the Mixture
The next ingredient is molasses. Add a modest amount to the bucket and stir it into the mixture.
Molasses contains sugars that can provide an easily available food source for microorganisms. This can support microbial activity as the organic material breaks down.
You do not need to turn the mixture into a sweet syrup. A small amount is enough. Using excessive molasses will not automatically make the fertilizer better.
After adding it, stir the bucket again.
At this point, you should have chopped weeds, potatoes, compost, water, and molasses all mixed together. The mixture may already have a strong organic smell, but the smell will usually become stronger as fermentation continues.
Cover the Bucket and Let It Ferment
Cover the bucket after everything has been mixed.
Do not seal a fermenting mixture completely airtight unless the container is specifically designed for fermentation and gas release. Microbial activity can produce gases, so a loose-fitting lid or simple cover is a better choice for a homemade garden bucket.
Place the bucket somewhere shaded and away from direct sunlight. A cool or moderately warm protected location is preferable to leaving it exposed to strong afternoon heat.
Give the mixture at least two weeks.
If you have more time, you can allow it to continue breaking down for longer. The exact speed depends on temperature, the ingredients used, the amount of plant material, and microbial activity.
You can occasionally open the bucket and stir the contents. Stirring helps mix the material and exposes different parts of the organic matter to the water.
Do not be surprised by the smell. Fermented weeds and decomposing organic material can smell quite strong. Keep the bucket away from doors, windows, sitting areas, and places where the smell will bother you.
What Happens During Fermentation
During the fermentation and decomposition process, microorganisms work on the weeds, potatoes, and other organic material.
The plant tissues gradually soften and break down. Some soluble nutrients and organic compounds move into the surrounding water. The liquid usually becomes darker as the process continues.
The final product is not a laboratory-formulated fertilizer with a guaranteed nutrient ratio. The nutrient content will vary depending on the weeds you collected, the amount of plant material, the compost, the water, and how long the mixture was left to break down.
This is why it is better to think of it as a homemade organic liquid feed rather than a precise replacement for a balanced fertilizer.
The variety of weeds also means every batch can be slightly different.
Strain the Finished Liquid
After at least two weeks, you can strain the mixture.
Use an old cloth, fine mesh, or another suitable strainer to separate the liquid from the larger pieces of plant material. If you are using a watering can, removing large pieces will make application easier and prevent the opening from becoming blocked.
The liquid should have a darker color than the original water and will usually have a noticeable fermented smell.
The solid material left behind should not be wasted. Add it to a compost pile or another appropriate composting area where it can continue decomposing.
Do not use the concentrated liquid directly on plant roots. Homemade fermented mixtures can be quite strong and their nutrient concentration is not known precisely.
Dilute Before Applying It to Plants
Dilution is one of the most important parts of using homemade liquid fertilizer.
Mix the fermented liquid with plenty of water before applying it to your garden. Because homemade batches vary in strength, it is sensible to start with a weak dilution, especially when using the mixture for the first time.
Apply the diluted liquid around the soil near established plants. A watering can makes this easy.
You can use it around vegetables, flowers, fruit plants, and other established garden plants, but avoid treating very young seedlings with a strong mixture.
It is also better to avoid pouring concentrated fermented liquid directly onto foliage. Applying it to the soil reduces the chance of leaf damage from a strong solution.
If you are uncertain about the strength, use more water rather than less. You can always make the next batch slightly stronger after seeing how your plants respond.
Recent Posts
Garden weeds are usually something we remove and throw away, but green weeds and leaves can be useful when they are turned into a homemade liquid fertilizer. Fresh green plant material contains...
A deep homemade garden bed can be useful for growing different crops throughout the year. A few months ago, this bed was used for a tomato plant, and the plant grew very well. Now that the tomato...