
Garden weeds are usually something we remove and throw away, but green weeds and leaves can be useful when they are turned into a homemade liquid fertilizer. Fresh green plant material contains nutrients that the plant absorbed while growing, and some of those nutrients can be released into water as the material breaks down.
This type of fertilizer can be useful during fall when many gardeners are growing vegetables such as lettuce, spinach, cabbage, broccoli, kale, peas, carrots, and other cool-season crops. It can also be useful for winter vegetables in warmer growing zones where plants continue growing through the colder months.
Young plants need nitrogen for healthy leaf and stem growth. When a plant has enough nitrogen, its leaves generally stay green and the plant can produce plenty of new growth. This is particularly important for seedlings because they are still building their root systems and leaves.
Using weeds as fertilizer does not mean every weed has the same nutrient content. Different plants contain different amounts of nutrients, which is why collecting several types of common green weeds can be useful.
You can also include suitable green leaves from plants already growing in your garden. The main idea is to use healthy green plant material that would otherwise become garden waste.
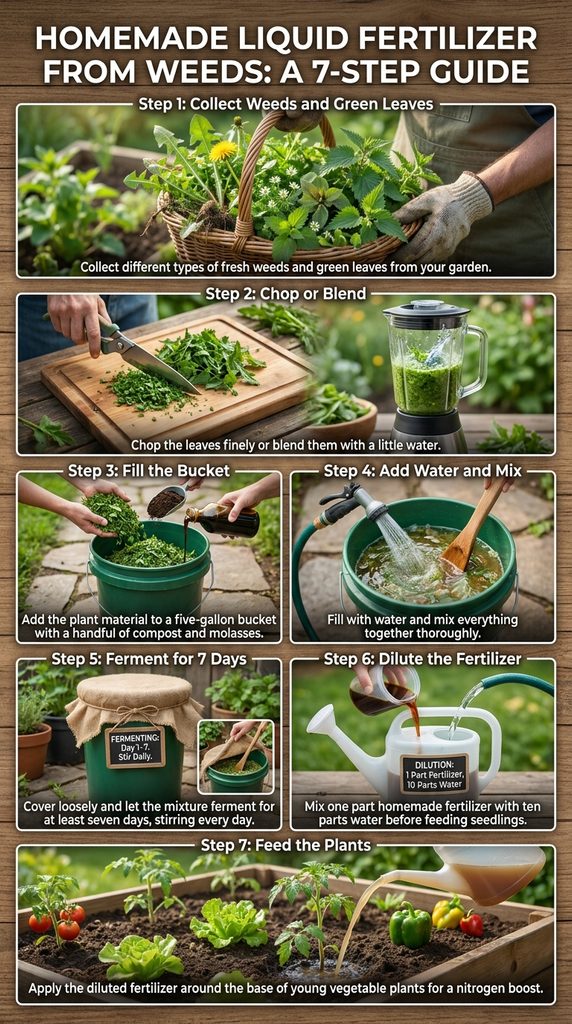
What You Need
The recipe is simple and does not require many ingredients. You need fresh weeds or other green leaves, a handful of mature compost, a sugar source, water, and a container.
A five-gallon bucket works well. Depending on its actual size, it can hold roughly 15 to 19 liters. The bucket should be clean and large enough to leave some room at the top.
For the sugar source, you can use molasses, brown sugar, or ordinary white sugar. Molasses is a convenient choice because it contains sugars that microorganisms can use while breaking down the plant material.
You will also need a stick or long-handled tool for stirring. A loose lid or another breathable cover is useful for covering the bucket without sealing it completely.
If you have access to rainwater, that is a good option. Otherwise, you can use water that has been allowed to sit before adding it to the mixture.
Choosing Weeds and Green Leaves
Collect a mixture of fresh green weeds from areas where you know they have not been sprayed with herbicides or pesticides. Avoid plants that have obvious disease, heavy insect infestations, or chemical treatments.
There is no need to search for specific weed species. A mixture of several common green weeds is fine.
You can also add green leaves from healthy garden plants. For example, unused vegetable leaves or other soft green plant material can be included.
Avoid adding plants that you know contain strong natural compounds that could be harmful to other plants. It is also better to avoid weeds that have mature seeds because you do not want to accidentally introduce viable weed seeds back into the garden.
The fresher and greener the material, the better suited it is for this type of fertilizer.
Chop the Plant Material
After collecting the weeds and leaves, chop them into small pieces. A sharp garden knife, pruning shears, or scissors can be used for this.
There is no need to make every piece extremely small, but smaller pieces provide more surface area for microorganisms to work on.
You can also use a blender if you want to break the material down more quickly. Add some water along with the leaves and blend them into a coarse green mixture.
Do not worry about making a perfectly smooth liquid. The purpose of blending is simply to break up the plant tissue and make it easier for the material to decompose.
If you are using a blender, avoid filling it too much at once. Work in small batches and add enough water to allow the blades to move freely.
Add Compost and a Sugar Source
Put the chopped or blended plant material into your five-gallon bucket. Then add a handful of mature compost.
Compost contains a large community of microorganisms that can help break down organic material. Garden soil can also be used if you do not have compost. A small amount of healthy soil introduces microorganisms into the mixture.
Next, add your sugar source. Molasses is a good option, but brown sugar or white sugar can also be used.
The sugar is not being added as plant food in the same way as a commercial fertilizer. It provides an easily available food source for microorganisms involved in breaking down the organic material.
You do not need a huge amount of sugar. Too much sugar can make the mixture unnecessarily concentrated and can encourage an unpleasant fermentation.
Add Water and Mix Everything
Once the plant material, compost, and sugar source are in the bucket, add water.
Leave some empty space at the top of the bucket. This makes it easier to stir and gives the mixture room as the organic material moves around.
Mix everything thoroughly. Try to break up clumps of leaves and distribute the compost and sugar throughout the water.
The mixture will look different depending on the plants you use. It may be green, brown, or somewhere in between.
At this stage, the goal is simply to get all the ingredients mixed together so the microorganisms can begin breaking down the plant material.
Cover the Bucket Properly
Cover the bucket after mixing, but do not seal it tightly.
As organic material breaks down, gases can be produced. A completely sealed container can allow pressure to build up, so the container needs a way for gases to escape.
A loose-fitting lid is enough. You can also use another suitable cover that keeps insects and debris out while allowing gases to escape.
Keep the bucket somewhere out of direct sunlight and away from areas where children or pets could easily knock it over.
The mixture can develop a strong smell while it breaks down. This is one reason to keep the bucket in a suitable outdoor location.
Let the Mixture Ferment and Stir It Daily
Leave the mixture for at least seven days. During this time, stir it thoroughly once every day.
If you have time, you can stir it in the morning and again in the evening. Regular stirring helps distribute the plant material throughout the water and introduces oxygen into the mixture.
The leaves will gradually become softer and break down. The liquid will also change in appearance and smell as the process continues.
Seven days is a practical minimum for this recipe, but the exact speed of decomposition depends on temperature, the type of plant material used, how finely it was chopped, and other conditions.
Do not expect every batch to look exactly the same. Homemade fertilizers are not standardized products, so their nutrient content can vary from one batch to another.
Strain and Dilute the Fertilizer
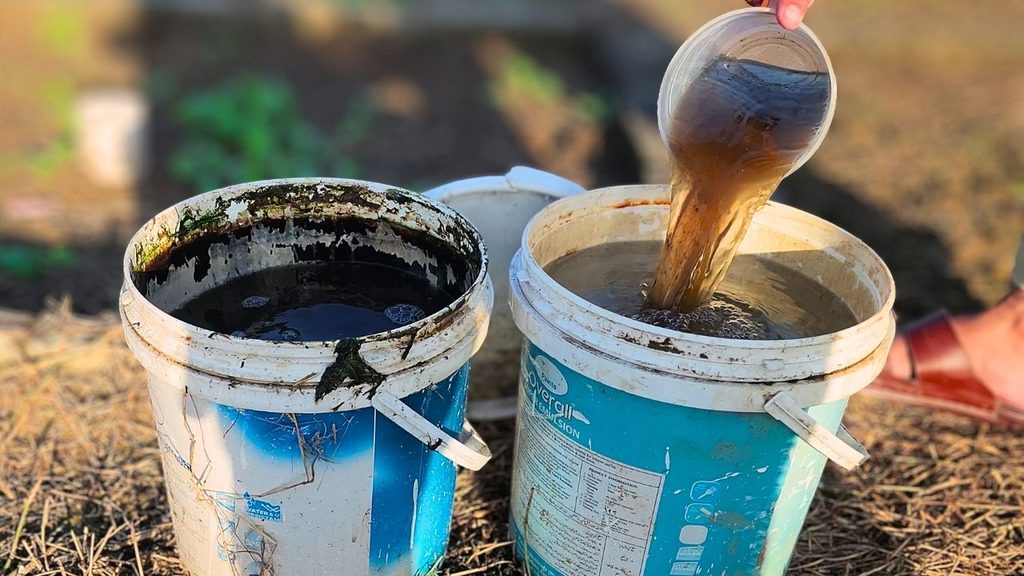
After at least seven days, you can strain the liquid to remove the larger pieces of plant material. The remaining liquid is your concentrated homemade fertilizer.
Do not pour the concentrated mixture directly onto small seedlings. Young plants have small root systems and can be more sensitive to strong fertilizer solutions.
For seedlings, dilute the fertilizer at a ratio of one part homemade liquid fertilizer to ten parts water.
For example, mix one cup of the homemade fertilizer with ten cups of water. If you make a larger quantity, simply keep the same one-to-ten ratio.
It is better to start with a weaker solution than to give young plants too much. If the plants respond well, you can continue using the diluted mixture as part of your normal feeding routine.
How to Apply It to Vegetable Plants
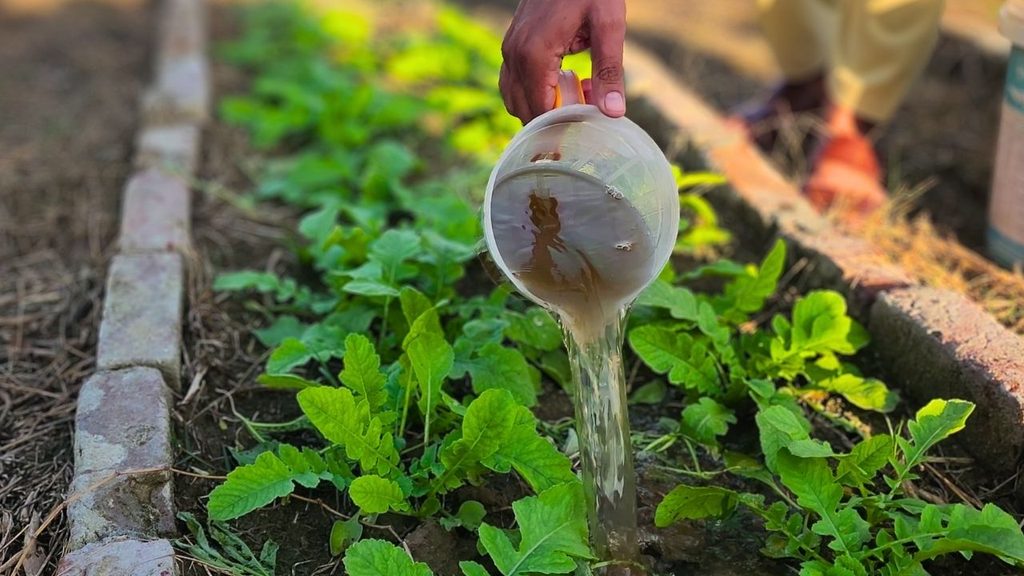
Apply the diluted fertilizer around the base of the plant, where it can reach the soil around the roots.
Try not to soak the foliage with the fertilizer. Soil application is a simple way to deliver the diluted liquid to the root zone.
This fertilizer can be used on larger vegetable plants as well, but the one-to-ten dilution is a useful starting point, especially when you do not know the exact nutrient concentration of your homemade mixture.
Young plants should not be fed heavily. A small amount of diluted fertilizer is enough to supplement the soil while the plants continue developing.
Remember that fertilizer is not a replacement for good soil, adequate sunlight, proper watering, and suitable growing conditions. Plants need all of these things to grow well.
Related Posts
Recent Posts
You don't need a large garden to grow potatoes. You can grow them in containers, raised beds, or even a homemade mesh garden bed. We are growing ours in a mesh bed that we made a few months ago, and...
How to Prepare Garden Soil for Spring Planting Using Organic Matter
One of our garden beds is completely covered with weeds and unwanted plants. We are going to clean it up and prepare it for spring planting. Since we still have a few months before the growing season...