
Growing healthy and strong plants requires the right kind of nutrients. While chemical fertilizers are widely available, they often come with side effects that can harm both soil and plants over time. A better alternative is making a homemade liquid fertilizer using simple kitchen ingredients.
Not only is it eco-friendly, but it also enriches the soil naturally, strengthens plants, and improves overall garden health. One of the easiest and most effective methods involves using orange peels and dairy milk, two ingredients that are often available at home and usually considered waste.
This natural fertilizer provides essential nutrients, supports root growth, and can even improve the immune system of plants, making them stronger and more resilient. With a little patience, this method can transform your garden, whether you are growing vegetables, fruits, or flowers.
Ingredients Required
Making this liquid fertilizer is very simple because it uses ingredients that are easily available and affordable. The main components are:
- Orange Peels: Oranges are rich in natural nutrients like potassium, calcium, and small amounts of magnesium. The peels also contain natural oils that have mild pest-repelling properties, making them doubly useful in the garden.
- Dairy Milk: Milk is not only nutritious for humans but also for plants. It contains proteins, amino acids, calcium, and lactic acid, which help improve soil health, promote microbial activity, and boost plant immunity.
- Water: To dilute the final mixture before application.
No special equipment is required other than a blender or grinder, a container with a lid, and a spoon for mixing. This simplicity makes the method suitable for all types of gardeners, from beginners to experts.
Preparing the Orange Peels
The first step in creating this fertilizer is properly preparing the orange peels. Instead of throwing them away after eating oranges, collect them over a few days. Once you have enough, wash the peels lightly to remove any dirt or pesticide residue.
Next, spread the orange peels under direct sunlight. Let them dry completely until they become hard and crispy. The drying process is crucial because any moisture left in the peels can interfere with grinding and may even cause unwanted fermentation during storage. Depending on weather conditions, this can take anywhere from one to three days. You can test dryness by gently bending a peel; if it snaps easily, it is ready.
Once fully dried, the peels should be ground into a fine powder using a blender or grinder. The powder does not have to be perfectly smooth, but finer powder mixes better with milk and improves nutrient extraction during fermentation.
Mixing Orange Peel Powder with Milk
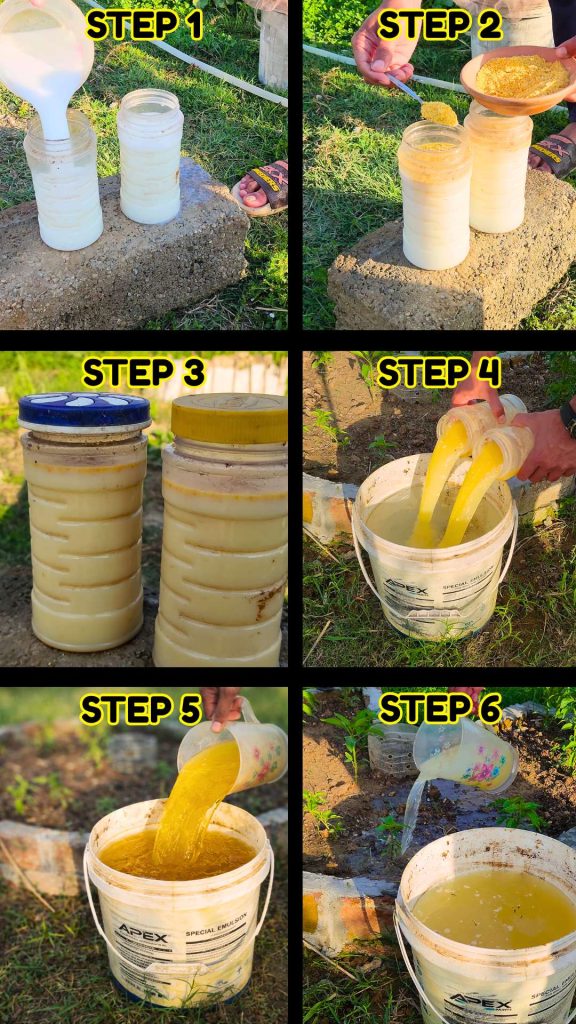
After preparing the orange peel powder, the next step is to mix it with dairy milk. Take a clean container that can hold at least one liter. Pour in about one liter of milk and add approximately three tablespoons of orange peel powder. This ratio works well to create a balanced mixture rich in nutrients without being too concentrated.
Mix the powder and milk thoroughly using a spoon. Stir until the orange peel powder is evenly distributed throughout the milk. Once mixed, loosely cover the container with a lid. It’s important not to close the lid tightly because fermentation gases will develop, and a tightly closed container may create pressure.
Fermentation Process
Fermentation is a critical step that allows the nutrients from the orange peels and milk to interact and form a liquid rich in essential elements for plants. Place the container in a shaded area, away from direct sunlight, and leave it undisturbed for about three weeks.
During this period, the milk will slowly ferment. The lactic acid in the milk helps break down the orange peel powder, releasing nutrients into the liquid. Beneficial microbes also grow in this environment, which is helpful for improving soil microbial activity when applied later. The smell of the mixture will change, becoming slightly sour, and the texture may thicken. This is completely normal and indicates that fermentation is progressing well.
Patience is key here. The longer you allow it to ferment, the more concentrated the nutrients become. If you can wait a little beyond three weeks, it often improves the fertilizer’s effectiveness.
Diluting the Fertilizer
Once fermentation is complete, the liquid is ready for use but must be diluted before application. Using the fertilizer directly in its concentrated form can overwhelm plants and cause nutrient burn.
To dilute, take a small portion of the liquid and mix it with water. A general guideline is to use one part fertilizer to ten parts water, though this can be adjusted depending on plant type and age. For young seedlings, higher dilution is recommended, while mature plants can handle slightly stronger solutions.
Dilution not only makes the fertilizer safe but also helps it spread evenly across the soil or leaves when applied.
Applying the Fertilizer
There are two main ways to apply this liquid fertilizer to plants:
- Soil Application: Pour the diluted mixture directly around the base of the plants. This nourishes the roots, improving root growth and nutrient absorption. Over time, the soil becomes richer, and the microbial activity is enhanced, creating a healthy environment for plants.
- Foliar Spray: Spray the fertilizer on plant leaves. This allows plants to absorb nutrients directly through their foliage and can give them a quick boost, especially during active growth periods.
Using this fertilizer once a week or once every two weeks is sufficient. Regular use ensures that plants receive a consistent supply of nutrients without overloading the soil.
Benefits for Plants
Giving this homemade liquid fertilizer to plants provides multiple advantages. Some of the key benefits include:
- Improved Root Development: Nutrients like calcium and potassium support strong root systems, which in turn support overall plant growth and stability.
- Stronger Stems and Leaves: Regular application helps plants develop thick, sturdy stems and vibrant green leaves. This is especially important for vegetables that bear fruits and flowers.
- Enhanced Flowering and Fruit Production: The nutrients from the mixture support flower formation and fruit development, leading to better yields and higher-quality produce.
- Boosted Plant Immunity: Amino acids and lactic acid from fermented milk enhance the plant’s ability to resist stress, disease, and minor nutrient deficiencies.
- Soil Enrichment: Over time, the fertilizer improves soil structure, encourages beneficial microbes, and enhances nutrient retention, making it more fertile for future planting.
This combination of benefits makes the homemade fertilizer a sustainable choice for any gardener looking to grow healthy and productive plants naturally.
Recent Posts
Don’t Plant Peppers Before Watching This Simple Kitchen Waste Gardening Trick!
The first step in growing healthy pepper plants is selecting the right place in your garden. Pepper plants need good sunlight for proper growth, so choose a spot where they can get at least 5 to 7...
Do THIS While Planting Tomatoes and Watch Them Grow Faster with ZERO Transplant Shock!
Tomatoes are one of the most rewarding plants to grow at home, but they are also sensitive right after transplanting. Many gardeners notice that seedlings look healthy in pots, but once they are...