
It is fun to grow gourds in your yard or garden on fences. They are the oldest cultivated plants in the world. The Egyptians used them as early water bottles, utensils, storage containers.
If we talk about the gourds botanically, there is no difference between pumpkin, squashes, and gourds. All of these healthy vegetables belong to the family Cucurbitaceae.
IS FENCE WORK AS A PERFECT SUPPORT?
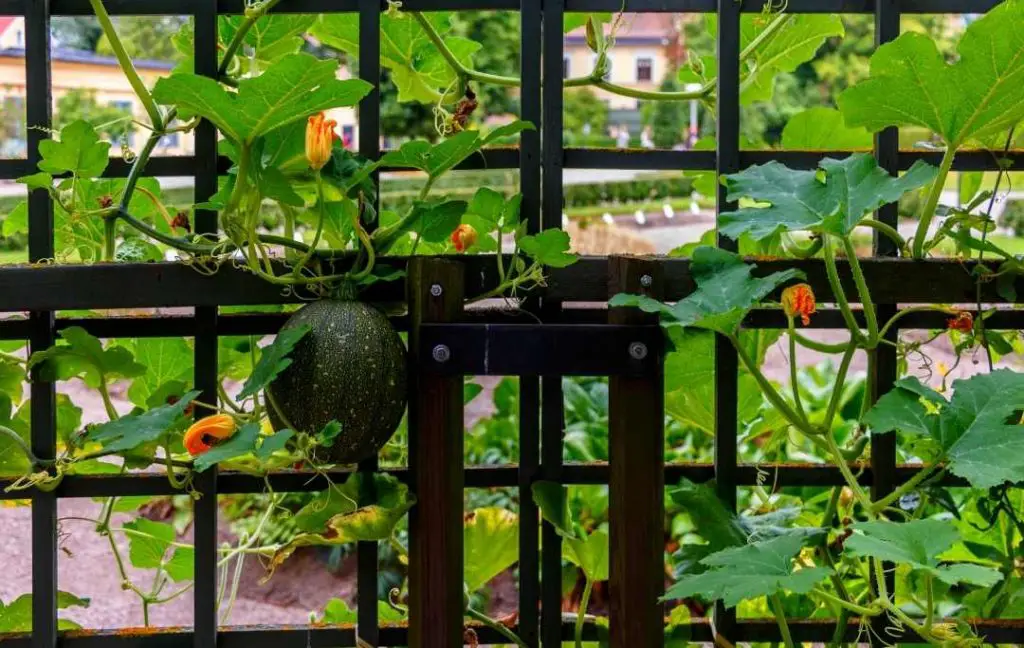
You can leave the gourds to sprawl their long vines in all directions but you can also simply train them on the fence of your garden or yard. In this way, they will consume less space in your growing area.
You can easily harvest or pick the fruit when needed, your fruits will not become the dinner of pests. A trellis is a perfect structure that is suitable for providing better support to any vine.
Besides, a trellis you can also use a sturdy chain-link fence for supporting gourd vine. The vines become attractive when they weave through the links. If you are planning to plant gourds to climb up a fence from hills or mounds then leave at least 15 feet of space in each direction from the hill in this way each plant will get 30 feet of fence.
You can create a full bushy plant by pinching the tip of each main stem. Remember, gourds never grow from the main stem but they grow on the side branches.
TYPES OF GOURDS
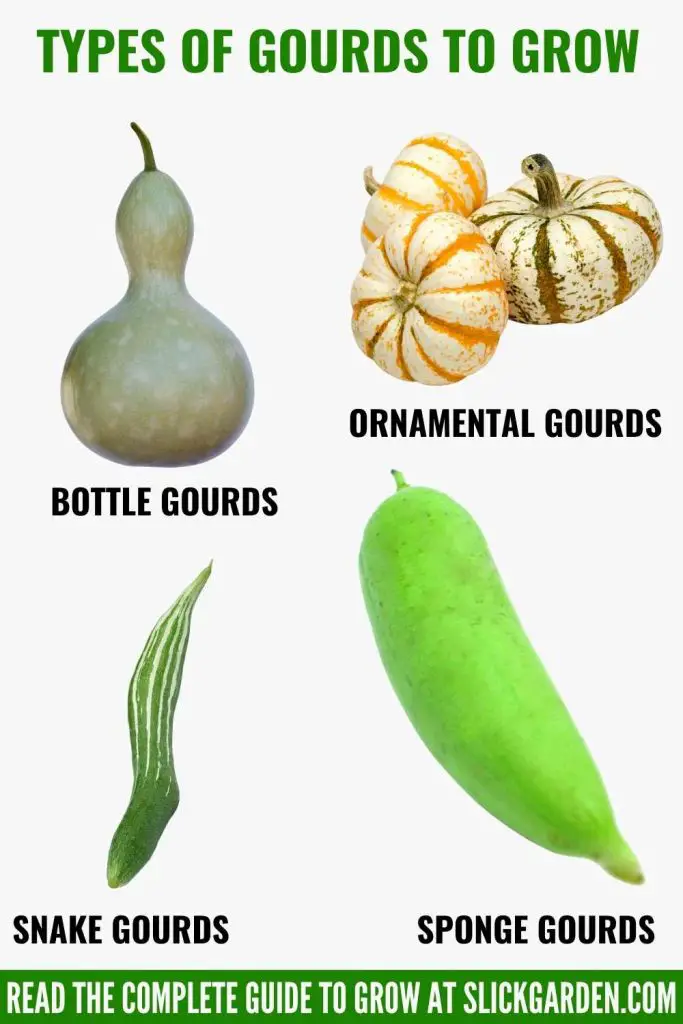
Gourds are available in different colors, sizes, and shapes. There are different types of gourds generally found in the world.
HARD SHELLS
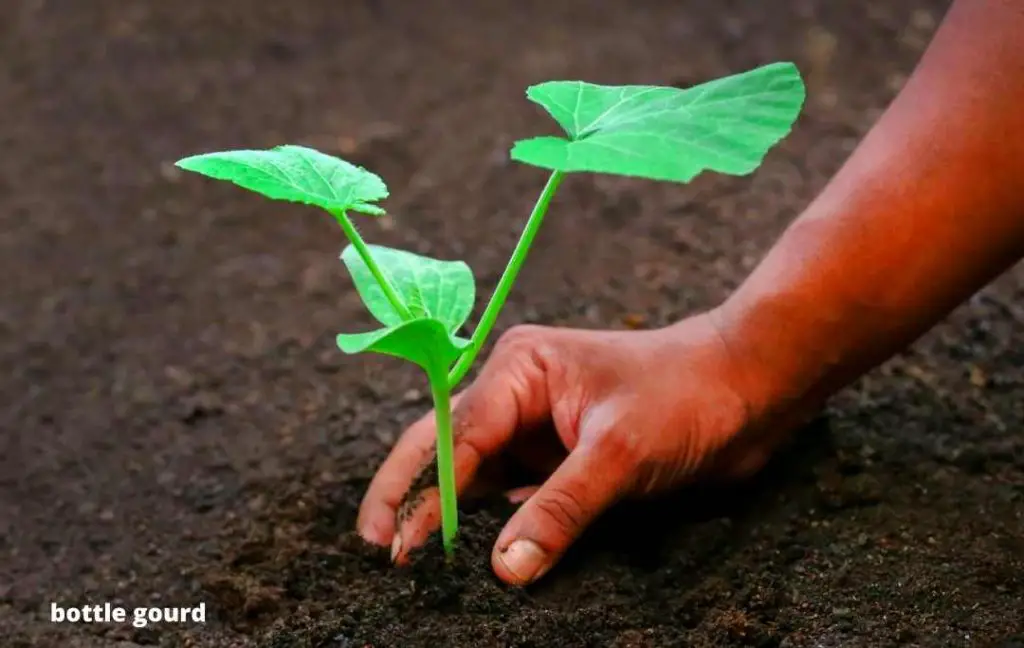
The other name of the hard shell variety is bottle gourds, they are also called Lagenaria siceraria which means drinking vessels. Hard shells have beautiful white flowers. The flowers produce green fruits and they open at night.
You can dry this type of gourds after harvest. This type of variety lasts for several years that’s why it has been growing for five thousand years. Hard shells gourds have been used in crafts, musical instruments, bowls, diapers, bottles, and baskets. Purchase Seeds On Amazon
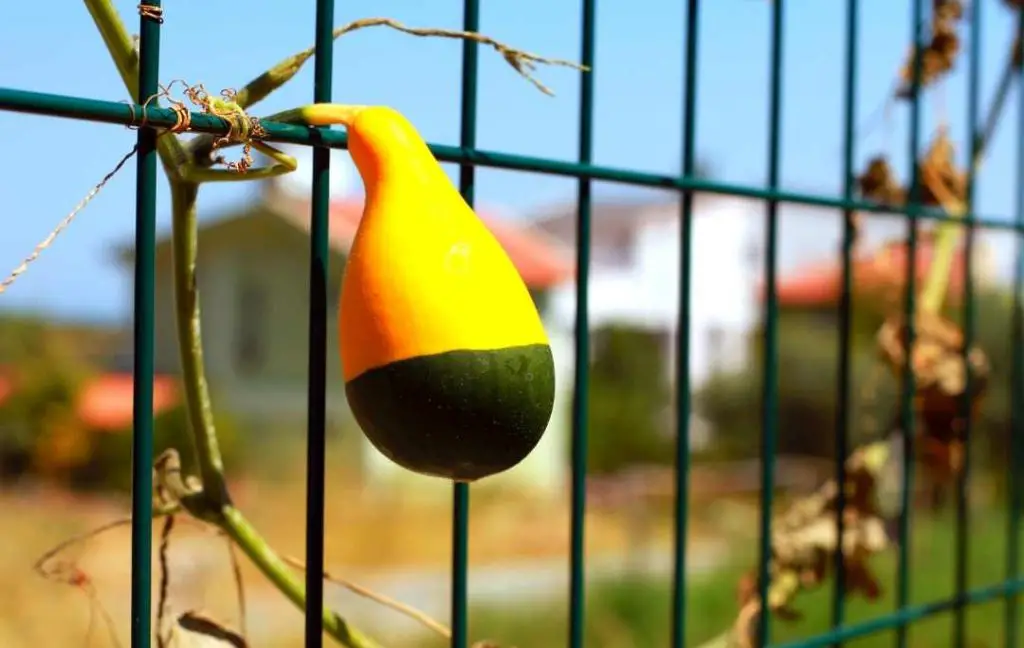
ORNAMENTAL GOURDS
The other name of ornamental gourds is Cucurbita pepo. Ornamental gourds are cute, colorful, and used for decorations. As they have soft shells they are closely related to squash and pumpkins and you can enjoy them fresh from the vines in fall.
This variety has unusual shapes and different textures. The golden yellow blooms of this variety will turn into colorful fruits. You will find different colors in this variety such as yellow, gold, orange, white and green.
A sunny spot with rich and well-drained soil will give you nutritious gourds. It is suggested that you can add compost, aged manure, and organic fertilizer before transplanting the seedlings. You can’t use the fruits for more than one season. Purchase Seeds On Amazon
SPONGE GOURDS
It is a well-known bath sponge that is related to cucumbers. Luffa aegyptiaca is left to mature and dry. After that, the outer shell is scraped off and you will find the scratchy inner fiber as a bath sponge. Purchase Seeds On Amazon
SNAKE GOURDS
Snake gourds belong to the pumpkin family. The seeds of this variety are similar to watermelon. This weird and long variety is edible when they are young and tender. After maturity, the snake gourds will become tough.
You should harvest them when the size is 10 to 12 inches and you can cook them like zucchini. The white and strong scented flowers of snake gourd open at night.
If you want snake gourd straight and long then you should grow them on a sturdy trellis. The length of the snake gourd can be 4 ½ feet. On the ground, the fruit will grow like a coiled snake. Purchase Seeds On Amazon
WHEN TO PLANT GOURDS?
Gourds grow best in hot climates, if you are living in cold areas where the temperature is so freezing throughout the winter then you must start your gourds indoors.
The reason is that the low temperature outside is not good for your gourd plants. One more thing which is very important for cold area growers is that they should sow the seeds 6-8 weeks before the last frost. The germination process of gourd plants is long, that’s why they will give you ripe fruit in 180 days.
- The best temperature for growing gourds is between 75 and 85 degrees Fahrenheit.
- If you are starting seeds indoors then plant the seeds in individual containers. Arrange a few grow lights and make sure your plant gets water on regularly.
You might like these articles:
- 10 VEGETABLE GARDEN TRELLIS IDEAS
- 10 Best Trellis Ideas For Vertical Gardening
- 8 Fast Growing Vegetables That You Can Grow In A Hurry
HOW TO GROW GOURDS?
It is not a difficult task to grow gourds at home, whether you are growing them for artistic use or just like the colorful squash. Now we will discuss all the steps of growing gourds in your garden or yard. Hope this article will help you to get this crop from your growing area.
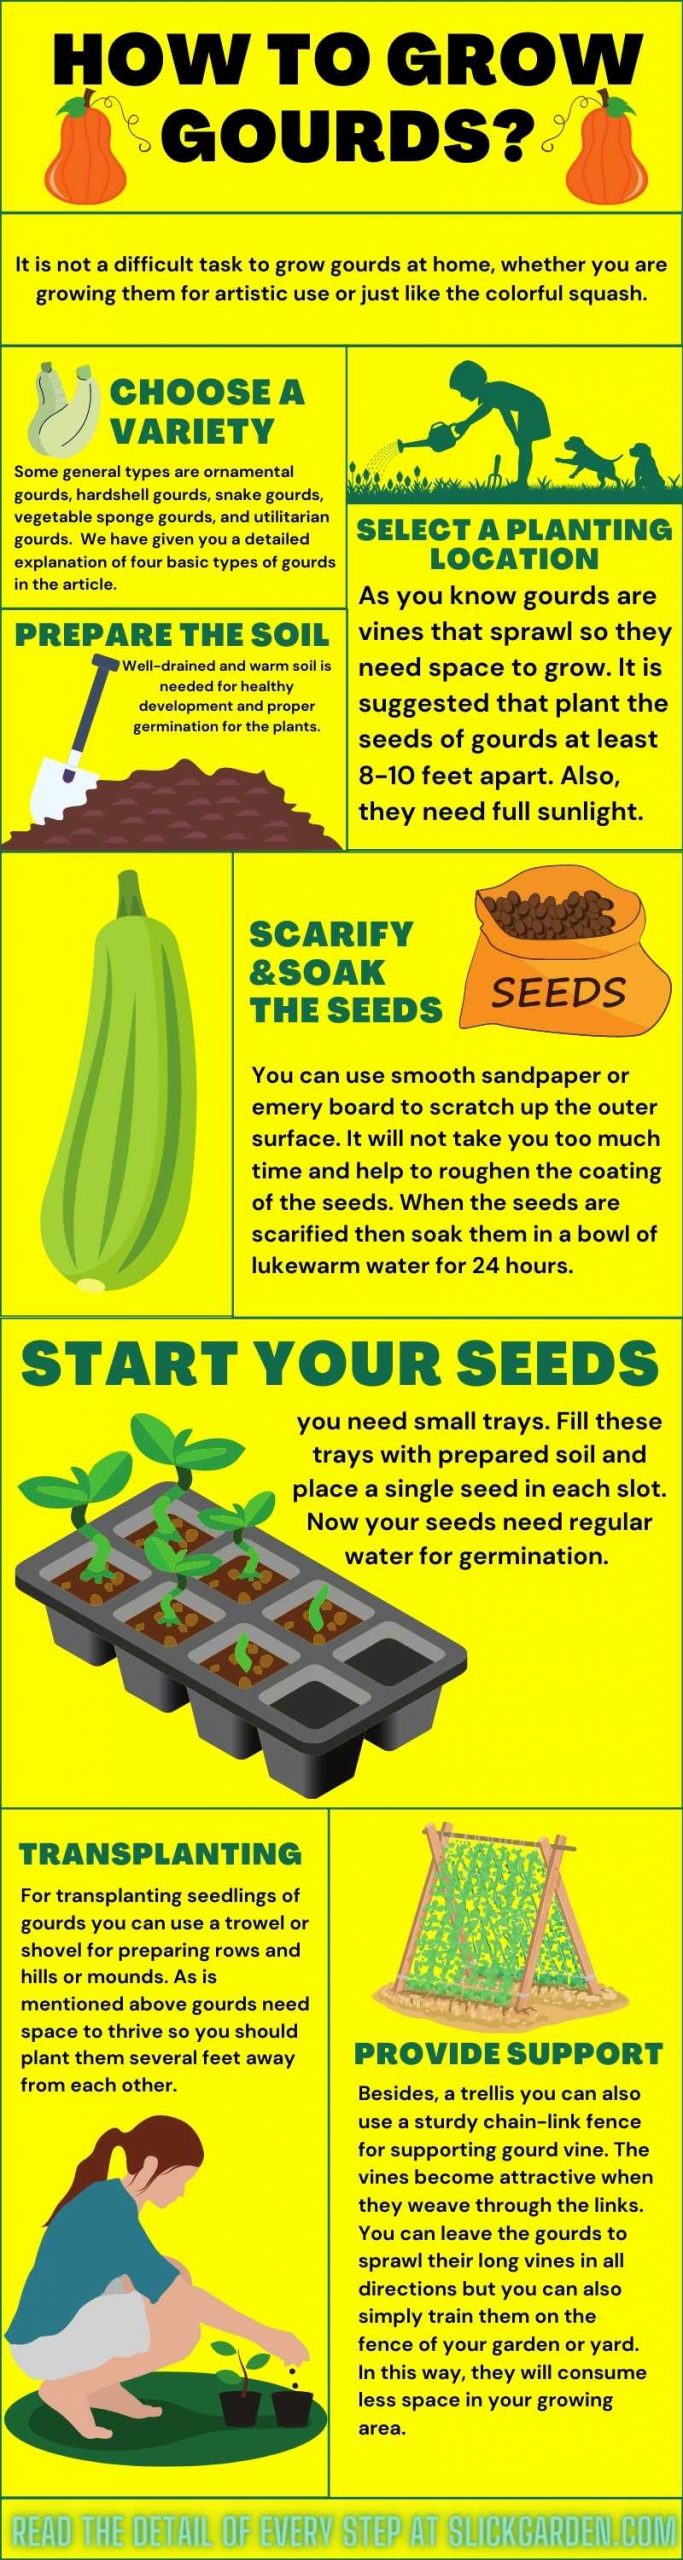
STEP 1: CHOOSE A VARIETY OF GOURD
There are dozens of species of gourds available. Each one has its unique shape, color, taste, and size. Some general types are ornamental gourds, hardshell gourds, snake gourds, vegetable sponge gourds, and utilitarian gourds.
We have given you a detailed explanation of four basic types of gourds. You can choose any variety you like. Remember all types of gourds are not edible. You can eat Cushaw Festival Squash, Butternut Squash, Chinese okra, Balsam Apple, Golden Acorn, and more.
STEP 2: SELECT A PLANTING LOCATION
If you are growing gourds outside then they need full sunlight. As you know gourds are vines that sprawl so they need space to grow. You can also grow them in pots but this will limit the size of the fruit and slow the production process.
Gourd plants need proper space to give you healthy fruit. It is suggested that plant the seeds of gourds at least 8-10 feet apart. This will provide ample room for each plant for growing and prevent your plants from diseases.
STEP 3: PREPARE THE SOIL
It is not difficult to prepare the soil for gourds plants. Well-drained and warm soil is needed for healthy development and proper germination for the plants.
The sandy soil will not let them thrive as they like moisture in the soil which is not possible in the sandy soil. The pH of the soil should be between 5.8 and 6.4. A soil test will help you in this purpose. A soil test can be performed with the help of the kit.
- If the pH of the soil is high, it means it is alkaline so you should add peat moss to increase the acidity.
- If the weather is warm but the soil is not warm then the gourd plants won’t grow well.
STEP 4: SCARIFY THE SEEDS
The seed shells of the gourds are very tough so they take an extra-long germination period. Scarify the seeds to speed up the process of germination. In this way, you can prevent seeds from rotting.
You can use smooth sandpaper or emery board to scratch up the outer surface. It will not take you too much time and help to roughen the coating of the seeds.
STEP 5: SOAK THE SEEDS
When the seeds are scarified then soak them in a bowl of lukewarm water. After 24 hours, your seeds are ready for sowing. This is a simple trick but helps to speed up the germination process.
After that remove the seeds from the water and let them dry in the air. You can place them on a piece of wax paper. Please give some time to seeds to completely dry out as it will prevent them from rotting before sprouting.
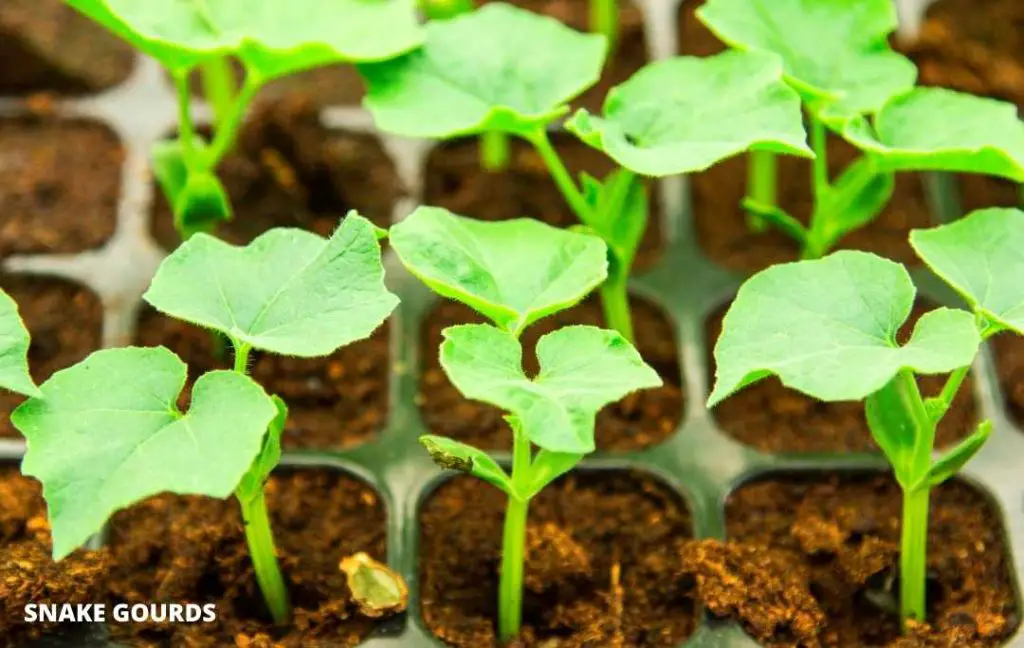
STEP 6: START YOUR SEEDS
Even if you are living in a warm area, it is a good option to plant seeds in starter sets indoors. For this purpose, you need small trays. Fill these trays with prepared soil and place a single seed in each slot. Now your seeds need regular water for germination.
Besides water, they also need proper light for growth. After sprouting they are ready to transplant outside in your growing area. The best time of transplanting is after the last frost.
STEP 7: TRANSPLANTING
Now the steps of digging rows and creating hills come. In the place, you selected for gourds, for transplanting seedlings of gourds you can use a trowel or shovel for preparing rows and hills or mounds.
For spacing between the plants of the gourds, you can get all the information on the packet of seeds. As is mentioned above gourds need space to thrive so you should plant them several feet away from each other.
Keep the rows near your chain-link fencing so you can train the gourds easily. Place seedlings into individual hills and cover the base of seedlings for new growth.
TIPS FOR CARING YOUR NEWLY PLANTED GOURDS
A: If you want to reduce the transplant shock then water the seedlings heavily. Water the plants regularly so the soil will keep moist as gourds like moisture.
B: If you seed any weeds then remove them as they will steal all the nutrients from the soil. Gourds need more space to thrive as compared to other plants and weeds occupy growing space.
C: You can add a layer of mulch which will help to retain the moisture in the soil and prevent your plants from weeding.
D: It is suggested that add equal part fertilizer such as a 10-10-10 mixture.
E: If the weather is completely dry then extra water is needed by your gourd plants. This will maintain the high level of moisture in the soil.
F: Powdery mildew will often settle on the leaves of the gourd. To deal with it, you can simply make the spray. For making this spray you need a cup of skim milk and 5 cups of water. Use this spray every week for 3 weeks.
G: If you want to protect your gourd plant from cucumber beetles then you can cover them with floating row covers.
H: The gourd plants can spread up to 40 feet so don’t crowd gourd. When the fruits of gourds are set, you will see they grow very fast.
HARVESTING
When you see the gourds have reached their full size and the vine will start dying then this the time your gourds are ready to harvest. You can also leave the gourd for curing on the vine. This process will take at least one month.
The gourds will taste great if you harvest them when they are young. Wait till the vine at the top of the gourds has turned brown or dry then you can cut the gourds. Check the gourds every week so you will know they are ready for harvest or not. You can use a sharp scissor or shears to cut the gourds easily.
You might like these articles: