
You don’t need to buy a lot of compost or fertilizer to prepare a good garden bed. If you have leaves, kitchen scraps, and other plant waste, you can use them to improve your soil and feed future crops.
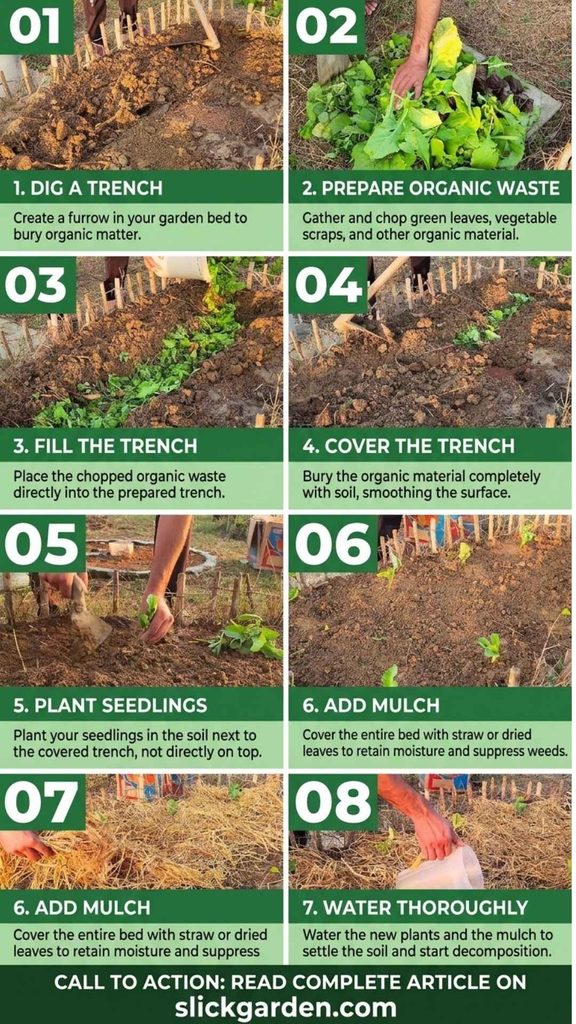
The method is simple. Dig a trench through the middle of the bed, fill it with organic matter, cover it with soil, and plant your seedlings on either side. You don’t have to wait weeks before planting, so you can prepare the bed and start growing vegetables on the same day.
The buried material will take time to break down, but that’s fine. We’re preparing the soil for the current crop and the crops that come after it.
Choose a Good Spot for Your Garden Bed
Start by choosing a place that gets enough sunlight for the vegetables you want to grow. Tomatoes, peppers, cucumbers, and eggplants generally need plenty of direct sunlight to grow well.
Also, check how water moves through the soil after rain. If water stays in the bed for days, deal with the drainage problem first. Burying a lot of organic matter in waterlogged soil can lead to unpleasant smells and slow decomposition.
Remove any troublesome weeds before you start. You don’t have to clean every little piece of plant material from the surface, but get rid of weeds that could quickly grow back and compete with your vegetables.
Dig a Trench Through the Center
Now dig a long trench through the middle of your garden bed. Make it deep enough to hold a good amount of organic matter, but there’s no need to dig deeper than necessary.
Keep the soil you remove beside the trench because you’ll use it to cover everything later.
The size of the trench depends on your bed and the amount of material you have. If you’re working with a small bed, a smaller trench is perfectly fine.
One thing to keep in mind: don’t dig heavy clay soil when it’s soaking wet. It can stick to your tools and become even more compacted. Wait until it’s dry enough to crumble when you handle it.
Collect Leaves and Kitchen Scraps
For the organic matter, use whatever suitable plant waste you have available. Dry leaves, vegetable scraps, fruit peels, and soft garden trimmings are all useful.
I would chop the material into smaller pieces before adding it to the trench. It takes a little extra time, but smaller pieces generally break down faster.
You can mix dry leaves with softer green material from the garden. There’s no need to follow an exact recipe. Just avoid filling the trench with a tightly packed mass of material.
Don’t add meat, dairy products, oily leftovers, or large amounts of cooked food. These can attract pests and cause problems in the bed. Leave out diseased plants and weeds carrying mature seeds, too.
Fill the Trench and Cover It With Soil
Spread the organic matter along the trench rather than dumping everything in one spot. This way, it will be distributed along the length of the bed.
You don’t need to fill the trench right to the top. Once you’ve added enough material, cover it completely with the soil you removed earlier.
Spread the soil evenly and level the bed. That’s all the preparation we need before planting.
You might notice the soil level dropping later as the buried material breaks down. That’s normal. You can add more soil or compost when needed.
Plant Your Seedlings
Now you can plant your seedlings on either side of the trench. Keep them away from the center, where you’ve buried the fresh organic matter.
Fresh leaves and kitchen scraps need time to decompose. Some materials, particularly dry leaves and other carbon-rich plant waste, can temporarily tie up nitrogen as they break down. Keeping young roots away from the fresh material helps avoid potential problems.
Plant your seedlings at the spacing recommended for each vegetable. Tomatoes need more room than some smaller crops, while cucumbers may need extra space to spread or climb.
Once the seedlings are in the ground, water them well so the soil settles around their roots.
You can still add finished compost to the planting holes or the soil surface if your garden soil is poor. The buried material is a slow source of organic matter and nutrients, so it shouldn’t be treated as a complete replacement for fertilizer in every situation.
Cover the Bed With Mulch
After planting, cover the soil with dry leaves, straw, or another suitable mulch. You can often collect enough leaves from your own garden without spending anything.
Spread the mulch across the bed, but leave a little space around the stems of your seedlings. Don’t pile it directly against the plants.
Mulch helps keep moisture in the soil, protects the surface during heavy rain, and reduces the amount of bare soil where weeds can grow. It also breaks down gradually, adding more organic matter to the top of the bed.
Give the bed a good watering after mulching. Keep the soil moist while the seedlings settle in, but don’t let water sit around their roots.
Keep the Bed for Future Growing Seasons
The buried leaves and kitchen scraps won’t disappear overnight. Earthworms and other soil organisms will gradually break them down, releasing some nutrients and adding organic matter to the soil.
As the soil improves, it may hold moisture better and become easier to work with. How much improvement you get depends on your original soil, the material you bury, and how well the bed drains.
You can use the bed for your current vegetables and prepare it again when you’re ready for another crop. Check the soil level, remove any weeds, add finished compost if needed, and put down fresh mulch.
If you’re finishing the growing season and want to leave the bed over winter, cover it with mulch rather than leaving the soil bare. When you’re ready to plant again, check the bed and make any adjustments it needs.
You don’t have to repeat the entire process every time. Add more organic matter when the soil needs it, and let the material already buried beneath the surface continue breaking down.
This is a practical way to use leaves and kitchen scraps instead of throwing them away. The bed is ready for planting today, and the organic matter underneath will keep working its way into the soil long after your first seedlings have started growing.
Recent Posts
I had an old rice storage sack that I wasn't using anymore, so I decided to turn it into two small raised garden beds. I cut the sack in half, used some bamboo sticks to hold everything in place, and...
How to Prepare a Garden Bed Using Fruit Peels, Soil and Compost
We have this garden bed, and it's full of weeds. Instead of buying new soil or starting another bed, I'm going to clean this one and get it ready for vegetables. I'll use banana peels, apple peels,...