
Tomatoes grow best when they get plenty of sunlight, so the first and most important step is picking the right place in your garden. A good spot should receive at least 6 to 8 hours of direct sunlight every day. Without enough sun, tomato plants may grow slowly, produce fewer flowers, and give a weak harvest.
The soil in the chosen area should also be loose and well-draining. If the soil is too hard or clay-like, roots will struggle to spread properly. You can improve such soil by mixing in compost or old organic matter. A slightly raised or leveled garden bed works well because it prevents water from collecting around the roots.
It is also better to choose a place where tomatoes or other heavy-feeding crops were not grown recently. This helps avoid soil fatigue and reduces the risk of disease. A fresh patch of soil gives your tomato plants a better start and stronger growth throughout the season.
Digging the Planting Hole and Preparing Trenches
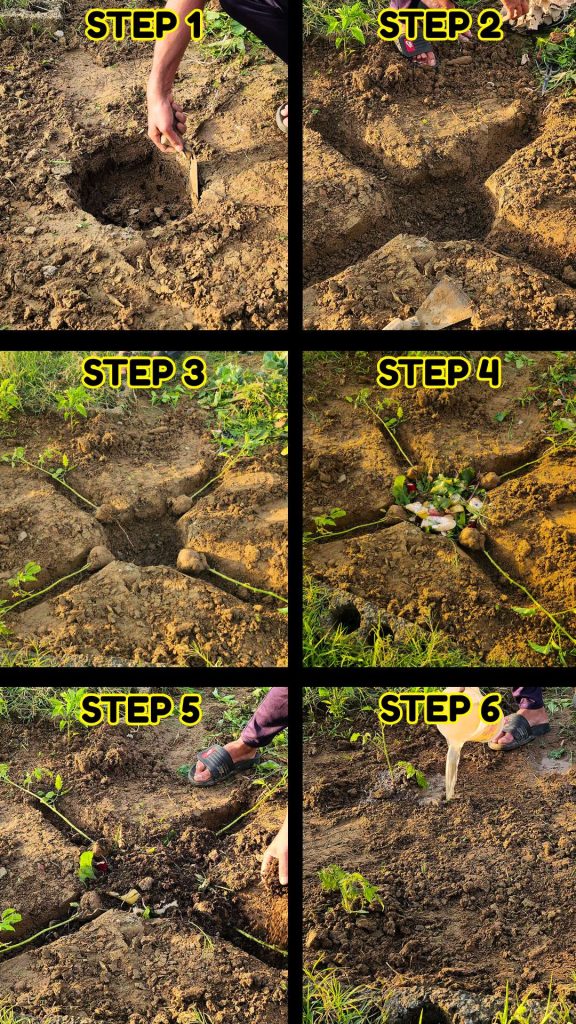
Once the location is ready, the next step is digging a proper planting hole. This is not a small regular hole. It should be wide and deep enough to hold a good amount of organic material. The idea is to create a nutrient-rich zone right under the plant where roots can grow freely.
After making the main hole, small trenches are created extending from it. These trenches are where the tomato stem will be laid down. Instead of planting the tomato upright like usual, the plant is positioned sideways in the trench. This helps more parts of the stem come in contact with soil, which is very important for root development.
The trench does not need to be very deep, but it should be long enough to support the lower part of the tomato plant. The main hole acts as a nutrient hub, while the trench helps spread the root system horizontally. This combination creates a strong foundation for long-term plant growth.
Preparing the Tomato Plant Before Planting
Before placing the tomato plant into the soil, some preparation is needed. The lower leaves of the plant should be carefully removed. This step is important because any leaves buried under soil can rot and cause disease. Only the stem should remain in the portion that will be buried.
Tomato plants have a special ability to grow roots from their stems when they come in contact with soil. This is the main reason why this sideways planting method works so well. By exposing more of the stem to soil, you are basically encouraging the plant to create a much larger root system than usual.
The plant should be handled gently during this step. The stem should not be damaged or broken while removing leaves. A healthy and clean stem ensures better adaptation once it is placed in the soil.
Using Kitchen Waste as Natural Fertilizer
One of the most important parts of this method is using kitchen waste as a natural fertilizer. Instead of throwing away vegetable peels, fruit scraps, and other organic waste, it is used directly in the planting hole. This waste slowly breaks down in the soil and feeds the plant over time.
Kitchen waste acts like a long-term nutrient source. Unlike chemical fertilizers that give a quick boost and fade away, organic waste continues to decompose for weeks and months. During this process, it releases essential nutrients that support plant growth naturally.
Eggshells can also be added because they provide calcium, which helps prevent issues like blossom end rot in tomatoes. However, oily food, cooked leftovers, and meat should be avoided as they can attract pests and create bad smell in the soil.
This method also helps reduce household waste and turns it into something useful. It improves soil quality while also supporting sustainable gardening practices.
Planting the Tomato in a Trench Position
Now comes the actual planting process. The tomato plant is gently placed into the trench in a sideways position. The root ball is positioned near the main hole, while the stem is laid along the trench. The top part of the plant is bent upward so that it remains above the soil and faces the sunlight.
This sideways positioning might look unusual at first, but it is very effective. As the buried stem comes into contact with soil, it starts forming new roots along its length. This increases the plant’s ability to absorb water and nutrients.
Once the plant is correctly placed, the main hole is filled with kitchen waste. After that, the trench and hole are covered with a mixture of soil and compost. The entire buried stem is covered properly, leaving only the upper green part visible.
The soil should be gently pressed to remove air pockets, but not too tightly. Loose soil helps roots spread easily and grow deeper.
Watering and Early Care of the Plant
After planting, watering is very important. A good amount of water should be given immediately so that the soil settles around the roots and the organic waste starts breaking down. This also helps reduce transplant shock, allowing the plant to adjust quickly to its new environment.
In the early days, regular watering is needed to keep the soil slightly moist. However, overwatering should be avoided because it can cause root problems. As the plant grows stronger, it becomes more independent and can handle slightly dry conditions better.
During this stage, it is also important to keep an eye on sunlight exposure and protect the plant from strong winds if needed. A stable environment in the beginning helps the plant build a strong foundation.
Root Development and Plant Growth
One of the biggest advantages of this method is the way roots develop. Since the tomato stem is buried along a trench, it starts producing multiple new roots along its length. Instead of relying on a single root system, the plant creates a wide network of roots.
More roots mean better access to water and nutrients. This directly improves plant strength, leaf growth, and fruit production. The plant becomes more stable and less affected by weather changes like heat or dry conditions.
As the kitchen waste continues to decompose, it keeps feeding the plant naturally. This reduces the need for additional fertilizers and creates a self-sustaining growing system inside the soil.
Recent Posts
The Secret Garden Hack to Kill Weeds Naturally and Grow Strong Pepper Plants at Home
Weeds are one of the most frustrating parts of gardening. They don’t wait for permission, they just grow wherever they find space. In a vegetable garden, especially in small home setups, weeds...
Growing healthy pepper plants does not always require expensive fertilizers or complicated techniques. Sometimes, the simplest methods work the best. One such method uses organic material placed...