
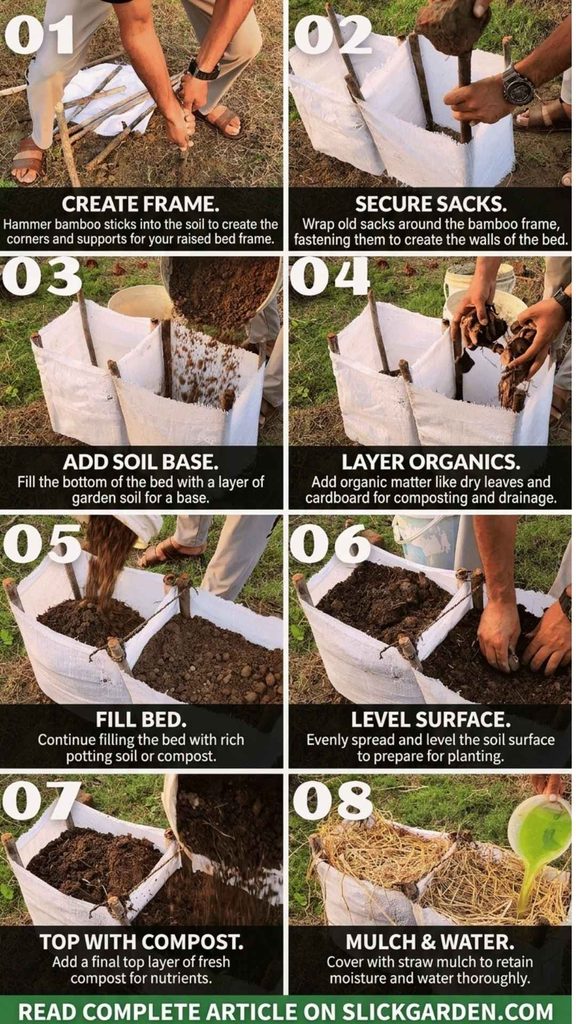
I had an old rice storage sack that I wasn’t using anymore, so I decided to turn it into two small raised garden beds. I cut the sack in half, used some bamboo sticks to hold everything in place, and filled the beds with garden soil, organic waste, and compost.
I’m going to grow potatoes in them. Since the beds are quite small, I’ll plant just one seed potato in each. And when it’s time to harvest, I should be able to cut the sack open and get the potatoes out without digging through the soil.
Choose a Sunny Spot
First, I picked a place in the garden that gets plenty of sunlight. Potatoes need good sunlight to grow, so I wanted to get the location right before making the beds.
I also made sure I could reach the beds easily for watering and checking on the plants. There’s no point putting them somewhere that becomes difficult to work in later.
Cut the Old Rice Sack in Half
For the beds, I used an old sack that had been used for storing rice. It was still in usable condition, so rather than throwing it away, I cut it into two pieces.
That gave me the material for two separate beds. You can make yours larger or smaller depending on the sack you have and how much space is available in your garden.
Before using an old sack, check that it’s clean and strong enough to hold the soil. The weight adds up once you fill it, especially after watering.
Make the Frames with Bamboo Sticks
I used bamboo sticks to make a simple frame for each bed. I pushed the sticks into the ground at the corners and wrapped the sack material around them to form the sides.
That’s all there is to the structure. The bamboo holds the sack upright and keeps it from spreading out as I add the soil. I didn’t need to buy a ready-made frame or use any complicated tools.
Once both frames were in place, I started filling them.
Add Garden Soil at the Bottom
I began by putting garden soil into the bottom of each bed. Since these beds are fairly deep, filling the whole thing with soil and compost would use up a lot of material.
So, I’m filling them in layers instead. I added some soil first, then I’ll put organic waste on top and cover it with more soil.
I’m using soil from my own garden, which saves me from buying bags of growing mix. If you’re doing something similar, use soil that’s suitable for growing vegetables and isn’t contaminated with chemicals.
Add Organic Waste
After the first layer of soil, I added organic waste. This is a good way to use suitable garden materials that would otherwise be thrown away.
You can use dried leaves and other plant waste that will break down over time. As these materials decompose, they add organic matter to the soil.
Just be careful about what you put in. I wouldn’t use diseased plants or weeds carrying mature seeds, because they can cause problems later. Also, avoid filling the bed with lots of fresh kitchen scraps. They can attract pests and produce unpleasant smells while decomposing.
Cover It with Another Layer of Soil
Next, I covered the organic waste with more garden soil. This gives the potato roots a growing area above the material underneath.
I spread the soil across the bed and broke up any large clumps. Potatoes develop underground, so I want the soil to be loose enough for the tubers to grow.
The organic material underneath will take time to break down, and the soil level may drop a little as that happens. If needed, I can top up the beds later with more soil or compost.
Add Compost on Top
The last layer is compost. I spread it over the soil to add organic matter and nutrients before planting.
I’m using well-decomposed compost because it’s ready to use around plants. Homemade compost works well for this kind of project, so there’s no need to spend money on an expensive potting mix if you already have suitable soil and compost available.
Now the beds are filled, and I can plant the potatoes.
Plant One Seed Potato in Each Bed
I’ve got some seed potatoes that have already started sprouting. I’m planting just one in each bed because there’s not much room to spare.
I made a small hole, placed a sprouted potato inside, and covered it with soil. That’s it. There’s no need to make a complicated planting setup.
As the plant grows, I’ll keep an eye on the soil level and add a little more around the base if needed. I also want to make sure the developing potatoes stay covered, because exposure to sunlight can turn them green.
I’m curious to see how much I’ll get from just one seed potato in each bed. The harvest will depend on how well the plants grow, but it’ll be interesting to find out whether these small homemade beds are enough for a decent crop.
Mulch the Beds with Straw
After planting, I covered the soil with dry straw. I had some available, so I used it rather than leaving the soil bare.
The straw helps the soil hold moisture for longer, which is useful during warm weather. It also covers the surface and can help keep weeds down.
You can use dry leaves or another suitable mulch if that’s what you have. Just spread it loosely so the potato shoots can come through as they grow.
Water with Homemade Green Weed Tea
Now I’m watering the beds. Instead of using plain water this time, I’m using some homemade green weed tea that I prepared earlier.
I’ve diluted it before applying it to the soil. Weed tea can provide some nutrients, depending on which weeds were used and how it was prepared, but the strength isn’t always predictable. If you make your own, don’t use weeds that have mature seeds or plants that may have been exposed to herbicides.
You can use plain water if you don’t have any homemade liquid fertilizer. The important thing is to keep the soil moist without letting it become waterlogged.
I’ll check the beds regularly, especially in warm weather. Since the sides are made from sack material, I’ll also keep an eye on how quickly the soil dries out and whether the frame is holding up properly.
Harvesting Should Be Much Easier
This is the part I’m looking forward to. When the potato plants have matured and their foliage has died back naturally, I’ll cut open the sack and remove the soil to collect the potatoes.
Instead of digging through a large garden bed, I should be able to open the sides and get to the crop more easily. I’ll still need to handle the potatoes carefully so I don’t cut or bruise them.
The sack may weaken after months outdoors, so I’ll check it from time to time. If it starts tearing, I’ll support the sides to keep the soil in place until harvest.
Let’s See How Many Potatoes We Get
Both beds are ready now. I made them from one old rice sack, a few bamboo sticks, and materials I already had in the garden.
I didn’t need to buy expensive containers or fill the beds entirely with purchased soil. I just reused what was available and made a growing space for two potato plants.
Now comes the waiting part. I’ll let the plants grow and see what happens underground. When it’s time to harvest, we’ll find out how many potatoes these homemade beds have produced.
Add exact sack cutting measurementsMake the introduction more engaging
Recent Posts
You don't need to buy a lot of compost or fertilizer to prepare a good garden bed. If you have leaves, kitchen scraps, and other plant waste, you can use them to improve your soil and feed future...
How to Prepare a Garden Bed Using Fruit Peels, Soil and Compost
We have this garden bed, and it's full of weeds. Instead of buying new soil or starting another bed, I'm going to clean this one and get it ready for vegetables. I'll use banana peels, apple peels,...