
Creating a mini worm farm inside your garden bed is one of the easiest and most effective ways to recycle kitchen waste into nutrient-rich compost. Instead of throwing away vegetable peels, fruit scraps, eggshells, and leftover plant material, you can feed them back into the soil.
Worms love this kind of organic material, and as they process it, they produce castings which are packed with nutrients. These castings improve soil fertility, help retain moisture, and promote healthy plant growth.
A small worm compost system does not require expensive bins or special equipment. It can be built using simple items you already have lying around, and once set up, it works continuously with minimal effort. It also reduces household waste and keeps the garden healthy.
Choosing the Right Spot in the Garden
The first step is to pick the best spot in your garden bed for the mini worm farm. Choose an area close to your plants but away from delicate roots. This way, the nutrients released from the worm farm will directly feed the plants without disturbing their growth.
The spot should have good drainage and some protection from harsh sun. Too much direct sunlight can make the soil inside the basket very hot, which worms do not like. Similarly, avoid very soggy areas, as excess water can drown the worms or make the organic material go slimy.
Preparing the Garden Bed
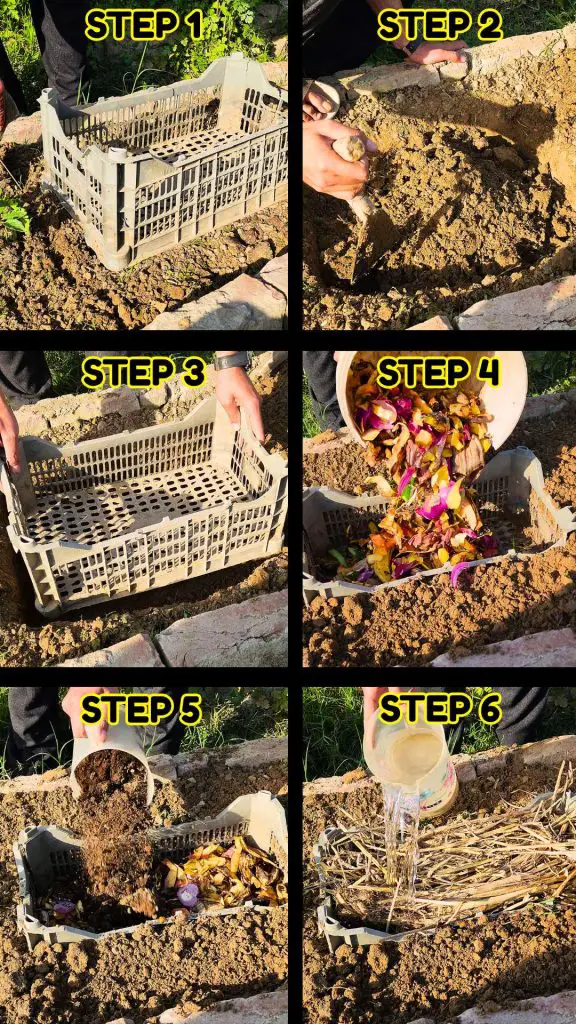
Once you have selected the spot, it’s time to prepare the garden bed. Take a small shovel or trowel and dig a hole deep enough to hold the basket. The basket should sit mostly below soil level, with just the top edge slightly above ground. This ensures that the basket stays stable and worms can move freely in and out of the surrounding soil.
After digging the hole, remove any large stones, roots, or debris that may block the worms’ movement. Level the bottom so that the basket can sit evenly. Press soil firmly around the edges to secure it and prevent it from tipping or shifting.
Setting Up the Basket
An old fruit basket works perfectly for this project because it already has plenty of holes. These holes allow worms to move freely and help water drain properly. Place the basket inside the prepared hole and make sure it fits snugly. Press soil around the basket edges to keep it stable.
The top edge of the basket should remain slightly above soil level. This allows easy access to add kitchen scraps and ensures good air circulation. A stable and well-positioned basket will last for a long time and serve as a permanent mini worm farm.
Creating the Base Layer
Start by creating a base layer inside the basket. Use dry material such as dried leaves, shredded paper, or small pieces of cardboard. This layer acts as a sponge to absorb excess moisture from kitchen waste and keeps the contents from getting too wet.
A good base layer should be around 2–3 inches thick. Spread it evenly across the bottom and lightly press it so that it stays in place. This layer also provides initial bedding for the worms to start working on as soon as they arrive.
Adding Kitchen Waste
The next step is to add your kitchen scraps. Almost any organic waste can be used, including vegetable peels, fruit scraps, tea leaves, coffee grounds, eggshells, and leftover plant material. Avoid adding meat, fish, or oily food as they can attract pests and create bad smell.
Chop larger pieces into smaller bits. Smaller pieces break down faster and are easier for the worms to digest. Spread the scraps evenly over the base layer, covering the entire bottom. This layer becomes the primary food source for the worms.
Introducing Compost and Vermicompost
If you have old compost or some vermicompost, add a layer on top of the kitchen waste. This helps introduce beneficial microbes and a few worms if available. These microbes help speed up the decomposition process, turning the waste into rich castings faster.
Spread the compost evenly and lightly mix it with the kitchen waste. This ensures that the worms have a balanced mix of food and soil microbes to thrive. It also makes the final compost more nutrient-rich for your garden plants.
Covering with Soil or Mulch
After adding kitchen waste and compost, cover everything with a layer of soil or mulch. This is very important to control odor, prevent flies, and maintain proper moisture levels. Mulch also protects the contents from direct sun and keeps the internal temperature stable.
A 1–2 inch layer of soil or mulch is enough. Spread it evenly and gently press it without compacting too much. The covering keeps the mini worm farm healthy and ensures that worms can work efficiently.
Watering the Mini Farm
Once everything is layered and covered, give it some water. Do not soak it; just make it moist like a squeezed sponge. Moisture is essential for worms to survive and for decomposition to happen effectively.
If the mini farm starts looking dry over time, sprinkle some water. On the other hand, if it becomes too wet or soggy, add some dry leaves or shredded paper to absorb the excess moisture. The right balance of moisture is key to maintaining a healthy worm farm.
How Worms Work
Over time, worms from the surrounding soil will find their way into the basket through the holes. They start feeding on the kitchen waste, compost, and mulch, and as they move, they create tunnels. These tunnels help aerate the soil and allow nutrients and water to reach the plant roots more easily.
Worms also produce castings, which are natural fertilizers packed with nitrogen, phosphorus, potassium, and other essential nutrients. These castings are rich, dark, and crumbly, improving soil structure and fertility.
Recent Posts
Planting Tomatoes This Way Changed Everything – Deep Hole Method for Bigger Tomato Plants
Before planting a new crop, it is always a good idea to prepare the bed properly. In this case the bed was previously used for growing sweet peas. The plants produced well and once the harvest was...
48-hour seed test that reveals which cucumber seeds are alive — try this tonight
Germinating cucumber seeds is an important first step for any gardener. Starting seeds before planting them in soil ensures higher success rates and saves time. By germinating seeds first, you can...