
Before planting a new crop, it is always a good idea to prepare the bed properly. In this case the bed was previously used for growing sweet peas. The plants produced well and once the harvest was finished, the remaining plant material needed to be cleared.
Old stems, dried vines, and leftover roots are removed from the soil. This cleaning process helps prevent pests and diseases from staying in the bed. It also creates space for the new crop to establish itself without competition from old plant material.
Once the bed is cleared, the soil is lightly loosened. This allows air to reach deeper into the soil and makes it easier for new roots to grow. At this stage compost or organic matter can also be mixed into the top layer of soil if needed. Healthy soil is the foundation of a productive garden, and a little preparation makes a big difference later.
After the bed is clean and the soil is loose, it becomes ready for the next crop. In this case the next plants chosen for the bed are tomatoes.
Planning Tomato Spacing in the Bed
Tomatoes are strong plants that grow best when they have enough space around them. Crowded plants often compete for sunlight, water, and nutrients, which can reduce the overall harvest. Good spacing allows each plant to grow fully and also improves airflow between plants.
Instead of planting many seedlings close together, it is better to plan the spacing carefully. The size of the garden bed and the variety of tomatoes both play a role in deciding how many plants should go in one bed.
For a medium sized bed, planting around five tomato plants gives each plant enough room to spread its branches. This spacing also allows sunlight to reach the lower parts of the plants. When air can move freely between plants, it helps keep leaves dry and reduces the chances of fungal diseases.
By limiting the number of plants in the bed, each plant has a better chance to develop strong roots and produce a large harvest later in the season.
Digging Deep Planting Holes
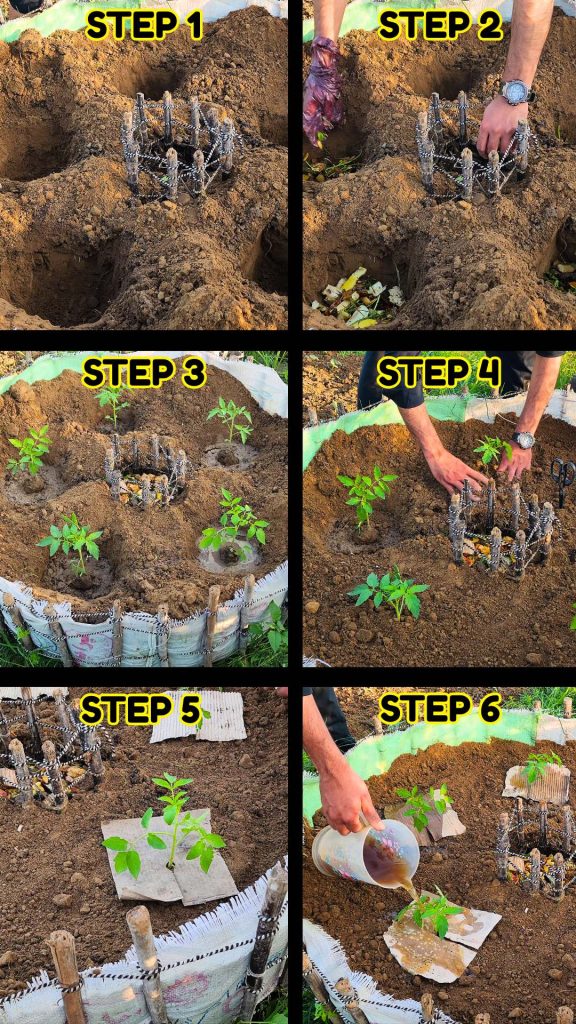
Once the spacing is decided, the next step is digging the planting holes. Instead of shallow holes, deeper holes are made at each planting spot. These holes go further down into the soil than the normal planting depth.
The idea behind this method is to create a small nutrient zone underneath each plant. Deep holes also allow the tomato stem to be buried deeper, which helps the plant develop additional roots along the buried stem.
Each hole should be wide enough to comfortably hold the seedling and deep enough to allow extra soil and organic matter to be placed below the plant. Since the bed in this example contains five plants, five deep holes are prepared.
Digging deep holes may take a little extra effort at the beginning, but it helps the plants grow stronger over time. The deeper soil also stays cooler and holds moisture longer, which benefits the roots during warm weather.
Using Fruit Peels as Natural Fertilizer
Kitchen waste can be surprisingly useful in the garden. Fruit peels are rich in natural nutrients that plants can use as they break down in the soil. Instead of throwing these scraps away, they can be used to feed the soil.
A small amount of fruit peels is placed at the bottom of each planting hole. Banana peels, apple skins, and other fruit scraps work well for this purpose. These materials slowly decompose and release nutrients like potassium and other minerals into the soil.
It is important not to add too much kitchen waste at once. A small handful in each hole is enough. Large amounts of fresh scraps may take longer to break down and can create heat while decomposing.
Once the fruit peels are placed in the hole, they act like a slow-release fertilizer. Over time they become part of the soil and help nourish the plant roots.
Creating a Soil Barrier Over the Kitchen Waste
After placing fruit peels in the holes, the next step is covering them with soil. A thick layer of soil is placed on top of the kitchen scraps before the seedling is planted.
This soil layer acts as a protective barrier between the fresh organic material and the young plant roots. Fresh scraps need some time to start decomposing properly, and direct contact with very young roots is not always ideal.
By adding a good layer of soil above the fruit peels, the plant roots stay separated from the scraps in the early days. As time passes and the scraps begin to break down, the nutrients slowly move into the surrounding soil.
After about ten to fifteen days, it becomes perfectly safe if the roots grow deeper and reach that area. By then the decomposition process has already started, and the soil becomes richer with nutrients.
Adding Compost Tea to Improve Soil Life
Healthy soil is full of microscopic life. Bacteria, fungi, and other tiny organisms help break down organic matter and make nutrients available to plants. Compost tea is a simple way to encourage this activity in the soil.
Compost tea is made by soaking compost in water for some time. During this process the water absorbs nutrients and beneficial microbes from the compost. The liquid can then be poured directly into the soil around plants.
Before placing the tomato seedlings in the holes, a small amount of compost tea is poured into each hole. This adds moisture and introduces helpful microorganisms into the soil environment.
These microbes begin working right away. They help break down organic matter and improve nutrient availability for the plant roots. Healthy soil life also supports stronger plant growth throughout the season.
Planting Tomato Seedlings Deep in the Soil
Tomatoes have a special growing habit that makes them different from many other plants. When part of the tomato stem is buried under soil, it can grow additional roots from that buried section.
Because of this, tomato seedlings benefit from being planted deeper than they were growing in their original containers. Before planting, the lower leaves of the seedling are gently removed.
Once the lower leaves are removed, the plant can be placed deeper into the hole. The stem that goes under the soil will eventually develop extra roots. These additional roots strengthen the plant and allow it to absorb more nutrients and water.
After positioning the seedling in the hole, the remaining space is filled with soil. The soil is gently pressed around the plant to remove large air pockets while keeping the soil loose enough for roots to grow.
Planting tomatoes this way often results in stronger plants that are more stable and productive.
Mulching the Soil With Cardboard
Mulching is an important step in maintaining healthy soil conditions. A layer of mulch protects the soil surface and offers several benefits for plant growth.
One simple material that works well as mulch is cardboard. Pieces of cardboard can be cut and placed around the base of the plants. A small opening is made in the center so the plant stem can pass through.
Once placed on the soil surface, cardboard blocks sunlight from reaching the soil. This prevents most weed seeds from germinating and reduces the need for frequent weeding.
Cardboard also helps retain moisture in the soil. Water evaporates more slowly when the soil is covered, which keeps the root zone moist for a longer period. Over time the cardboard softens and begins to break down, adding organic matter back into the soil.
This makes it both a protective layer and a future soil amendment.
Recent Posts
You don't need to buy a lot of compost or fertilizer to prepare a good garden bed. If you have leaves, kitchen scraps, and other plant waste, you can use them to improve your soil and feed future...
I had an old rice storage sack that I wasn't using anymore, so I decided to turn it into two small raised garden beds. I cut the sack in half, used some bamboo sticks to hold everything in place, and...