
In many gardens, there are plants that appear without invitation. They grow quickly, spread easily, and are usually removed without a second thought. Most of the time, these plants are labeled as weeds and thrown away. But every now and then, one of these unnoticed plants turns out to be far more valuable than expected.
This is exactly what happened with a small, soft green plant that looked very similar to fenugreek. It had delicate trifoliate leaves and blended perfectly with the rest of the garden. At first, it seemed like nothing more than another weed competing for space. But a closer look revealed something that completely changed its importance.
Identifying Burr Medic in the Garden
When the plant was pulled from the soil, its roots told a different story. Tiny round nodules were attached along the root system. These nodules were not just random growths; they were a sign of something important happening beneath the surface.
This plant turned out to be burr medic, also known as Medicago or bur clover. It belongs to the legume family, a group of plants known for their unique relationship with soil bacteria. These bacteria live inside the root nodules and have the special ability to fix nitrogen from the air.
This natural process allows the plant to take nitrogen, which is normally unavailable in the air, and convert it into a form that plants can use. Because of this, legumes are often considered beneficial plants for improving soil fertility.
Understanding the Power of Nitrogen Fixation
Nitrogen is one of the most essential nutrients for plant growth. It plays a major role in the development of leaves, stems, and overall plant health. When plants receive enough nitrogen, they grow greener, stronger, and more productive.
In the case of burr medic, the nitrogen fixed by the bacteria is not only used by the plant itself but is also stored within its tissues. This means that the leaves, stems, and roots all contain valuable nutrients that can later be returned to the soil.
Instead of removing and discarding such a plant, it makes far more sense to use it as a resource. By doing so, the nutrients captured by the plant can be recycled back into the garden.
Changing the Way We See Weeds
The discovery of burr medic’s benefits naturally leads to a shift in perspective. Not all weeds are harmful or useless. Some of them play an important role in improving soil health and supporting plant growth.
Rather than treating every unwanted plant as a problem, it can be helpful to observe and understand what it offers. In many cases, these plants can be used to create natural fertilizers, compost material, or mulch.
This approach not only reduces waste but also supports a more balanced and sustainable gardening system. It encourages working with nature instead of constantly trying to control it.
Collecting and Preparing the Plant Material
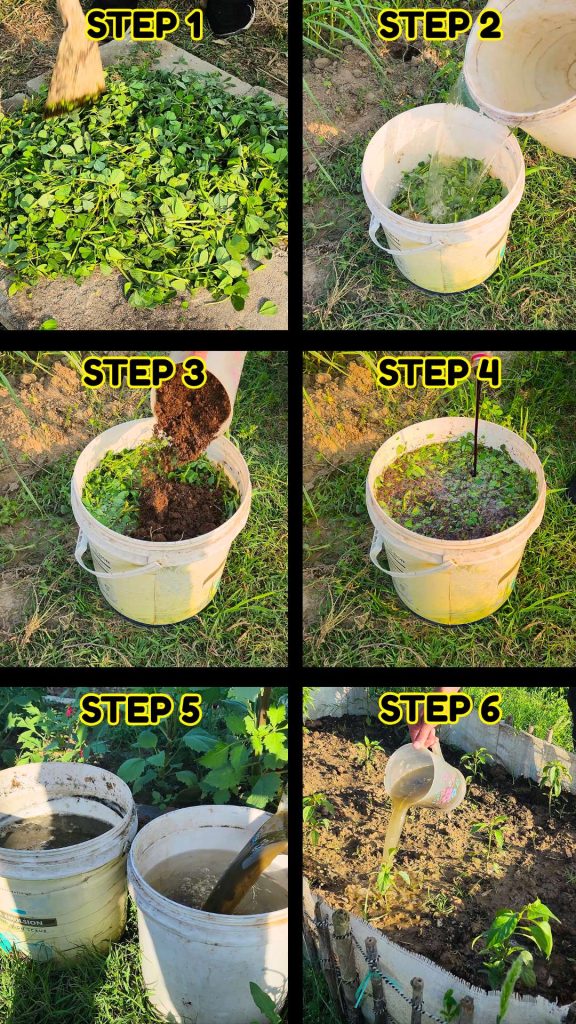
Once the value of burr medic is understood, the next step is to make use of it. The process begins with collecting the plant material from the garden. A good amount should be gathered to ensure that the final result is effective.
After collecting the plants, it is important to remove excess soil. This helps keep the mixture clean and prevents unnecessary dirt from affecting the process. The plants do not need to be perfectly cleaned, but shaking off loose soil is enough.
The collected material is then prepared for further use. Instead of leaving it whole, it is chopped into smaller pieces. This step is simple but very important.
Why Chopping Makes a Difference
Cutting the plant into small pieces increases its surface area. This allows water and microorganisms to interact more easily with the plant material. As a result, nutrients are released more efficiently during the process.
Smaller pieces also break down faster, which speeds up the overall preparation. The goal is to make it easier for the plant material to decompose and release its stored nutrients into the liquid.
This step does not require precision. Rough chopping is enough to get the desired results.
Setting Up the Liquid Fertilizer Mixture
After chopping the plant material, it is placed into a container. This can be a bucket, drum, or any large vessel depending on the quantity being prepared.
Water is then added until all the plant material is fully submerged. This is important because exposure to air can slow down the breakdown process. Keeping everything under water creates the right environment for fermentation.
The water acts as a medium that extracts nutrients from the plant material over time.
Boosting the Process with Compost and Molasses
To improve the quality of the liquid fertilizer, a small amount of compost is added to the mixture. Compost contains beneficial microorganisms that help break down organic matter more effectively.
These microorganisms play a key role in converting the plant material into a nutrient-rich solution. Without them, the process would still happen, but it would be slower and less efficient.
Molasses is also added to the mixture. It serves as a food source for the microorganisms, helping them grow and multiply quickly. With more active microbes, the breakdown process becomes faster and more complete.
Together, compost and molasses create an ideal environment for fermentation.
The Fermentation Process and What to Expect
Once everything is mixed well, the container is covered loosely. It should not be sealed tightly because gases will be produced during fermentation. Allowing some airflow prevents pressure buildup.
The mixture is then left undisturbed for about two weeks. During this time, microorganisms begin breaking down the plant material. Nutrients are released into the water, gradually turning it into a concentrated liquid fertilizer.
It is normal for the mixture to develop a strong smell. This is a sign that fermentation is active and progressing as expected. While the smell may not be pleasant, it indicates that the process is working.
Recognizing When the Fertilizer Is Ready
After about two weeks, the mixture changes noticeably. The liquid becomes darker in color and appears rich and concentrated. This is a clear indication that nutrients have been successfully extracted from the plant material.
At this stage, the liquid can be used as fertilizer. Some people prefer to strain it to remove solid pieces, while others use it directly without straining.
Both methods are effective, depending on personal preference.
The Importance of Dilution Before Use
Although the liquid fertilizer is rich in nutrients, it is too strong to be used directly on plants. Applying it without dilution can damage plant roots and cause stress.
To make it safe, the concentrated liquid is mixed with water. A common ratio is one to two cups of the fertilizer in a bucket of water. This creates a balanced solution that plants can absorb easily.
Dilution ensures that plants receive nutrients in a gentle and effective way.
Benefits for Plant Growth and Health
Using this natural fertilizer provides several benefits. The most noticeable is improved plant growth. Plants treated with this solution often show greener leaves, stronger stems, and better overall development.
The nitrogen content supports leaf growth, which is especially important for vegetables and leafy crops. In addition to nitrogen, the liquid also contains other nutrients and organic compounds that contribute to plant health.
Recent Posts
How to Protect Tomatoes and Peppers From Extreme Heat Stress | Summer Garden Survival Tips
Tomatoes and peppers are warm-season crops, but there is a limit to how much heat they can handle. When temperatures stay very high for many days in a row, especially during June, July, and August,...
Yellow Cucumber Leaves? I Tried 3 Simple Fixes and the Results Surprised Me
Yellowing leaves on cucumber plants are usually a sign that something in the growing conditions is not right. Cucumbers are fast-growing and sensitive plants, so even a small imbalance in water,...