
Growing healthy pepper plants does not always require expensive fertilizers or complicated techniques. Sometimes, the simplest methods work the best. One such method uses organic material placed directly into the soil to slowly feed plants over time. It is practical, low-cost, and easy to follow, making it suitable for both beginners and experienced gardeners. This approach focuses on working with nature instead of relying heavily on store-bought inputs.
Pepper plants, whether they are chili peppers or bell peppers, need consistent nutrients to grow well. Instead of feeding them again and again from the top, this method allows nutrients to be released slowly from below. The result is steady growth, healthier roots, and improved soil quality.
Understanding the Idea Behind the Method
The basic idea is simple. Organic materials such as leaves, vegetable scraps, and plant waste are buried in the soil. Over time, these materials break down and turn into compost. As they decompose, they release nutrients that plants can absorb through their roots.
This process is not new. It is similar to how natural ecosystems work. In forests, fallen leaves and plant matter decompose on the ground, enriching the soil without any human effort. By copying this process in your garden, you create a self-feeding system that supports plant growth for weeks or even months.
One important thing to understand is that fresh organic material does not immediately provide nutrients. It needs time to break down first. That is why proper placement and timing are important.
Preparing the Garden Bed for Planting
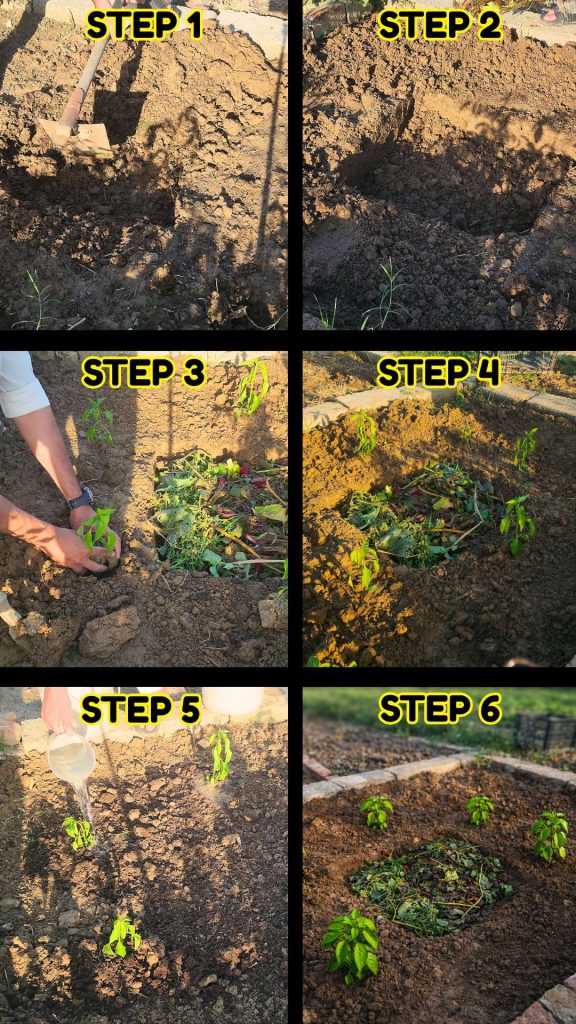
Start by choosing a suitable spot in your garden bed. The soil should be loose and well-drained. If the soil is too hard, it will be difficult for roots to grow and for organic material to break down properly.
Dig a hole in the center of the bed. The depth should be around 4 to 6 inches. This depth is enough to hold a good amount of organic material while still keeping it close to the plant roots. As you dig, keep the removed soil aside. It will be used later to cover the hole.
Make sure the hole is not too shallow, as this can expose the material, and not too deep, as it may slow down the decomposition process. A balanced depth ensures proper moisture and airflow.
Choosing the Right Organic Materials
One of the best things about this method is flexibility. You can use a wide range of organic materials that are easily available. Dry leaves, grass clippings, dead plants, fruit peels, vegetable scraps, and even slightly rotten produce can all be used.
Avoid adding materials that may attract pests or take too long to decompose, such as large branches or oily food waste. Stick to simple, natural materials that break down easily.
Mixing green and brown materials is a good idea. Green materials like fresh leaves and vegetable scraps provide nitrogen, while brown materials like dry leaves provide carbon. This balance helps the decomposition process happen more smoothly.
Filling the Hole with Organic Matter
Once you have collected your materials, start filling the hole. Do not pack everything too tightly. Leave a little space for air, as oxygen is needed for proper decomposition.
Layering the materials can also help. For example, you can place a layer of dry leaves first, followed by kitchen scraps, and then another layer of leaves. This creates a balanced environment for microbes to work.
After filling the hole, the material may look rough and uneven, but that is completely fine. It will settle down over time as it starts to break down.
Planting Pepper Seedlings Around the Hole
Now it is time to plant your pepper seedlings. Instead of placing them directly into the hole, plant them around it. This allows the roots to grow towards the organic material as it decomposes.
Keep a small distance between the seedlings and the hole. The roots should be close enough to benefit later, but not so close that they come into contact with fresh material immediately.
This step is important because fresh organic matter can sometimes produce heat or release compounds that may harm young roots. Giving some space allows the plants to establish themselves safely.
Covering the Hole and Leveling the Soil
After planting the seedlings, take the soil that was set aside earlier and use it to cover the hole. Spread it evenly so that the surface of the bed becomes level again.
This covering layer helps in several ways. It keeps moisture inside, prevents the organic material from being exposed, and reduces the chances of pests. It also gives the garden bed a neat and clean look.
Lightly press the soil to remove large air pockets, but do not compact it too much. The soil should remain loose enough for roots to grow easily.
Adding Compost or Manure on Top
A thin layer of well-decomposed compost or manure can be added on top of the soil. This step is optional but highly beneficial. It introduces helpful microbes that speed up the decomposition process happening below.
These microbes play an important role in breaking down organic matter into nutrients that plants can absorb. They also improve soil structure and support overall plant health.
Make sure the compost or manure is fully decomposed. Fresh manure can be too strong and may harm the plants.
Watering and Maintaining Moisture
Watering is a key part of this method. After planting and covering the hole, give the area a good watering. This helps settle the soil and starts the decomposition process.
Keep the soil consistently moist but not waterlogged. Too much water can reduce oxygen levels in the soil, slowing down decomposition. Too little water can stop the process altogether.
Regular watering ensures that microbes remain active and continue breaking down the organic material efficiently.
Recent Posts
This Simple Homemade Liquid Fertilizer Uses Rice Water and Expired Coffee to Feed Plants Naturally
Many people think good plant growth always depends on expensive fertilizers or store-bought plant foods. But in reality, some of the most useful things for plants are already available in the...
I Buried a PVC Pipe in My Garden and It Completely Changed My Soil Health (Easy Compost Hack)
This method is based on a very simple idea: instead of throwing kitchen waste away, you give it a dedicated place inside your garden where it slowly turns into plant food. A PVC pipe is used as a...