
The quest for the perfect tomato harvest is a journey of continuous experimentation, learning, and soil mastery. While standard planting methods often yield decent results, maximizing the genetic potential of a tomato plant requires a deeper understanding of its unique biology and nutritional cravings. Tomatoes are heavy feeders with a remarkable ability to adapt to their environment, provided they are given the right foundation.
By shifting away from conventional surface planting and focusing instead on a specialized sub-surface nutrient zone, you can establish an environment where your plants thrive independently for months. This comprehensive guide details a highly effective, nature-based methodology designed to build a massive root system, supply long-lasting essential minerals, and unlock a prolific fruit yield.
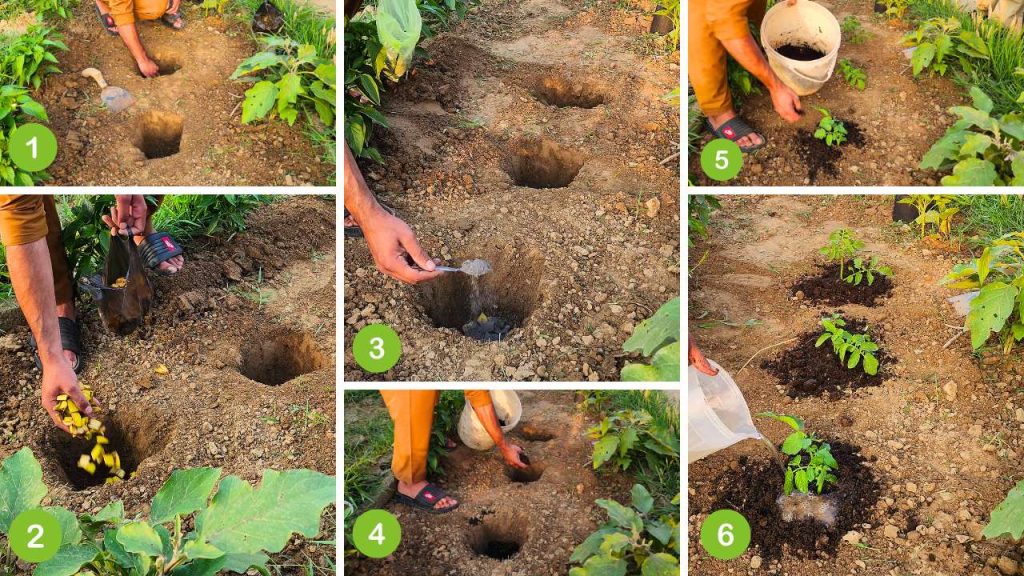
The Power of Deep Planting and Root Expansion
The foundational step of this methodology begins with a dramatic departure from how most vegetable crops are handled. Instead of placing the tomato transplant level with the surrounding soil, you must dig a deep, spacious hole tailored specifically to the height of the individual plant. The goal is to bury approximately half to two-thirds of the entire stem underground. While burying the stem of most plants would cause them to rot and die, tomatoes possess a fascinating biological superpower: the ability to develop adventitious roots.
Adventitious roots are roots that grow from non-root tissue, such as stems or leaves, when placed in contact with moisture and soil. When you bury a long segment of a tomato stem, every single tiny hair along that stem transforms into a brand-new root node. Within a couple of weeks, the underground portion of the plant multiplies its root surface area exponentially.
This massive, deep root system provides several game-changing advantages for the plant’s life cycle. First, it anchors the heavy, fruit-laden vine firmly into the earth, allowing it to withstand severe summer storms and high winds without snapping or dislodging.
Second, a deeper root system can access moisture stores deep within the water table that shallow-rooted plants cannot reach. This makes your tomatoes highly resilient against heatwaves and temporary droughts, preventing the soil moisture fluctuations that stress the plant. Finally, a vast network of roots maximizes the plant’s surface area for nutrient absorption, creating an incredibly efficient highway system capable of pulling up minerals to feed a heavy canopy of fruit.
Potassium Optimization with Chopped Banana Peels
Once the deep planting holes are prepared, the process focuses on creating a targeted, slow-release nutrient reservoir at the very bottom, right where the deepest roots will eventually establish. The first layer of this reservoir consists of a generous handful of chopped banana peels. Utilizing banana peels in the planting hole is not just a sustainable way to recycle kitchen waste; it is a highly calculated method of delivering localized potassium directly to the root zone.
Potatoes, peppers, and tomatoes are all members of the Solanaceae family, and they all share an intense craving for potassium, particularly when transitioning from vegetative growth to fruit production. Potassium plays a vital role in regulating the opening and closing of stomata, which are the tiny pores on the leaves that manage gas exchange and water evaporation.
Without adequate potassium, a tomato plant cannot efficiently regulate its internal water pressure, leading to wilting, poor nutrient transport, and stunted growth. Furthermore, potassium is directly responsible for the synthesis of sugars and starches within the plant. It drives the sizing, sweetness, and overall quality of the tomato fruits, ensuring that the clusters are dense, flavorful, and numerous.
Chopping the banana peels into small pieces before placing them in the hole is essential because it increases the surface area available to soil microbes. As these peels steadily decompose in the dark, consistently moist subsoil, they release a steady stream of potassium alongside valuable micronutrients like magnesium, manganese, and iron.
Magnesium is the central atom in the chlorophyll molecule, meaning it is directly responsible for the plant’s ability to photosynthesize and create food from sunlight. Because the peels are buried deeply beneath a thick layer of soil, they break down at a controlled, gradual pace, providing a long-term nutritional foundation that feeds the plant from the bottom up precisely when the demand for fruiting peaks.
Defending Against Disease with Mineral-Rich Wood Ash
Directly on top of the chopped banana peels, the next step introduces a highly concentrated mineral supplement: one to two tablespoons of clean wood ash. Wood ash derived from burning hardwoods is a traditional gardening amendment that offers profound benefits when used with strict moderation. At the root level, its primary contribution is a substantial dose of readily available calcium carbonate, alongside supplementary potash and trace minerals.
Calcium is arguably the most critical structural nutrient for a developing tomato plant. It is essential for cell division and the building of strong, rigid cell walls throughout the plant’s stems, leaves, and fruits. A severe lack of calcium, or an inability of the plant to transport calcium efficiently, leads to one of the most frustrating conditions a gardener can face: blossom-end rot. This physiological disorder manifests as a flat, black, leathery patch on the bottom of the tomato fruit, rendering it completely inedible.
By strategically placing a small amount of wood ash directly into the planting hole, you ensure that as the new adventitious roots push downward, they immediately encounter a rich source of calcium. This localized placement allows the plant to absorb the mineral during its critical early growth stages, embedding structural strength into the very first clusters of fruit.
Additionally, wood ash has a natural alkalizing effect, which can gently optimize the pH of the immediate root zone to enhance nutrient availability, provided your baseline soil isn’t already excessively alkaline. Because wood ash is highly alkaline and potent, limiting the application to just one or two tablespoons prevents it from shifting the soil chemistry too drastically or shocking the delicate, microscopic root hairs.
Creating a Biological Buffer Layer with Compost
With the raw banana peels and concentrated wood ash sitting at the bottom of the hole, it is critical to introduce a protective, nutrient-dense buffer before setting the plant in place. This is achieved by covering the amendments completely with a layer of fully decomposed manure or high-quality compost. This step bridges the gap between raw organic materials and the living plant tissue.
Raw amendments like wood ash and decomposing fruit peels can occasionally create localized zones of intense microbial activity or minor pH spikes that might stress tender, young roots upon direct contact. A layer of well-rotted compost or manure acts as a safe, stabilizing cushion.
Compost is inherently balanced, rich in humic acids, and packed with billions of beneficial soil microbes, fungi, and protozoa. When placed over the amendments, these microbes immediately go to work, safely processing the underlying nutrients and converting them into water-soluble forms that the plant can easily absorb.
Furthermore, fully decomposed organic matter functions like a biological sponge. It has an exceptional capacity for moisture retention and cation exchange, meaning it holds onto both water and nutrient ions tightly, preventing them from leaching away into the deeper subsoil during heavy rains. This buffer layer ensures that the transplant enters a cozy, familiar environment filled with gentle, slow-release nitrogen, phosphorus, and trace elements, allowing the plant to settle in smoothly without experiencing transplant shock.
Strategic Planting, Top-Dressing, and Early Care
With the nutrient reservoir fully assembled and insulated by compost, the tomato plant can finally be set into the hole. If the transplant is root-bound in its starter pot, gently tease the outer roots to encourage them to spread outward into their new home. Hold the plant straight and fill the remaining space with the native garden soil, firmly but gently patting it down to eliminate large air pockets while ensuring the lower half of the stem is completely submerged.
Once the hole is filled, apply a small, additional top-dressing of compost around the base of the plant on the soil surface. This top-dressing serves a dual purpose. On the surface, it acts as a light, nutrient-rich mulch that helps shade the soil, reducing water evaporation and keeping the shallow root zone cool under the sun. Secondly, as you water the garden over time, the nutrients from this top layer will slowly wash downward, feeding the newer roots that develop near the surface of the soil.
The final, vital component of this methodology is the initial watering and subsequent moisture management. Immediately after planting, give the tomato a deep, thorough soaking. This heavy watering is crucial because it settles the shifted soil directly against the buried stem, ensuring immediate contact and triggering the adventitious root development process.
Recent Posts
The Secret Homemade Liquid Fertilizer That Can Boost Flowering, Fruiting, and Plant Growth Naturally
Many of the materials we throw away in the kitchen still contain nutrients that can be useful in the garden. Onion peels and potato peels are good examples. Instead of sending them to the trash, you...
I Mixed Yogurt, Molasses & Compost Tea for 24 Hours… The Results Changed My Garden Soil
Healthy soil is much more than a mixture of sand, silt, clay, and organic matter. It is a living ecosystem filled with bacteria, fungi, protozoa, nematodes, and many other microscopic organisms....