
In a world dominated by automated gadgets and expensive irrigation systems, it is easy to forget that nature operates on simple physical principles. For backyard gardeners, keeping up with a strict watering schedule during the peak of summer is a relentless chore. Soil can dry out in hours, leaving crops stressed and vulnerable. While commercial drip kits and electronic timers exist, they are costly and require complex installation.
Fortunately, you do not need expensive technology to maintain a perfectly hydrated garden. By looking at household waste through a lens of resourcefulness, you can repurpose basic items to build a functional, self-regulating irrigation network.
Utilizing discarded plastic beverage containers to manage soil moisture is a premier example of practical sustainability. This approach solves two problems at once: it keeps single-use plastics out of landfills and provides your plants with a steady, metered supply of water directly at the root zone.
The beauty of a homemade capillary watering system lies in its passivity. It requires no electricity, no plumbing, and no financial investment. Instead, it relies on fundamental laws of nature—specifically capillary action and gravity—to transport moisture from a central reservoir straight into the dirt. This low-tech strategy mimics the gentle, consistent moisture levels found in natural environments, preventing the harsh shock of the dry-and-drench cycle.
Understanding the Science of Capillary Action and Gravity
To appreciate why this simple setup is so effective, it helps to understand the underlying mechanics. The entire system is driven by a natural phenomenon known as capillary action, or wicking. Capillary action occurs when the adhesive forces between a liquid and a solid material are stronger than the cohesive forces holding the liquid molecules together. When a porous material like a rope comes into contact with water, the water molecules naturally cling to the microscopic fibers and pull themselves upward, climbing through the gaps against the force of gravity.
However, capillary action alone can only carry water so far. If you try to wick water upward out of a deep bucket resting on the ground, the water might only travel a few inches before gravity halts its progress. This is where strategic elevation becomes critical. By lifting the water reservoir above the level of the soil, you turn gravity from an obstacle into an ally.
When the plastic bottle is elevated, the water climbs over the rim via capillary action and then begins its downward journey toward the plant. At this point, gravity takes over, pulling the water down the slope of the cord. The rope acts as a controlled pipeline, regulating the speed of the water flow.
Because dry soil naturally acts like a sponge, it exerts a continuous pull on the wet end of the rope, drawing the moisture into the dirt. This creates a beautifully balanced loop: as long as the soil is dry, it draws moisture; once it becomes sufficiently damp, the pulling force decreases, preventing waterlogging.
Gathering Your Materials from Around the House
One of the greatest advantages of this project is that you do not need to make a trip to the store. Every component can be salvaged from common household items. The foundation is a clean plastic bottle. Any standard beverage bottle will suffice, though larger containers like a two-liter soda bottle or a gallon jug are preferred because they hold a greater volume of water, meaning you will need to refill them less frequently. Wash the bottle thoroughly with warm water to remove any sugary residue, which can breed bacteria and attract pests like ants to your crops.
The next essential item is the wick material. You will need a long, continuous piece of rope or a strip of fabric. Through practical testing, standard braided or twisted rope consistently outperforms a piece of cloth.
Many types of cloth, especially cotton from old clothing, tend to rot quickly when buried in damp soil. Furthermore, tightly woven fabric strips can restrict the smooth movement of water. A medium-thickness utility rope, nylon cord, or natural jute twine offers a much cleaner, more durable channel for steady water transit.
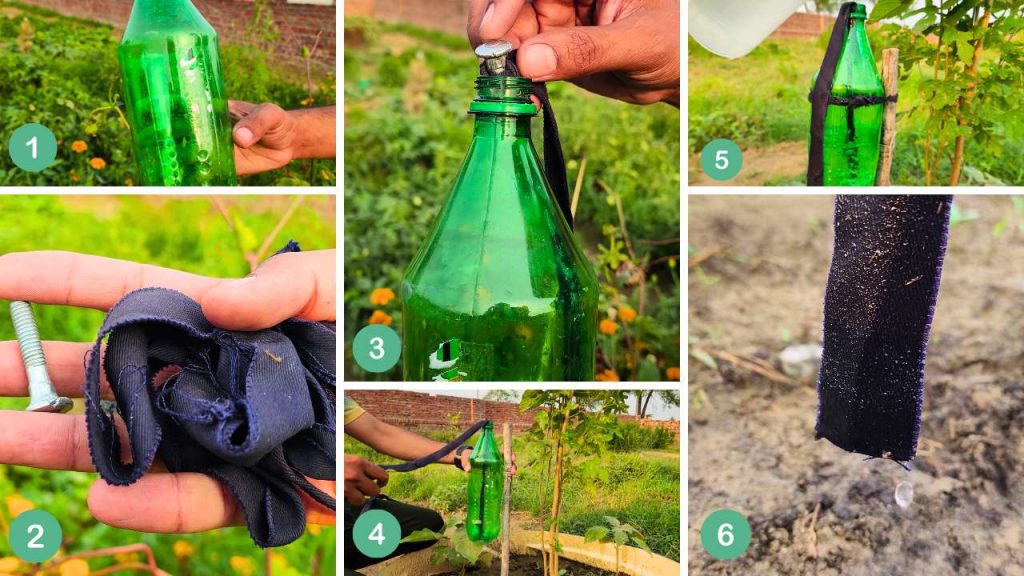
Finally, you will need a small, heavy object to act as an anchor, along with a support structure to lift the bottle. For the anchor, a heavy metal nut, a large bolt, or a heavy washer works perfectly to keep the rope pinned to the bottom of the container.
To elevate the bottle, look for sturdy items around your yard. A brick, a concrete block, or an upside-down terracotta pot can serve as a steady platform. If you prefer to suspend the bottle, a thick wooden stake or a strong garden stick tied to the bottle will do the job beautifully.
Step-by-Step Assembly of Your DIY Irrigation System
Building this self-watering device takes less than five minutes. First, prepare your plastic bottle. Cut an opening near the top, either slicing off the top quarter completely or cutting a wide window into the shoulder of the container. This opening allows you to easily drop your weighted rope inside and creates a wide target for pouring in fresh water later.
Next, cut a length of rope that is long enough to reach from the very bottom of your plastic bottle, up over the top edge, and down into the soil of your target plant. Always err on the side of making the rope a little too long, as you can easily bury the excess, whereas a short rope will fail to deliver water. Take your heavy bolt or metal nut and tie it securely to one end of the rope. Drop this weighted end directly into the bottle so it sits flat against the absolute lowest point.
Now, establish the high ground. Position your elevation platform right next to the plant you want to water. Place your prepared plastic bottle firmly on top of this platform. If you are using a stake instead, drive it deep into the ground and use twine or zip-ties to securely lash the bottle to the stake a few inches above the soil line. Ensure the setup is stable and won’t tip over when filled with water.
Take the loose, dangling end of the rope and guide it over toward the base of your plant. Instead of laying it loosely on top of the ground, where the sun will evaporate the moisture, you must bury it. Dig a small, shallow hole about two inches deep right in the root zone of the plant.
Tuck the end of the rope deep into this hole and pack the dirt back down firmly over it. Finally, fill the plastic bottle to the brim with clean water. Within minutes, the rope will darken as it drinks up the water, commencing a continuous, slow-drip feeding process straight to the roots.
Recent Posts
The Secret Homemade Liquid Fertilizer That Can Boost Flowering, Fruiting, and Plant Growth Naturally
Many of the materials we throw away in the kitchen still contain nutrients that can be useful in the garden. Onion peels and potato peels are good examples. Instead of sending them to the trash, you...
I Mixed Yogurt, Molasses & Compost Tea for 24 Hours… The Results Changed My Garden Soil
Healthy soil is much more than a mixture of sand, silt, clay, and organic matter. It is a living ecosystem filled with bacteria, fungi, protozoa, nematodes, and many other microscopic organisms....