
Growing heavy-feeding vegetables like tomatoes, cucumbers, and peppers requires a massive amount of soil energy. These plants grow fast, produce heavy fruits, and constantly pull raw nutrients out of the earth. When the soil runs out of energy, plant growth slows down, leaves turn pale, and the plants become highly vulnerable to pests and diseases. Many growers buy expensive chemical liquids to force their plants to grow.
However, you can achieve much better, long-lasting results by using a simple homemade liquid fertilizer. By combining basic kitchen staples with organic garden materials, you can create a powerful mixture that feeds the soil, protects the leaves from disease, and delivers deep nutrition directly to the plant. This method relies on one and a half liters of clean water, ten tablespoons of brown sugar, two tablespoons of pure baking soda, ten liters of dilution water, and three liters of homemade weed tea.
The Role of Brown Sugar in Soil Health
When you mix ten tablespoons of brown sugar into your garden water, you are not directly feeding the plant itself. Plants produce their own sugars naturally through the daily process of photosynthesis. Instead, the brown sugar is used to feed the living soil ecosystem.
Healthy garden dirt is not just dead rock and dust; it is packed with billions of microscopic living organisms. These beneficial bacteria and fungi are the true workers of your garden. Their job is to eat dead plant matter, compost, and raw minerals, breaking them down into simple chemical elements that your plant roots can easily absorb.
If these soil microbes are starving or slow, your vegetable plants will also starve, no matter how much raw compost you put on top of the ground. By dissolving brown sugar in water and applying it to the garden, you provide a massive, instant dose of simple carbohydrates directly to this soil food web.
The bacteria consume the sweet liquid and multiply at an incredibly fast rate. With a massive population of active, hungry microbes working in the dirt, the breakdown of organic matter speeds up rapidly. This process quickly releases locked-up nitrogen, phosphorus, and potassium right next to the roots.
Furthermore, a highly active microbe population physically changes the soil structure. They create sticky substances that bind dust particles together into small clumps, leaving open spaces for air and water to flow. This makes the soil soft, spongy, and capable of holding moisture for a much longer time during hot summer days.
Controlling Garden Diseases with Baking Soda
Fungal diseases can destroy an entire season of hard work in just a few days. Conditions like powdery mildew cover the green leaves in a thick white dust, which completely stops the plant from absorbing sunlight. Early blight causes dark spots on lower tomato leaves that quickly spread upward, turning the plant yellow and causing the leaves to die and fall off. Fungal spores blow through the air and land on your plants, waiting for the perfect conditions to grow. Fungi almost always require a damp, slightly acidic environment to survive and multiply on a leaf surface.
This is exactly why two tablespoons of baking soda are included in this mixture. You must ensure you are using pure sodium bicarbonate, which is standard baking soda, and never baking powder. Baking powder contains extra starches and acidic chemicals that will ruin the recipe and harm the plant. Baking soda is naturally alkaline. When you dissolve it in water and apply it to your garden, it actively raises the pH level of the leaf surface and the topsoil.
Because fungal spores cannot survive in an alkaline environment, the baking soda literally burns the spores and stops them from growing into an active infection. Using baking soda will not harm your vegetable plants; it simply alters the surface environment to make it impossible for fungus to live there. It acts as an invisible, non-toxic shield that stops diseases before they can ruin your harvest.
Extracting Deep Nutrition with Weed Tea
The core nutritional base of this organic fertilizer is three liters of fermented weed tea. Weeds are incredible survival plants. Wild plants like dandelions, stinging nettles, thistles, and wild grasses grow thick, aggressive taproots that push deep past the shallow topsoil. They reach far down into the subsoil to pull up valuable trace minerals, iron, calcium, potassium, and raw nitrogen that regular vegetable roots simply cannot reach. When you pull these weeds out of your garden, you are holding a dense package of stored plant nutrition. Throwing weeds in the trash is a waste of a highly valuable resource.
To extract these nutrients, you soak the pulled weeds in buckets of water and allow them to ferment over several weeks. As the green plant matter breaks down and decays in the water, it releases all of its stored minerals into the liquid, creating a dark, rich weed tea. This liquid is a highly potent fertilizer on its own.
However, raw weed tea nutrients still need to be processed by the soil before the plant can use them. By combining your homemade weed tea with the microbe-boosting brown sugar, you create a perfect system. The sugar ensures that there is a massive army of soil bacteria ready and waiting to process every single mineral found inside the weed tea, handing those nutrients directly to the roots of your tomatoes and cucumbers.
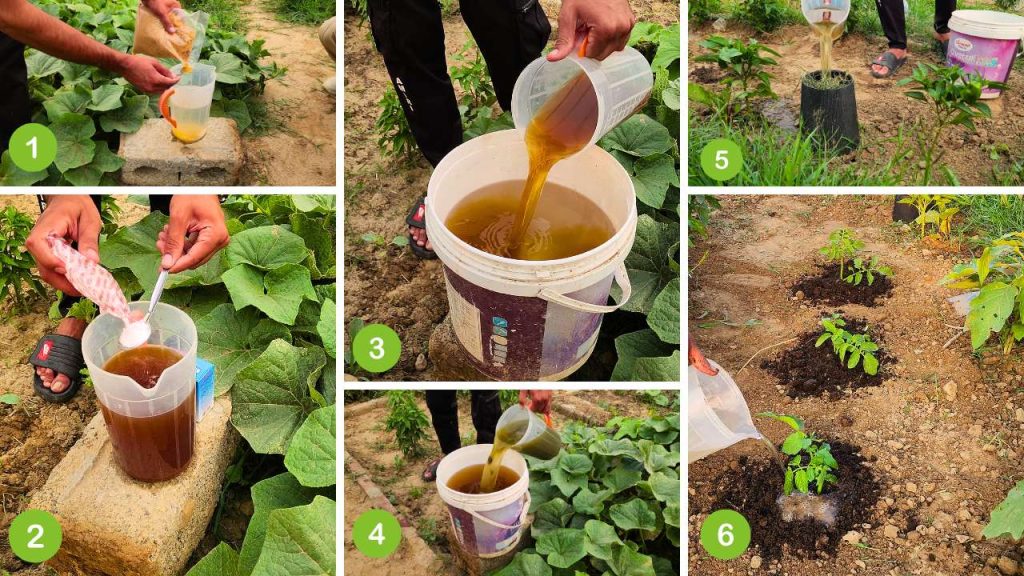
Step by Step Fertilizer Mixing Instructions
Mixing this fertilizer requires a specific process to ensure all the dry ingredients dissolve completely. Start by finding a small bucket or mixing bowl and pour in one and a half liters of clean water. It is very important to use clean water. If you use standard city tap water, you should let it sit in an open bucket for at least twenty-four hours before using it. This allows the chlorine gas to evaporate into the air. Chlorine is designed to kill bacteria, which means it will kill your soil microbes and ruin the effect of the brown sugar.
Once your water is clean, add the ten tablespoons of brown sugar. Take a stick or spoon and stir this for several minutes. Brown sugar tends to clump together, so you must mix it until every single grain has dissolved and the water is smooth and sweet. Next, add the two tablespoons of pure baking soda into the sugar water. Stir the liquid again vigorously until the water becomes clear and no white powder settles at the bottom. This liquid is your active concentrate.
Now, prepare a large garden bucket or a big plastic container. Fill this large container with ten liters of clean, unchlorinated water. Pour your sweet baking soda concentrate directly into these ten liters and give it a gentle stir to mix it in. Finally, measure out three liters of your prepared, dark weed tea. Pour the weed tea into the large container with the rest of the mixture. Use a large stick to stir the entire batch deeply. You now have over fourteen liters of highly active, disease-fighting, nutrient-rich liquid ready to apply to the garden.
Applying the Mixture Directly to the Root Zone
The most common way to use this mixture is to pour it directly onto the dirt around the base of your plants. This technique is called a soil drench. When you pour the liquid onto the ground, the brown sugar immediately makes contact with the topsoil, waking up the dormant bacteria. The weed tea sinks deep into the earth, bringing heavy nitrogen and vital minerals right to the thickest part of the root system. The small dose of baking soda travels with the water, helping to neutralize the soil and stop soil-borne fungal diseases from climbing up the main stem.
To apply the drench, use a small cup or a watering can. Pour about half a liter to a full liter of the mixture around each heavy-feeding plant. You should avoid pouring the liquid directly against the main stalk of the plant. Instead, pour it in a wide circle a few inches away from the stem. This encourages the plant roots to stretch outward to find the water, which builds a wider, stronger root system that anchors the plant securely in the wind. Using this root drench method every two weeks during the main growing season will result in dark green leaves, thick stems, and the energy required to grow massive fruits.
Using a Foliar Spray for Fast Nutrient Absorption
When a vegetable plant is highly stressed, turning yellow, or already showing the early white dust of powdery mildew, pouring fertilizer on the dirt takes too much time. Roots are slow, and it can take days for the nutrients to travel from the soil to the top leaves. For immediate results, you must apply the liquid directly to the plant leaves using a foliar spray method. Plants have tiny microscopic pores on the surface of their leaves called stomata. They can drink water and absorb liquid nutrients directly through these pores.
Before you put this fertilizer into a garden pump sprayer, you absolutely must strain it. Weed tea always contains small pieces of broken leaves, seeds, and dirt. If you pour raw weed tea into a sprayer, these small particles will quickly clog the spray nozzle and ruin your equipment. Pour the liquid through a fine cloth, an old shirt, or a tight mesh sieve to remove all solid pieces.
Once the liquid is totally clear, fill your sprayer. Pump it up and spray your plants until the liquid drips heavily off the branches. You must coat the top of the leaves, but it is even more important to spray the undersides. The undersides of the leaves contain the highest number of stomata pores and are exactly where fungal spores hide from direct sunlight. The leaves will instantly absorb the weed tea and sugar for a fast energy boost. As the water dries, the baking soda will remain on the leaf, creating a strong, invisible barrier that fungal diseases cannot cross.
Recent Posts
Before You Bury Your Next Tomato Plant, Put This Hidden Trick in the Dirt Immediately!
The quest for the perfect tomato harvest is a journey of continuous experimentation, learning, and soil mastery. While standard planting methods often yield decent results, maximizing the genetic...
In a world dominated by automated gadgets and expensive irrigation systems, it is easy to forget that nature operates on simple physical principles. For backyard gardeners, keeping up with a strict...