
Every single day, the average household discards an incredible amount of organic matter that could easily be transformed into high-grade plant nutrition. From vegetable peelings and coffee grounds to the stubborn weeds pulled from garden beds, these items are often viewed as nothing more than garbage.
In reality, they are packed with the exact macro and micronutrients that plants need to thrive. While traditional backyard composting is an excellent practice, it requires significant space, regular physical labor to turn the heavy piles, and months of waiting before the compost is ready to use.
A liquid fertilizer making system offers a faster, easier, and highly concentrated alternative. Often called weed tea or liquid compost, this method extracts nutrients from organic materials and dissolves them directly into water.
Because the nutrients are already suspended in a liquid state, they are immediately bioavailable to your plants. This means that when you water your garden with this homemade tonic, the roots can absorb the food instantly, leading to faster growth, greener leaves, and more abundant harvests.
Building a self-contained liquid fertilizer factory is simple and costs next to nothing. By using a clever, stacked-bucket design, you can create a continuous supply of free organic fertilizer right on your porch, balcony, or garden corner.
This system effectively bridges the gap between waste management and plant care, allowing you to close the sustainability loop in your own home. Whether you are growing a dense patch of backyard vegetables or tending to a few prized houseplants, mastering this liquid brewing method will completely change the way you look at everyday household waste.
Choosing and Preparing the Right Materials
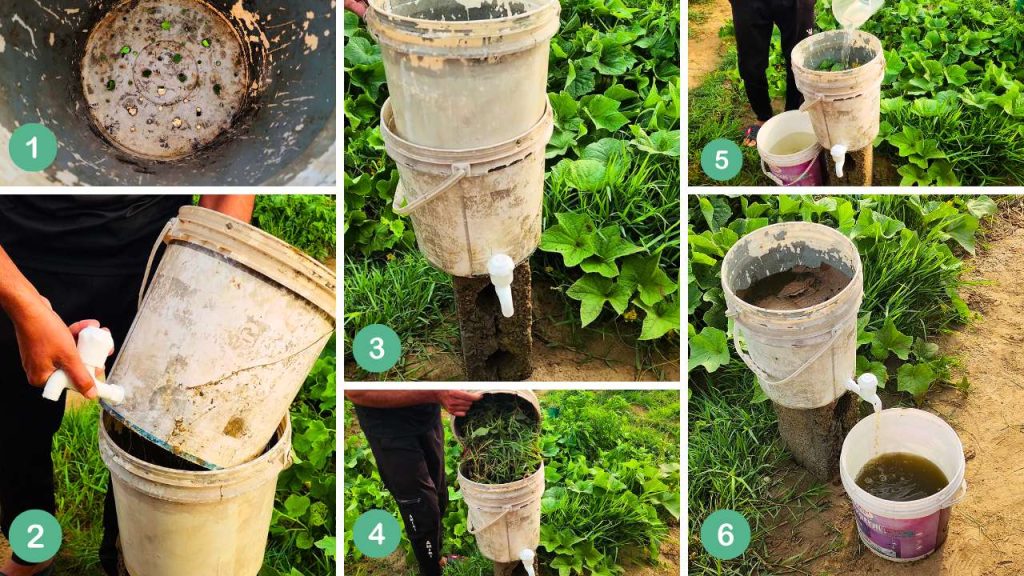
Before assembling your system, you need to gather a few basic tools and materials. The entire structure relies on two heavy-duty plastic buckets of the same size. Standard five-gallon buckets are the perfect choice for this project because they are durable, easy to move, and readily available at local hardware stores or even as leftovers from food-service industries.
You will also need a drill with a few different drill bit sizes, a standard plastic or brass tap or spigot, and a waterproof sealant like silicone or rubber washers to prevent leaks.
The first step in construction focuses on the inner bucket, which will hold your raw organic material. This bucket acts as a colander or filtration chamber. Flip the bucket upside down and use your drill to create a grid of small holes across the bottom surface.
The size of these holes is crucial. They need to be large enough to allow liquid to freely drain through, but small enough that bits of chopped food and shredded weeds cannot slip into the bottom reservoir. A drill bit around one-quarter of an inch is usually ideal for this task. Space the holes a few inches apart so the bottom remains structurally sound but still allows for maximum drainage.
Next, you will modify the outer bucket, which serves as the collection reservoir for the potent liquid fertilizer. This bucket needs a way to release the fluid without you having to lift or tip the heavy, stacked setup. Measure about an inch or two up from the very bottom of the outer bucket and mark a spot for your tap.
Use a spade bit or a hole saw that perfectly matches the diameter of your tap’s threaded end to drill a clean hole. Carefully thread the tap into the hole. To ensure a completely watertight seal that won’t leak onto your patio, place a rubber washer on both the outside and inside of the bucket wall before tightening the locking nut. If you don’t have washers, a generous ring of silicone sealant around the threads will do the trick.
Assembling the Double Bucket Reservoir System
Once both buckets are prepared, it is time to assemble the system. The bucket with the holes in the bottom will slide directly inside the bucket equipped with the tap. Because most standard five-gallon plastic pails are manufactured with a slight taper, the top bucket should naturally nest inside the bottom one while leaving a critical gap of a few inches at the very bottom. This empty space underneath the inner bucket is the reservoir where your weed tea water will pool, safely separated from the solid decomposing matter above.
However, bucket designs can vary depending on the manufacturer. If you find that your two buckets slide completely into each other with no space left at the bottom, the system will not work properly because the solid waste will sit directly in the pooling liquid, causing it to rot anaerobically and create a terrible odor. Luckily, this is incredibly easy to fix.
Simply collect a few flat, clean stones, heavy river pebbles, or a couple of broken brick pieces. Drop these stones into the bottom of the outer bucket before you insert the inner one. The stones will act as a sturdy platform, propping up the inner bucket and guaranteeing that you have a functional, open reservoir space to collect your liquid gold.
This reservoir system is the secret to the entire setup. By keeping the solid waste elevated above the liquid, you allow oxygen to circulate more effectively through the organic matter. This aeration keeps the decomposition process clean and healthy, preventing the sludge-like conditions that attract unwanted pests and foul smells. The liquid that filters down into this space will be clean, clear of large debris, and perfectly positioned to flow right out of the tap whenever you are ready to harvest it.
Selecting and Prepping the Perfect Organic Ingredients
The quality of your liquid fertilizer depends entirely on what you put into the top bucket. To create a well-rounded, balanced plant food, you want to use a diverse mix of green, nitrogen-rich materials and nutrient-dense garden debris.
Your daily kitchen waste is an excellent foundation. Collect items like vegetable peels, fruit cores, apple skins, squash seeds, and used coffee grounds. Avoid adding meats, fats, dairy, or oily foods, as these break down very slowly, smell terrible, and can attract scavengers to your garden setup.
In addition to kitchen scraps, garden leaves and weeds are secret weapons in this system. Gardeners spend hours pulling weeds and throwing them away, not realizing they are discarding valuable nutrients. Many common garden weeds, such as dandelions, stinging nettles, and comfrey, have incredibly long, deep taproots.
These deep roots dig far below the level of normal garden plants, absorbing hard-to-reach minerals, micronutrients, and trace elements from deep within the earth. When you pull these weeds and drop them into your fertilizer bucket, you are unlocking those deep-earth nutrients and making them available to your surface-level garden plants.
Before tossing your kitchen waste and yard weeds into the top bucket, there is one critical step you must follow: you must chop everything as finely as possible. Use a sharp pair of garden shears or a kitchen knife to cut up the weeds, leaves, and large food scraps.
Breaking the material down into tiny pieces vastly increases the total surface area available for beneficial microorganisms to colonize. The more surface area the microbes can access, the faster they can break down the cellular walls of the plants, releasing the locked-away nutrients into the liquid reservoir.
Accelerating the Brew with Compost and Mulch
Once your chopped kitchen scraps and garden weeds are tightly packed into the inner bucket, the natural decomposition process will begin, but you can significantly speed things up by introducing a biological starter. To do this, simply add a generous scoop of mature, finished compost or healthy, living garden soil right on top of your organic waste.
This layer does not need to be incredibly thick; a handful or two is plenty. This step introduces millions of active, beneficial bacteria, fungi, and microbes directly into your fresh waste material, kickstarting the breakdown process immediately rather than waiting for wild spores to find the bucket.
After applying your compost starter, you must protect the environment inside the bucket from drying out. Microbes require constant moisture and darkness to do their jobs effectively. To achieve this, cover the top of the pile with a layer of organic mulch.
Plain, unprinted, corrugated cardboard cut into a circle that fits snugly inside the bucket is an absolute favorite for this step. The cardboard acts as a breathable lid that holds in moisture and blocks out light, creating a perfect, cozy cave for the microbes to feast on the scraps below.
It is absolutely vital to use a permeable, organic mulch like cardboard instead of a tight-fitting plastic lid. If your fertilizer bucket is kept outdoors, an organic cardboard layer allows natural rainwater to pass right through into the system. Rainwater is naturally soft, free of harsh city chemicals like chlorine, and packed with atmospheric properties that benefit your plants.
When rain falls on the cardboard, it gently soaks through, picking up microbes from the compost layer, washing over the breaking-down kitchen waste and weeds, and slowly filtering into the tap reservoir below. This constant, gentle rinsing action ensures your fertilizer stays liquid and full of life.
Watering, Timing, and the Fermentation Phase
With your materials layered and covered, the system needs an initial dose of hydration to get the wheels turning. If it isn’t raining, or if you plan to keep your bucket system in a sheltered area, grab a watering can and give the material a thorough soaking. Pour enough water over the cardboard mulch so that it becomes completely saturated.
Watch as the water sinks down through the compost, travels through the chopped scraps and weeds, and begins to trickle out of the bottom holes into the tap reservoir. You want the material to be thoroughly wet, like a wrung-out sponge, but not completely drowning in standing water above the line of the inner bucket.
Now comes the easiest part of the entire process: waiting. Place your bucket system in a warm, semi-shaded spot in your yard or on your patio. Warmth acts as an accelerator for microbial activity, so a spot that gets a little bit of morning sun is perfect.
Leave the system completely alone to ferment for a period of two to three weeks. During this time, a quiet chemical transformation takes place inside the bucket. The microbes will digest the kitchen waste, and the water will extract the rich nitrogen, potassium, and phosphorus from the chopped weeds.
As the days pass, a dark, rich, deeply colored liquid will slowly accumulate in the bottom reservoir of the outer bucket. This liquid is essentially an artisanal, hyper-concentrated plant tonic. It will hold a distinct, earthy, fermented smell, which is a sure sign that the beneficial bacteria have done their jobs and successfully unlocked the nutrients from the raw organic matter.
How to Properly Dilute and Apply Your Fertilizer
After two to three weeks have passed, your liquid fertilizer is fully brewed and ready for harvest. Simply place a watering can or a clean jar underneath the tap of the outer bucket and turn the handle. Out will flow a rich, dark liquid that looks almost like black coffee or molasses. While it is tempting to take this nutrient-dense liquid and pour it straight onto your garden beds, doing so would be a massive mistake that could severely damage your plants.
Because this liquid is brewed from raw greens and concentrated waste, it is incredibly potent and highly acidic. If applied directly to the soil, it can cause “fertilizer burn,” a condition where the high concentration of nutrients actually pulls moisture away from plant roots, causing the foliage to wither, turn brown, and potentially die.
To make this liquid safe and effective, you must always dilute it before use. The golden rule for this homemade system is a strict one-to-ten ratio. For every single cup of concentrated fertilizer you pull from the tap, you must mix it with ten cups of clean, fresh water.
Once mixed thoroughly, the liquid should lose its dark, opaque appearance and turn into a pale amber color, resembling a weak cup of tea. This diluted mixture is completely safe for almost every plant in your care. You can use it just like regular water to feed your backyard vegetable patches, fruit bushes, flowering perennials, and even delicate indoor houseplants.
Try applying this mixture once every two weeks during the active spring and summer growing seasons. The diluted nutrients will seep deep into the soil, providing a gentle, balanced, and easily absorbable boost that encourages strong root development, vibrant green leaves, and robust health across your entire garden.
Recent Posts
The Secret Homemade Liquid Fertilizer That Can Boost Flowering, Fruiting, and Plant Growth Naturally
Many of the materials we throw away in the kitchen still contain nutrients that can be useful in the garden. Onion peels and potato peels are good examples. Instead of sending them to the trash, you...
I Mixed Yogurt, Molasses & Compost Tea for 24 Hours… The Results Changed My Garden Soil
Healthy soil is much more than a mixture of sand, silt, clay, and organic matter. It is a living ecosystem filled with bacteria, fungi, protozoa, nematodes, and many other microscopic organisms....