
Starting your own vegetable plants at home doesn’t need fancy equipment or costly seed trays. With a little creativity and some old household items, you can easily build a simple seed-starting setup that works just as well as store-bought trays. This method is especially useful if you want to grow cucumbers, tomatoes, chilies, or other vegetables in a budget-friendly way.
The idea is simple: use what you already have, reduce waste, and still grow strong seedlings. Many gardeners prefer this method because it is low-cost, easy to manage, and surprisingly effective even for beginners.
Preparing a Healthy Soil Mix for Strong Germination
Good seeds need good soil to grow properly. If the soil is weak or too heavy, seeds may not germinate well or seedlings may become weak. That’s why preparing a balanced soil mix is very important.
Take old garden soil as your base. Make sure it is clean and free from large stones or roots. To this, add compost. Compost is full of nutrients that help young plants grow faster and stronger. It also improves soil fertility naturally.
Next, mix in coco peat. Coco peat helps hold moisture in the soil, which is very important during germination. Seeds need consistent moisture to sprout, but not waterlogging. Coco peat keeps the balance just right by holding water and keeping soil airy at the same time.
When you mix all three—garden soil, compost, and coco peat—you get a soft, fluffy growing medium. It should not be too sticky or too dry. If you squeeze it lightly in your hand, it should hold shape but break apart easily.
Using a Fruit Basket as a Seed Starting Container
Instead of buying plastic seed trays, an old fruit basket works perfectly. Many homes already have unused baskets lying around, and they can easily be reused for gardening.
The basket should have holes or gaps at the bottom so excess water can drain out. This is very important because too much water can damage seeds and cause rot.
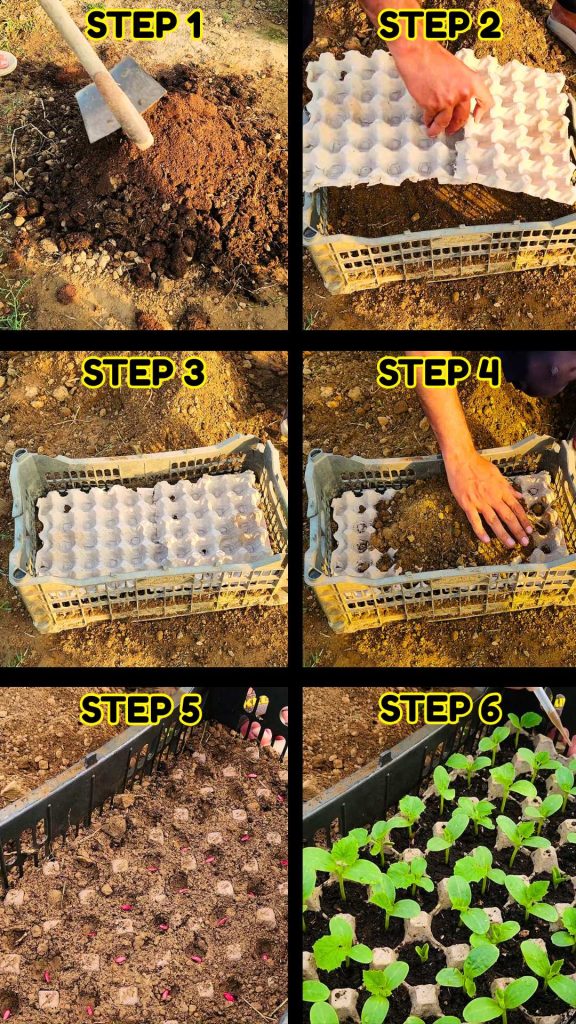
First, add a layer of your prepared soil mix at the bottom of the basket. Spread it evenly and gently level it with your hand. There is no need to press it too hard; just make it smooth and even.
This layer acts as a base and supports drainage while giving structure to the setup.
Using Egg Cartons as Natural Seed Compartments
Egg cartons are one of the best natural seed holders you can use. Instead of throwing them away, they can be reused to create small planting pockets.
Place the egg cartons directly on top of the soil layer inside the basket. Arrange them properly so they fit snugly. These cartons naturally divide space into small sections, which is perfect for sowing seeds individually.
One of the biggest advantages of egg cartons is that they slowly break down in soil. So when you transplant seedlings later, the roots are not disturbed much, and the carton decomposes naturally in the ground.
After placing the cartons, add another layer of soil mix on top. Make sure the cartons are well covered but still maintain their shape underneath.
Sowing Seeds for Best Germination Results
Once your setup is ready, it’s time to sow seeds. In this case, cucumber seeds are used, but the same method works for many vegetables.
Place one or two seeds in each egg compartment. Avoid overcrowding because too many seeds in one space will compete for nutrients and space later. Strong spacing at this stage leads to healthier plants in the long run.
After placing the seeds, cover them lightly with the same soil mix. The covering should be thin. Seeds don’t need to be buried too deep. A light layer is enough to protect them and maintain moisture.
Watering Technique for Seed Germination
Watering is a very important step. If done wrongly, seeds can get disturbed or even washed away.
Use a gentle sprinkler or spray bottle. Slowly water the entire basket so the soil becomes evenly moist. Do not pour water directly in one spot because it can create holes and disturb seed placement.
The goal is to keep the soil damp, not soggy. Too much water can block oxygen and stop seeds from germinating properly. At the same time, dry soil will prevent sprouting.
Consistency is key. Keep checking the soil daily. If the top layer feels dry, lightly spray water again.
Providing the Right Environment for Seed Growth
After watering, place the basket in a suitable location. Young seeds need warmth and indirect sunlight.
A partially shaded area is ideal in most conditions. Direct harsh sunlight can dry out the soil too quickly, especially during early germination stages. If the weather is cold, placing the basket in a greenhouse or warm indoor space helps improve germination speed.
Temperature and moisture together decide how fast seeds will sprout. When conditions are stable, cucumber seeds usually start germinating within a week.
Monitoring Growth and Early Seedling Care
Within a few days, you will start noticing small green shoots emerging from the soil. This is the most exciting stage of gardening because you can actually see your effort turning into life.
During this stage, continue checking moisture levels regularly. Do not let the soil dry out completely, but also avoid overwatering.
As seedlings grow, they will develop small leaves and become stronger. Around the two to three-week mark, they will be ready for transplanting.
Sometimes, small pests may appear and damage a few leaves. This is normal in outdoor or semi-outdoor gardening. Unless the damage is severe, plants usually recover on their own or continue growing without major issues.
Transplanting Seedlings Without Damaging Roots
Once seedlings are strong enough, it is time to move them to their final growing place. This could be a garden bed or larger pots.
Use a spoon to gently lift each seedling. Try to take it out along with the soil around its roots. The egg carton structure usually decomposes slightly by this time, making it easier to remove seedlings without disturbing roots.
Dig a small hole in your garden bed or pot and place the seedling carefully inside. Cover it with soil and gently press around the base so the plant stands upright.
Avoid pressing too hard because young roots are still delicate.
Using Mulch for Better Plant Growth
After transplanting, adding mulch around the plants is very helpful. Mulch can be dry leaves, grass clippings, or any organic material.
Mulch helps in several ways. It keeps the soil moist for longer periods, reduces weed growth, and maintains stable soil temperature. It also slowly breaks down and adds nutrients back into the soil.
For young plants, mulch acts like a protective layer that supports steady growth.
Watering and Long-Term Care After Transplanting
Once seedlings are transplanted, give them a good watering. This helps the soil settle around the roots and reduces transplant shock.
In the following days, continue regular watering depending on weather conditions. If it is hot, plants may need more frequent watering. If it is cooler, less water is needed.
As plants grow bigger, they will become stronger and start developing vines or branches depending on the crop. In the case of cucumbers, vines will start spreading and may need support like a trellis.
Recent Posts
The Secret Homemade Liquid Fertilizer That Can Boost Flowering, Fruiting, and Plant Growth Naturally
Many of the materials we throw away in the kitchen still contain nutrients that can be useful in the garden. Onion peels and potato peels are good examples. Instead of sending them to the trash, you...
I Mixed Yogurt, Molasses & Compost Tea for 24 Hours… The Results Changed My Garden Soil
Healthy soil is much more than a mixture of sand, silt, clay, and organic matter. It is a living ecosystem filled with bacteria, fungi, protozoa, nematodes, and many other microscopic organisms....