
Commercial drip irrigation setups are often praised as the ultimate solution to this problem, and for good right reasons. They deliver moisture slowly and precisely. However, these commercial systems come with a hefty price tag, complicated timers, and plastic tubing that can be difficult to install and maintain for a casual backyard gardener or someone tending to a few potted plants on a balcony.
Fortunately, you do not need to spend a small fortune or possess advanced plumbing skills to give your plants the exact benefits of a high-end irrigation system. By looking at everyday household waste through a creative lens, you can construct a highly efficient, customizable, and virtually free self-watering setup. This method utilizes a discarded plastic bottle and a basic medical fluid line to create a gravity-fed hydration system that keeps your soil perfectly damp without wasting a single drop of water.
Gathering Your Upcycled Materials
Before beginning construction, you need to gather a few simple items. The beauty of this project lies in its accessibility; you likely already have the main components sitting in your recycling bin or storage closets.
The primary structural component is a clean, empty plastic bottle. When selecting your bottle, keep in mind that volume dictates how long your system can run without human intervention. A standard half-liter water bottle will work for a small indoor houseplant, but for outdoor vegetable patches, large tomato plants, or thirsty container gardens, larger options are far superior.
Look for two-liter soda bottles, large juice containers, or even five-liter water jugs. A larger reservoir ensures that your plants stay hydrated for days at a time, making this an ideal solution for weekend getaways. Ensure the bottle is thoroughly rinsed with warm water to remove any sugary residues that might attract ants or mold.
The second component is an intravenous fluid kit, commonly referred to as an IV line. While the idea of upcycling a used medical kit might seem tempting to keep costs at absolute zero, doing so introduces unnecessary risks. Used medical equipment can harbor bacteria, pathogens, or chemical residues that could contaminate your soil and harm your plants—especially if you are growing edible vegetables. Instead, source a brand-new, sterile IV line. They are incredibly inexpensive, widely available online or at local pharmacies, and guarantee a clean environment for your garden.
Finally, you will need a few basic tools: a pair of sharp scissors or a utility knife, a sturdy support stake (such as a wooden stick, bamboo pole, or metal rod), and some securing material like twine, heavy-duty tape, or zip ties.
Constructing the Water Reservoir
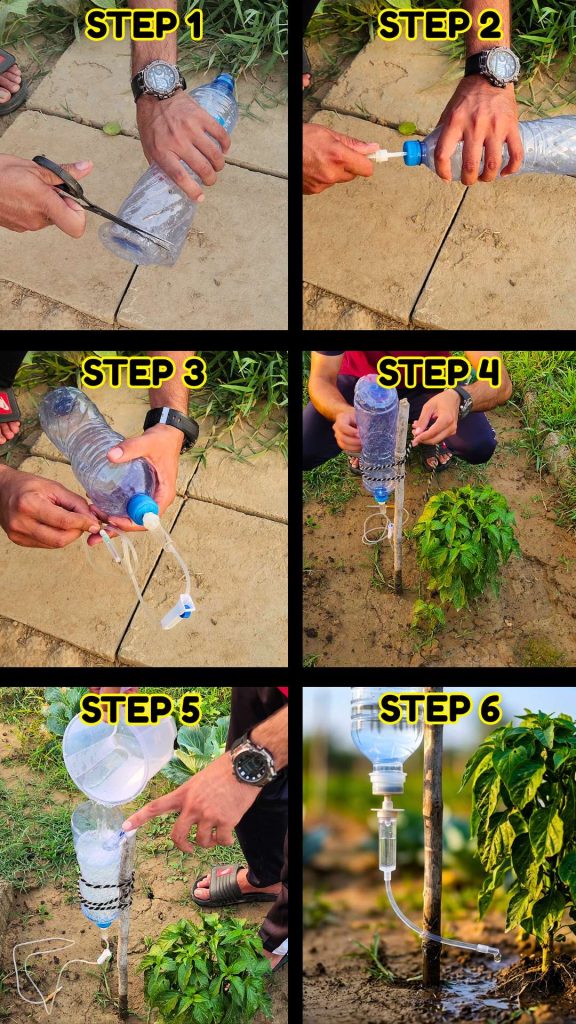
The first physical step in building your irrigation system involves modifying the plastic bottle so that it can be easily filled and managed once it is installed in the garden. Place your clean plastic bottle on a flat, stable surface. Take your scissors or utility knife and prepare to cut around the bottom circumference of the bottle, roughly an inch or two above the very base.
As you cut, it is crucial not to detach the bottom entirely. Slice approximately ninety-five percent of the way around the perimeter, leaving a tiny section of plastic—about five percent—completely intact. This small uncut bridge acts as a built-in hinge.
By creating this swinging lid, you solve two major problems at once. First, it allows you to easily flip the bottom open like a hatch whenever you need to pour in fresh water. Second, once the bottle is full, you can snap the lid back down. Keeping the top covered prevents dead leaves, dirt, and airborne debris from falling into the water and clogging the narrow tubing below. Furthermore, a closed lid drastically reduces evaporation caused by direct sunlight, ensuring that every drop of water you provide actually goes into the ground.
Connecting the Precision Flow Line
With the reservoir prepared, the next phase is connecting the mechanism that will transport the water from the bottle to the earth. Remove the plastic cap from the neck of your bottle. The goal is to insert the sharp plastic spike or connector end of the IV kit directly through the center of this cap.
Depending on the thickness of the plastic cap, you may need to pre-puncture it. You can do this safely by heating the tip of a small nail with a lighter and pressing it through the center of the cap, or by using a small drill bit. The hole should be slightly smaller than the IV connector to ensure a tight, friction-based fit. Once the hole is ready, push the plastic spike of the IV line firmly through the cap until it is securely seated.
To guarantee that your system does not lose water through small gaps, you can apply a small amount of waterproof sealant, hot glue, or silicone around the base of the connection point. Once the sealant dries, screw the cap back onto the neck of the bottle. You now have a completely sealed, airtight transition from the main water reservoir into the distribution tubing.
Installation and Support in the Garden
Because this system relies entirely on gravity to pull water downward through the tube, the bottle must be suspended upside down above the surface of the soil. To achieve this, take your wooden stick or bamboo stake and drive it deep into the ground immediately next to the plant you wish to water. Ensure the stake is anchored firmly enough to support the weight of a bottle completely filled with water.
Turn your modified bottle upside down, so the cap and tube face the earth and the hinged bottom flap faces the sky. Position the bottle against the stake at a height that allows the long IV tubing to comfortably reach the base of the plant without being pulled taut or kinked.
Using your twine, zip ties, or tape, secure the body of the bottle tightly to the stake in at least two places to prevent it from shifting or tipping over during heavy winds. Once the structure is stable, flip open the top hinged lid and fill the bottle to the brim with clean water. Inspect the cap area briefly to ensure there are no active leaks.
Calibrating the Drip for Optimal Growth
The final step is the most critical for the health of your plant: adjusting the rate of irrigation. Standard medical IV lines feature a small plastic roller clamp wrapped around the tubing. Rolling this wheel in one direction pinches the tube shut, while rolling it the other way opens the pathway completely.
Position the open end of the tube directly at the base of your plant, right where the main stem meets the soil. Slowly adjust the roller clamp while watching the drip chamber or the tip of the hose. Your goal is to achieve a slow, rhythmic drip—roughly one drop every few seconds.
Recent Posts
The Secret Homemade Liquid Fertilizer That Can Boost Flowering, Fruiting, and Plant Growth Naturally
Many of the materials we throw away in the kitchen still contain nutrients that can be useful in the garden. Onion peels and potato peels are good examples. Instead of sending them to the trash, you...
I Mixed Yogurt, Molasses & Compost Tea for 24 Hours… The Results Changed My Garden Soil
Healthy soil is much more than a mixture of sand, silt, clay, and organic matter. It is a living ecosystem filled with bacteria, fungi, protozoa, nematodes, and many other microscopic organisms....