
One of the simplest things you can do for an established fruit tree is loosen the soil around its root zone. Over time, repeated watering, rain, foot traffic, and natural settling can cause the soil surface to become hard and compacted.
Compacted soil can restrict the movement of air and water around the roots. When water cannot move properly through the soil, some areas may remain too wet while other parts stay dry. Tree roots also need oxygen, so improving the structure of the surface soil can create a better environment for healthy root activity.
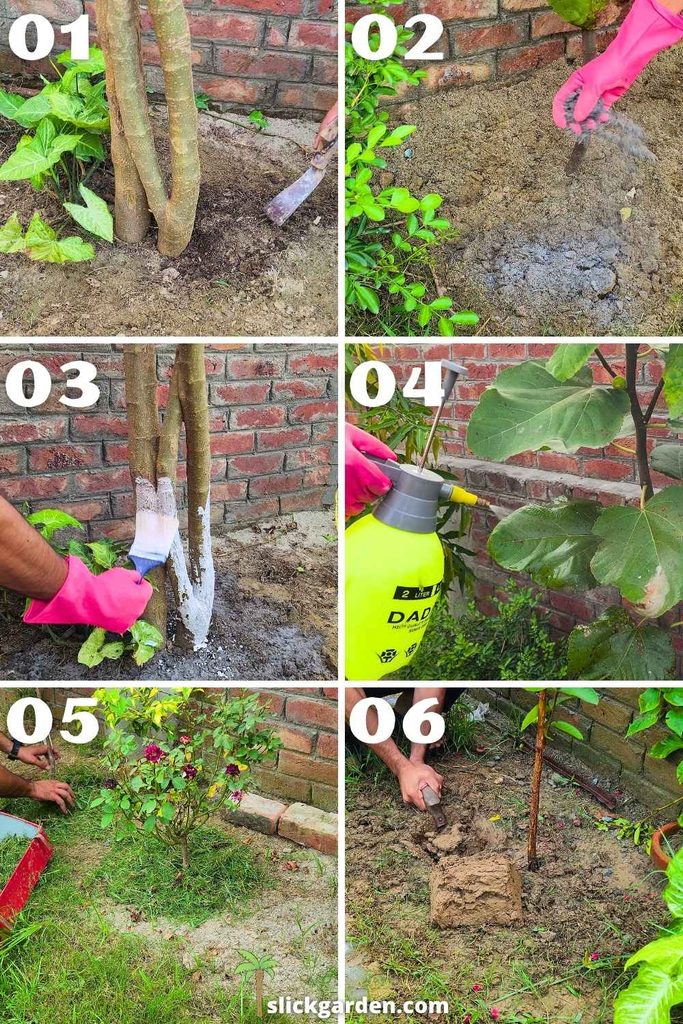
Use a hand cultivator, small hoe, or similar garden tool to gently loosen the top few inches of soil. Work around the tree rather than digging directly against the trunk.
Be careful because fruit trees can have roots close to the surface. Deep digging can cut these roots and cause unnecessary damage. The goal is not to turn over the entire root zone. Simply break up the hard surface and improve its condition.
The best area to work is around the tree’s root zone, particularly beneath the outer branches. Avoid concentrating all your work right next to the trunk.
Once the soil is loosened, water can move into the root zone more easily. Air can also enter the soil, and nutrients applied later can reach the roots more effectively.
This step is especially useful when the soil has become hard, dry, or crusted.
Apply a Small Amount of Wood Ash
After loosening the soil, you can apply a small amount of clean wood ash around the tree.
Wood ash contains minerals including potassium and calcium. Potassium is an important plant nutrient involved in several processes, including water regulation, plant development, and fruit production. Calcium also plays an important role in plant structure and growth.
Wood ash can also raise soil pH, which means it reduces soil acidity. This can be useful when the soil is acidic and needs some correction.
However, wood ash should be used carefully. It is not a fertilizer that should be applied heavily. Adding too much can raise the soil pH excessively and may reduce the availability of certain nutrients.
Sprinkle only a thin layer over the soil rather than creating a thick pile. Keep the ash away from direct contact with the trunk and avoid placing large amounts in one area.
Only use ash from untreated, clean wood. Do not use ash from painted, stained, pressure-treated, or chemically treated wood because it may contain unwanted substances.
It is also important to understand that wood ash is not suitable for every soil. If your soil is already alkaline, adding ash can make the problem worse. A soil test is the best way to determine whether your soil actually needs a material that raises pH.
When used appropriately, a small amount of wood ash can provide useful nutrients while helping manage soil acidity.
Whitewash the Lower Trunk With Lime
The next step is protecting the main trunk. A thin lime whitewash can be applied to the lower part of the trunk, starting near the soil line and extending about two to three feet upward.
Whitewashing has traditionally been used on fruit trees to protect the bark from harsh sunlight and temperature fluctuations. The light-colored surface reflects some sunlight, helping reduce excessive heating of the trunk.
This can be particularly useful where trees experience strong sunlight or large differences between daytime and nighttime temperatures.
A whitewashed trunk can also make it more difficult for some crawling insects to move unnoticed along the bark. It may help discourage ants from regularly traveling up and down the trunk, especially when combined with other pest-management practices.
However, lime whitewash is not a complete ant-control method. If ants are constantly climbing the tree, there may be an underlying reason. Ants often visit fruit trees because they are attracted to honeydew produced by aphids, scale insects, and other sap-feeding pests.
For this reason, controlling the insects attracting the ants is just as important as protecting the trunk.
When preparing the whitewash, use a suitable lime product and make a thin mixture rather than an extremely concentrated paste. Apply an even coating to mature bark.
Avoid applying strong lime mixtures to young trees, soft bark, open wounds, or damaged areas. Do not coat the trunk excessively.
The purpose is to provide a protective coating, not to cover the tree in a thick layer of material.
Spray the Leaves With Neem Oil
The final step is applying neem oil to the foliage. Neem oil is widely used in gardening as a natural pest-management product and can help manage several common insect pests.
It is particularly useful as part of a regular pest-monitoring routine. Neem-based products can interfere with feeding and other stages of some insects, making them less damaging to plants.
When using neem oil, always follow the mixing instructions on the product label. Different products contain different concentrations, so there is no single amount that is correct for every neem oil product.
Mix the recommended amount with water and, when required by the product instructions, use an appropriate emulsifier so the oil disperses properly.
Spray the leaves thoroughly. Don’t focus only on the upper surfaces. Check and spray the undersides of leaves as well because many small insects hide there.
The timing of the spray is important. Avoid spraying neem oil during intense afternoon sunlight or extreme heat. Applying oil in hot, direct sunlight can increase the risk of leaf damage.
Early morning or evening is generally a better time, provided conditions are suitable and the leaves can dry properly.
Before treating the entire tree, test the mixture on a small section of foliage. Wait and check for any signs of leaf damage before spraying the whole plant.
Neem oil should also be used carefully when flowers are open. Avoid spraying directly onto bees and other pollinators. Apply treatments when pollinators are less active and follow the product label regarding flowering plants.
Recent Posts
This garden bed has been growing vegetables throughout the summer, and now the soil needs some attention before we plant the next crop. We also had very heavy monsoon rain, and water stayed on the...
How We Renew Old Potting Soil Without Buying New Soil Every Season
Buying new potting soil every season can get expensive, especially when you have a lot of containers in your garden. And honestly, changing all that soil is a lot of work. You have to empty every...