
Old, broken plastic water tanks are a common sight in many rural areas, farms, and suburban backyards. Most of the time, these large containers are viewed as useless plastic waste that takes up valuable space. Because they are bulky and difficult to transport, they often sit in corners accumulating dust, or worse, they end up in landfills where they will take hundreds of years to decompose. However, with a little bit of creativity and physical effort, these old vessels can be rescued and transformed into incredibly productive, durable, and completely free raised garden beds.
The journey of upcycling these materials often starts in unexpected places. In this case, the water tanks were originally recovered during the cleanup of an old storage building. Instead of throwing them into a dumpster, they were brought home with the intention of finding a secondary use for them.
For a long time, they served a very practical purpose on the property. They were used as heavy-duty mixing and storage containers for homemade liquid fertilizers. Liquid fertilizers, such as compost tea or fermented plant juice, require large, sturdy open containers where organic materials can steep in water for weeks at a time. The tanks were perfect for this demanding job.
Unfortunately, plastic does not last forever when it is constantly exposed to the elements. Over the course of several seasons, the harsh combination of intense sunlight, UV radiation, freezing winter temperatures, and baking summer heat took a heavy toll on the material.
The plastic slowly began to lose its flexibility, becoming increasingly brittle and weak. With the passage of time, small hairline fractures turned into deep, gaping cracks. Eventually, the tanks reached a point where they could no longer hold a single drop of liquid without leaking everywhere. They had officially outlived their original purpose as fluid storage vessels, but their story was far from over.
Instead of letting this valuable plastic go to waste, a plan was formed to give them a brand-new life in the garden. Some time ago, the absolute largest tank in the collection—a massive white plastic water container—was sliced down and repurposed into a gorgeous, wide garden bed built directly around the base of a large fruit tree.
This initial project was a massive success. The circular plastic walls protected the tree’s root zone, held in moisture beautifully, and created a tidy, defined growing area. However, that major project left behind a large pile of random, mismatched plastic scraps and broken tank segments.
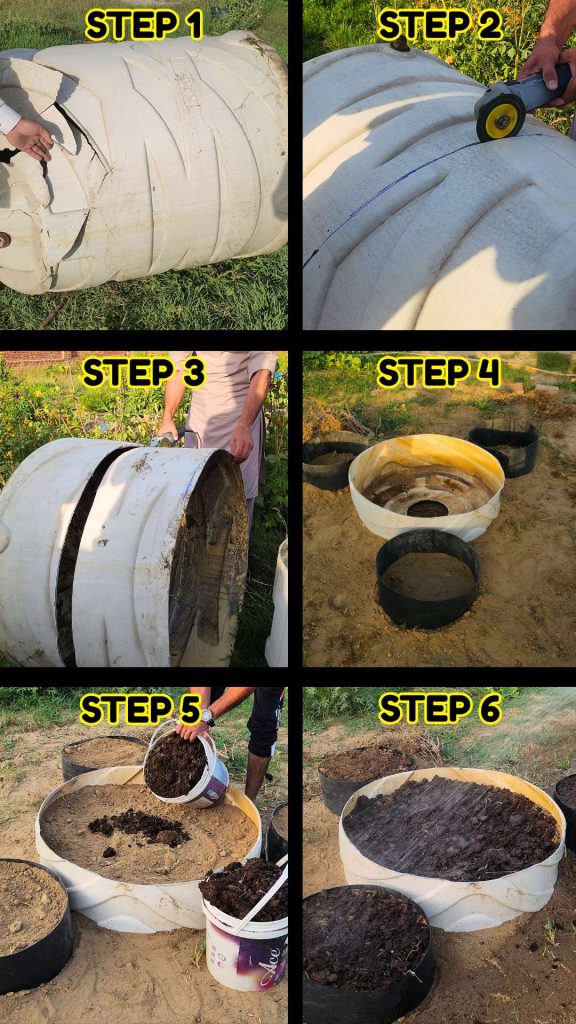
Rather than discarding these leftover pieces, the decision was made to gather them together and construct a completely new, multi-tiered mini raised garden bed. For this specific project, four distinct pieces were selected from the scrap pile: one large, weather-beaten base piece and three smaller, ring-like sections.
Understanding the Importance of Proper Container Drainage
Before a single shovelful of soil can be moved into place, you must address the absolute most critical factor in container gardening: drainage. When plants are grown directly in the ground, excess water from heavy rains or overwatering can easily seep deep into the lower layers of the earth. However, when you place plants inside a container with solid walls and a solid bottom, that water has nowhere to go. It becomes trapped at the bottom of the vessel, turning the soil into a thick, stagnant, anaerobic swamp.
When plant roots are forced to sit in waterlogged soil for extended periods, they are effectively choked. Roots need oxygen just as much as they need water and nutrients. Without oxygen, the root system begins to suffocate, drown, and rot away. This condition is commonly known as root rot, and once it takes hold, it is incredibly difficult to reverse. The leaves of your plants will start to turn yellow, wilt despite the soil being wet, and the entire plant will eventually die.
To prevent this disaster, preparation is key. The large, weather-beaten base piece of the water tank requires a bit of modification before it can safely hold plants. Using a heavy-duty tool, such as a power drill with a large spade bit or a heated metal rod, you must puncture numerous large drainage holes all across the bottom surface of the plastic. Do not be stingy with the holes; you want to ensure that water can exit the container as quickly and freely as possible.
Interestingly, the three smaller plastic pieces chosen for this project do not require any drilling at all. Because these pieces were salvaged from the most broken sections of the old water tanks, they are completely open on both the top and the bottom sides. They are essentially just thick, sturdy plastic rings.
When these rings are placed flat on top of the ground or nestled inside the larger base, they have no bottom barrier to hold water back. Any moisture poured into these sections will naturally and effortlessly drain straight down into the earth below. This open-bottom design is fantastic for deep-rooting plants, as it allows their roots to eventually grow past the plastic boundary and travel deep into the natural ground.
Selecting the Ideal Location for Your Raised Bed
Choosing where to place your newly constructed raised garden bed is a decision that requires careful thought and observation. Once a large plastic container is filled with hundreds of pounds of damp soil, it becomes incredibly heavy and virtually impossible to move without emptying it all out again. Therefore, you need to get the location right the very first time.
The primary factor to consider when selecting a garden spot is sunlight. The vast majority of popular garden vegetables—such as tomatoes, peppers, cucumbers, and squash—as well as small fruit trees, require a massive amount of energy to produce fruits and flowers. To achieve this, they need a minimum of five to six hours of direct, unfiltered sunlight every single day. If you place your garden bed in a deeply shaded area under a thick tree canopy or in the permanent shadow of a tall building, your plants will become tall, spindly, weak, and will produce a very poor harvest.
However, perfect positioning also depends heavily on your local climate and weather patterns. While five to six hours of sun is a great baseline rule, you must adapt this rule to your specific environment. For example, if you live in a region with extremely intense, scorching summer heat, a spot that gets full, blasting afternoon sun might actually be too stressful for your plants.
In hot climates, the ideal location is often an area that receives bright, direct sunlight during the cooler morning hours, but is shielded by some light, dappled shade during the brutal heat of the late afternoon. Take a few days to walk around your yard, watch how the shadows move from morning to evening, and select the spot that offers the best balance for your local weather.
Filling the Beds with Rich Loamy Soil and Nutrients
Once your plastic pieces are perfectly arranged in their permanent, sunny location, the next step is to fill them with the life-giving medium that will feed your plants: the soil. The quality of your soil is the single most important factor that dictates whether your garden will thrive or fail.
Ideally, you want to use what gardeners call loamy soil. Loam is often considered the holy grail of garden dirt because it contains a perfectly balanced mixture of sand, silt, and clay particles, along with a high percentage of organic matter. This unique texture gives loamy soil two incredible properties that seem contradictory but work together perfectly. First, it has excellent moisture retention, meaning it can hold onto enough water to keep plant roots hydrated without drying out too fast. Second, it possesses superb drainage, meaning that any excess, unnecessary water can easily pass through the pore spaces and exit out of the drainage holes you created.
If you do not have access to a natural supply of rich loamy soil on your property, there is absolutely no need to panic or spend a fortune at a garden center. You can easily manufacture high-quality soil using whatever native dirt is available in your yard. If your ground is full of heavy, sticky clay, or if it is incredibly dry and sandy, you can fix it by adding a heavy dose of organic garden nutrients.
Gather materials like well-aged animal manure, homemade compost, decomposed leaves, or fine wood chips, and thoroughly mix them into your native soil as you fill the plastic beds. These organic amendments act like a magical buffer. In sandy soil, compost acts like a sponge to help hold onto water. In clay soil, compost breaks up the tight, sticky particles so that air and water can actually move through it. By layering and mixing these nutrients into your broken tank beds, you create a loose, fertile environment where roots can expand rapidly and absorb all the food they need.
The Vital Final Step of Deep Watering and Settling
With the plastic structures in place and the containers filled to the brim with rich soil, it is incredibly tempting to immediately grab your seeds or young starter plants and stick them into the ground. However, rushing into planting at this stage is a common mistake that can ruin your hard work. There is one vital final step that must be completed first: you must give the entire raised bed a massive, thorough soaking with water.
When you shovel dry or slightly damp soil into a deep container, the dirt lands loosely. This creates millions of tiny, hidden air pockets throughout the entire depth of the garden bed. The soil might look perfectly flat and full on the surface, but it is actually highly unstable and fluffy underneath. If you plant your seeds into this fluffy dirt and then give it a light watering, nothing bad will happen immediately. However, the very first time a heavy rainstorm hits your garden, the water will rush through the soil, causing all those hidden air pockets to instantly collapse. As the air pockets disappear, the entire volume of soil will dramatically sink down by several inches.
This sudden sinking can cause major problems for your plants. Seeds that were carefully planted at the correct depth will suddenly find themselves washed away or buried under a thick, suffocating layer of collapsed mud, preventing them from ever breaking through to the surface. For young fruit trees or established vegetable starts, the sinking soil can expose their delicate root systems to the harsh air, causing them to dry out and die.
To avoid this, you must apply a generous amount of water to the bed before planting. Spray the soil continuously until you see water pouring heavily out of the drainage holes at the bottom of the large tank piece. This deep watering accomplishes two critical goals. First, it forces all the air pockets to collapse safely right now, settling the dirt into its permanent, compacted, but loose position.
If the soil level drops significantly after watering, you can simply add a little more dirt to top it off. Second, a heavy soaking literally wakes up the biology of the soil. Moisture activates beneficial soil microbes, dissolves tightly bound nutrients, and creates a perfectly hydrated, welcoming environment. Once the water has fully settled the earth, your completely free, upcycled water tank garden bed is officially prepared, beautiful, and ready to host a thriving oasis of vegetables, herbs, or fruit trees.
Recent Posts
The Secret Homemade Liquid Fertilizer That Can Boost Flowering, Fruiting, and Plant Growth Naturally
Many of the materials we throw away in the kitchen still contain nutrients that can be useful in the garden. Onion peels and potato peels are good examples. Instead of sending them to the trash, you...
I Mixed Yogurt, Molasses & Compost Tea for 24 Hours… The Results Changed My Garden Soil
Healthy soil is much more than a mixture of sand, silt, clay, and organic matter. It is a living ecosystem filled with bacteria, fungi, protozoa, nematodes, and many other microscopic organisms....