
Potatoes are one of the easiest crops to grow at home, but the way you plant them can make a difference in how the plants develop and how easy they are to manage later. There are several methods for planting potatoes, but two simple approaches are ridge planting and planting individual potatoes in holes.
Both methods can work well in a prepared garden bed. The important things are loose soil, healthy seed potatoes, enough spacing, moisture, and good drainage. In this comparison, the same type and amount of potatoes are planted using two different methods so their growth and harvest can be compared later.
One method uses raised ridges, while the other places compost directly into individual planting holes. Neither method requires expensive equipment or complicated preparation.
Preparing the Garden Bed
Potatoes develop their tubers underground, so soil preparation is especially important. Hard, compacted soil can restrict root growth and make it difficult for potatoes to expand underground.
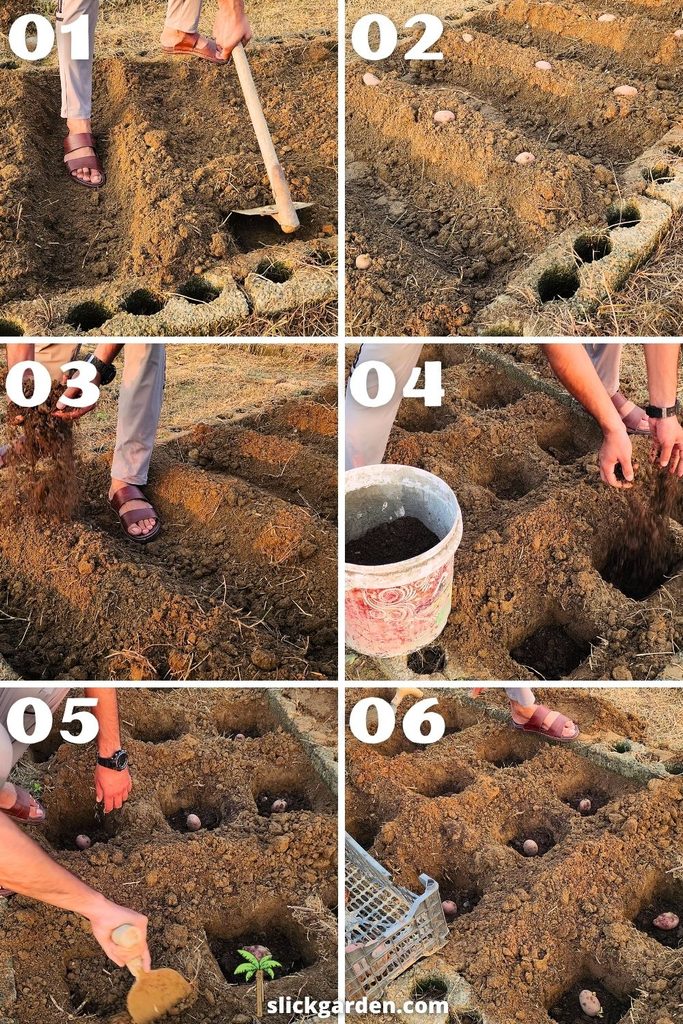
Start by clearing the planting area of weeds, large stones, old roots, and plant debris. If the soil is hard, dig it and turn it over with a spade or garden fork. Break apart large clumps as you work.
The goal is to create loose, workable soil rather than turning the bed into fine dust. Soil that is loose and crumbly gives developing roots and tubers room to spread.
If the garden soil is naturally heavy, adding some mature compost can improve its structure. Compost also adds organic matter, which can help the soil hold moisture while still allowing excess water to drain.
Avoid using fresh manure directly around seed potatoes. Fresh manure can be too strong for young plants and may contain weed seeds or pathogens. Well-decomposed compost or properly aged manure is a better choice.
Once the soil is prepared, divide the bed into two areas if you want to compare the two planting methods.
Choosing Sprouted Seed Potatoes
Good planting material is just as important as good soil. Seed potatoes should be healthy and free from obvious rot, severe damage, or disease.
Sprouts are a useful sign that the potato is ready to grow. When stored potatoes begin producing short, healthy sprouts, they can be planted in the garden.
Handle the sprouts carefully during planting. They can break off easily, especially if they are long and fragile.
Small seed potatoes can usually be planted whole. Larger potatoes can be cut into pieces, but each piece should have at least one healthy eye or sprout. If potatoes are cut before planting, allow the cut surface to dry and form a protective layer before putting them into the soil.
For this planting comparison, using potatoes of similar size makes the comparison more consistent.
Method One: Planting Potatoes in Ridges
The first method is the traditional ridge method. It starts with loose soil and raised ridges running across the garden bed.
After preparing the soil, shape it into ridges. The exact height of the ridges does not have to be perfect. The main purpose is to provide a deep area of loose soil around the potatoes.
Place the sprouted seed potatoes along the ridges, keeping approximately one foot between each potato.
Spacing is important because potato plants need room to develop leaves above the ground and tubers below it. Planting them too close together can increase competition for water, nutrients, light, and growing space.
Once the potatoes are positioned, cover them completely with soil. The potatoes should not remain exposed on the surface.
After covering them, add a thin layer of well-decomposed compost or aged manure over the top of the ridges. There is no need to bury the potatoes under a huge amount of compost. A moderate amount of mature organic matter is enough.
Water the ridges after planting so the soil settles around the potatoes.
Method Two: Planting Potatoes in Individual Holes
The second method is slightly different. Instead of preparing raised ridges, individual planting holes are made across the garden bed.
Start with the same type of prepared soil used for the first method. Mark the planting locations and keep approximately one foot between each hole.
Dig each hole deep enough to comfortably hold the seed potato and allow it to be covered with soil.
Add a handful of well-decomposed compost into the bottom of each hole. The compost is placed directly where the potato will be planted rather than spread across the entire surface.
Next, place one sprouted seed potato into each hole. Position the potato so the sprouts are facing upward as much as possible.
Cover the potato completely with soil. Avoid pressing the soil down too hard. Gently fill the hole and leave the soil loose enough for the young shoots to push through.
After planting all the potatoes, level the garden bed. Finally, water the planting area thoroughly.
The water helps settle the soil around the potatoes and provides the moisture needed for sprouting and early root development.
Why Spacing Matters
Keeping about one foot between seed potatoes gives the plants room to develop.
A potato plant does not only need space above the ground. Its roots spread through the soil, while new tubers develop underground around the stem.
If plants are crowded together, their roots compete for available moisture and nutrients. Dense foliage can also reduce air movement around the plants.
The ideal spacing can vary depending on the potato variety, soil quality, climate, and available garden space. However, keeping the plants roughly one foot apart is a simple starting point for a home garden.
The rows or planting areas should also have enough room for you to walk between them and work around the plants later.
Watering After Planting
Potatoes need moisture to begin growing, but constantly wet soil can cause problems.
After planting, water the bed thoroughly rather than giving the potatoes a small amount of water every few minutes. The goal is to moisten the soil around the planting depth.
After that, monitor the soil regularly. If the surface begins drying out, check the moisture a little deeper before watering again.
Good drainage is particularly important. Waterlogged soil can reduce oxygen around the roots and increase the risk of rotting seed potatoes.
On the other hand, allowing the soil to become extremely dry can slow growth and affect tuber development.
A layer of organic mulch can help reduce moisture loss once the plants have emerged and are growing strongly. Keep mulch from forming a thick, wet layer directly against the stems.
Comparing the Two Planting Methods
The main difference between these two approaches is where the loose soil and compost are placed.
With ridge planting, the entire planting area is prepared and shaped into ridges before the potatoes are planted. Compost or aged manure is then added over the ridges.
With the hole method, the planting area is leveled and individual holes are made. A handful of compost is placed directly into each hole before the seed potato is planted.
Both methods provide the potato with loose soil and organic matter, but they distribute that preparation differently.
For a home gardener, the hole method can be convenient when only a limited number of potatoes are being planted. It also allows compost to be placed directly at each planting point.
The ridge method is useful when planting a larger area and can make later soil management easier.
Keeping the Comparison Fair
If you want to compare two planting methods, try to keep the other conditions as similar as possible.
Use the same type of seed potato in both sections. Try to use potatoes of similar size and maturity. Keep the spacing the same, and give both sections similar amounts of water.
The garden bed should also have similar soil conditions in both areas.
Avoid giving one section significantly more fertilizer or water than the other. Otherwise, it becomes difficult to know whether the planting method made the difference.
It is also useful to mark the two sections clearly. A simple garden label can prevent confusion later when the plants become larger.
Recent Posts
This garden bed has been growing vegetables throughout the summer, and now the soil needs some attention before we plant the next crop. We also had very heavy monsoon rain, and water stayed on the...
How We Renew Old Potting Soil Without Buying New Soil Every Season
Buying new potting soil every season can get expensive, especially when you have a lot of containers in your garden. And honestly, changing all that soil is a lot of work. You have to empty every...