
Every gardener wants rich, dark soil that helps plants grow big and strong. While buying bagged fertilizer is easy, the best way to feed your garden is by working with nature. Soil is not just dirt; it is a living system filled with tiny bugs, bacteria, and most importantly, earthworms. Earthworms are nature’s best helpers. They dig through the ground, break down old plant matter, and leave behind rich waste that plants absolutely love.
Instead of making a traditional compost pile in the corner of your yard, you can bring the composting process directly to your garden beds. Building a homemade underground worm system allows you to feed the worms right where your plants are growing. This method saves you the trouble of moving heavy compost from one place to another. It delivers food, moisture, and nutrients straight to the root zone of your vegetables.
Using this system also helps you deal with kitchen waste. Instead of throwing fruit peels and vegetable ends into the trash, you can drop them into a buried pipe. The worms will find the food, eat it, and turn it into premium fertilizer. It is a simple, cost-effective, and natural way to keep your garden thriving all season long.
Gathering Your Tools and Upcycling Materials
You do not need to spend a lot of money to build an effective underground worm feeder. In fact, the best way to make one is by upcycling materials you might already have at home. Look around your garage or shed for leftover plastic pipes. Leftover drainage pipes or electrical wiring conduits work perfectly for this project. Using old materials keeps trash out of landfills and saves you a trip to the store.
To build the main structure, you will need two long pieces of pipe. The exact length depends on the size of your garden bed, but pieces around one to two feet long are usually ideal. Next, you need a T-shaped joint connector that fits the size of your pipes. This joint will hold the two long sections together and create a center opening. You will also need a short, separate piece of pipe, about six to eight inches long, to attach to the top of the T-joint.
For tools, you just need a drill to make holes in the plastic. If you do not have a drill, a hammer and a thick nail, or even a heated metal tool, can work to melt holes through the plastic. You will also need a shovel or a garden trowel to dig a trench in your garden bed. Finally, grab a long stick, like an old broom handle, to help you pack the food inside the pipes once everything is installed.
Prepping the Pipes for Your Subterranean Guests
Before you bury the structure, you have to prepare the pipes so worms can move in and out easily. The secret to this system lies in the holes you create along the pipe walls. Earthworms live in the dark soil, and they will smell the food inside the pipe. They need easy access entry points to get to the scraps.
Take your drill and poke holes all over the two long pieces of pipe. Space the holes a few inches apart on all sides. When choosing your drill bit size, aim for holes that are big enough for a thick earthworm to wiggle through comfortably. However, do not make the holes too large. If the openings are massive, loose garden soil will fall into the pipe and fill up the space meant for food.
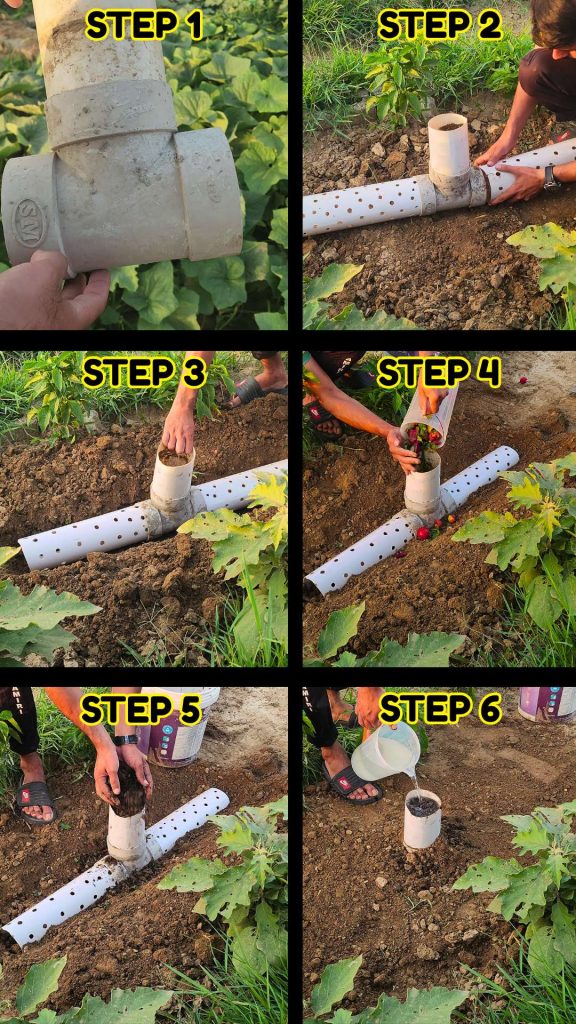
Once you finish drilling the holes, wipe away any loose plastic bits left around the edges. Now, take the two long, perforated pipes and push them into the opposite horizontal openings of your T-shaped joint. Next, take your short piece of pipe and pop it into the top, vertical opening of the T-joint. You should now have a long, straight pipe with a short stack sticking up right from the middle. This top section will act as your chimney and feeding chute.
Finding the Perfect Location in Your Garden Bed
Location is everything when installing an in-ground worm system. You want to place the feeder where your plants can get the most benefit from the nutrients. Heavy-feeding vegetables like tomatoes, cucumbers, peppers, and leafy greens love this setup because they require constant feeding to produce high yields.
Look for a central spot in your garden bed that sits right between your plants. Installing the pipe in the center allows the nutrients to spread out evenly in both directions, feeding multiple plants at the same time. Make sure you leave enough space around the feeding chute so you can easily walk up to it with your kitchen scraps without stepping on your crops.
Once you pick the perfect spot, clear away any surface mulch or weeds. You want a clean patch of soil to start digging. Keep in mind that once this system is in place, it will stay there for the entire growing season, acting as a permanent feeding hub for the local worm population.
Digging the Trench and Burying the Structure
Now that you have chosen the spot, it is time to dig. You need to create a trench that matches the shape and size of your pipe structure. The trench needs to be wide enough to fit the long horizontal arms and deep enough to keep the main pipes completely underground.
Dig into the soil carefully, especially if you already have plants growing nearby. You do not want to hack through large, established plant roots. Dig down until the trench is deep enough so that when you place the pipe structure inside, the long perforated sections sit right in the middle of the root zone. The only part that should stay above the ground is the short extension pipe attached to the top of the T-joint.
Set the pipe structure into the trench and check the height. If the feeding chute is buried, dig a little deeper. If it sticks up too high, it might get in the way when you tend to your garden. Once the height is correct, pull the soil back into the trench, filling the spaces around the pipes. Pat the dirt down gently with your hands to remove big air pockets and ensure the structure is stable and locked into the ground.
Preparing the Best Kitchen Scraps for Fast Composting
With your underground system securely in place, you can start gathering food for the worms. Worms love a variety of kitchen scraps, especially fruit peels, vegetable ends, melon rinds, and coffee grounds. Avoid adding things like meat, dairy, oil, or highly acidic foods like citrus peels, as these can create bad odors and drive the worms away.
To make this system work as fast as possible, do not just toss whole scraps into the tube. Take a few minutes to chop your fruit and vegetable peels into small, bite-sized bits. Small pieces have more surface area, which allows the natural moisture and soil microbes to break down the food much faster. The softer and more rotted the food becomes, the easier it is for the worms to eat it.
Gather your finely chopped scraps in a bucket or bowl. Keeping a small container on your kitchen counter is a great way to collect these materials throughout the week. Once you have a good amount, you are ready to head out to the garden and fill your new underground feeder.
Filling the Chute and Distributing the Food
Walk out to your garden bed and remove any temporary cap you have placed on the top of the feeding pipe. Pour your chopped kitchen scraps directly down into the vertical opening of the T-shaped joint. Because the food falls straight down, it will naturally pile up right in the middle of the structure.
To keep the system from clogging, you need to push the food into the long side pipes. Take your long stick or broom handle and insert it down into the chute. Gently push the scraps downward and then slide them outward toward the left and right sides of the pipe. This movement spreads the food evenly across the entire underground structure.
Spreading the food ensures that worms can enter from any hole along the pipe to find a meal. It also prevents the center joint from getting jammed with fresh waste, which would block air from getting inside. Keep adding scraps and pushing them to the sides until the horizontal sections are comfortably filled.
Adding the Biological Catalyst to Kickstart the System
Fresh kitchen scraps take a little time to break down on their own. To speed up the process and attract earthworms quickly, you need to introduce beneficial microbes into the pipe. You can do this easily by adding a biological catalyst right on top of the food.
Take a few handfuls of mature vermicompost from an old worm bin, or just use normal, high-quality garden compost. Pour this compost directly down the feeding chute so it lands on top of the fresh kitchen scraps. This introduces thousands of helpful bacteria and fungi that immediately start breaking down the food. It may also introduce worm cocoons or tiny juvenile worms into the system.
The compost also acts as a natural sponge that holds onto moisture and blocks any potential smells from escaping the tube. It creates a familiar, comfortable environment that encourages wild earthworms living in your garden bed to explore the pipe and start feeding.
The Importance of Moisture in an Underground System
Moisture is absolutely vital for a successful underground worm feeder. Earthworms breathe through their skin, and they can only survive and move around if their environment is damp. If the inside of your pipe dries out, the food will harden, and the worms will leave the area completely.
After adding your scraps and compost, pour a modest amount of water directly down the feeding tube. You do not want to flood the system or turn the dirt into mud, but you want to make sure everything inside is thoroughly damp. The water will soak through the food scraps and trickle out of the drilled holes into the surrounding garden soil.
This moisture helps soften the chopped peels, making them rot faster. It also creates a wet, nutrient-rich pathway in the soil that acts as a scent trail. Local earthworms will sense the moisture and the smell of decomposing food, drawing them straight toward the perforated pipes.
Recent Posts
Banana peels are one of those kitchen scraps that are easy to throw away without thinking about them. But if you have a garden, you can put them to use instead of sending them to the trash. One...
Put Potatoes, Charcoal and Compost in a Bucket for 7 Days — You’ll Want to Try This on Your Plants
Healthy plants begin with healthy soil. When soil contains plenty of organic matter and active microbial life, plant roots have a better environment for taking up water and nutrients. You do not...