
Spoiled fruits and fruit peels can be useful garden material instead of household waste. Fruits that have become too soft, bruised, overripe, or unsuitable for eating still contain organic matter that can be broken down and returned to the soil.
A simple liquid fertilizer can be made by combining chopped fruit waste with non-chlorinated water, mature compost or decomposed manure, and crushed untreated charcoal. The compost or manure supplies microorganisms that help break down the fruit, while the charcoal provides a porous material with surfaces where microorganisms and organic compounds can settle.
This mixture is not a replacement for a complete fertilizer, but it can be used as a homemade soil amendment alongside compost, mulch, and other methods of maintaining fertile garden soil.
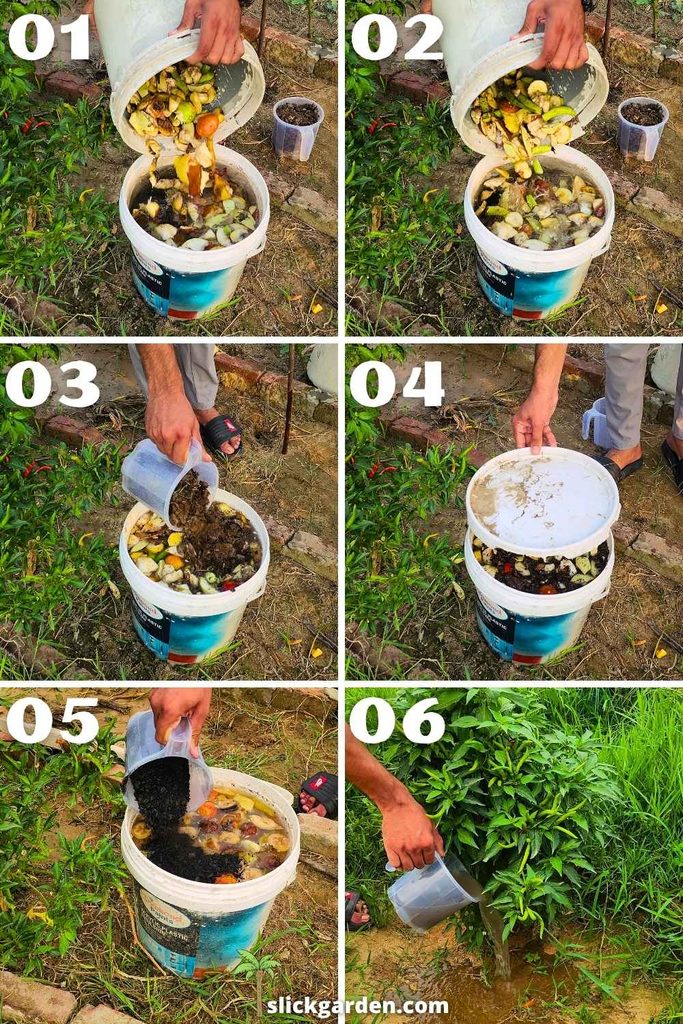
Materials Needed
The recipe starts with about 10 liters of non-chlorinated water. Rainwater is a good choice if it is available. Chlorinated tap water can also be used after allowing it to stand for some time.
You will need spoiled fruits and fruit peels. There is no need to use a particular fruit. Overripe bananas, apples, pears, mangoes, melons, and other fruit scraps can be combined.
You will also need a few handfuls of mature compost or well-decomposed manure. Avoid using fresh manure because it can be too strong for direct garden use and may contain pathogens or weed seeds.
The final ingredient is untreated charcoal. Charcoal should not contain lighter fluid, chemicals, or other additives. Crush it into small pieces or a coarse powder before adding it.
A large plastic bucket or similar container works well for preparing the mixture. You will also need a clean stick or tool for stirring.
Prepare the Fruit Waste
Collect the spoiled fruits and fruit peels and remove anything that is not organic material. Remove plastic, stickers, rubber bands, packaging, and other contaminants.
Cut the fruit into small pieces. There is no need to make the pieces extremely small, but chopping them increases the surface area exposed to water and microorganisms.
Small pieces generally break down faster than large chunks because microorganisms can work on more exposed surfaces.
Different fruits can be mixed together. You can use whatever suitable fruit waste is available instead of waiting for a specific type of fruit.
The goal is to recycle organic material that would otherwise be discarded.
Add Water and Compost
Fill the container with approximately 10 liters of non-chlorinated water.
Add the chopped fruit and fruit peels to the water. Once the fruit is added, put a few handfuls of mature compost or well-decomposed manure into the container.
Mix the contents thoroughly.
Mature compost and decomposed manure are useful because they contain diverse microorganisms. These organisms are involved in breaking down organic materials in natural soil.
Once introduced to the bucket, the microorganisms have a readily available source of organic material in the form of fruit and fruit peels.
The mixture should be wet enough for the fruit to remain surrounded by water while still allowing it to be stirred easily.
Leave the Mixture for Three Days
After mixing the ingredients, loosely cover the container.
Do not tightly seal the bucket. Decomposition can produce gases, and a tightly sealed container can allow pressure to build up.
Place the container outdoors or in a well-ventilated area. Keep it away from living spaces because decomposing fruit can produce a strong odor.
Leave the mixture for about three days.
During these three days, stir the contents regularly. Stirring helps distribute the fruit, compost, microorganisms, and water throughout the container.
The microorganisms from the compost or manure begin breaking down the fruit material during this period. Some soluble compounds are released into the surrounding water as decomposition takes place.
The mixture may become cloudy and develop an earthy, sour, or fermented smell. The appearance will vary depending on the fruits used and the environmental conditions.
Add Crushed Charcoal After Three Days
After three days, add crushed untreated charcoal to the mixture.
The charcoal should be crushed before adding it. Small pieces and coarse particles provide more surface area than large chunks.
Mix the charcoal thoroughly into the liquid.
Charcoal has a porous structure that provides many surfaces and small spaces. These surfaces can provide places for microorganisms and organic compounds to attach.
The charcoal also remains in soil much longer than fruit material. When incorporated into garden soil, carbon-rich porous materials can contribute to nutrient retention and water-holding capacity.
For this reason, adding charcoal gives the mixture a different function from the fruit and compost.
The fruit is the main decomposing organic material, compost or manure supplies microorganisms, and the charcoal provides a persistent porous carbon material.
Continue Decomposition for Ten Days
Once the charcoal has been mixed in, loosely cover the container again.
Leave it for another ten days.
Continue stirring the mixture regularly throughout this period. Stirring keeps the ingredients distributed and prevents large amounts of fruit material from remaining settled at the bottom.
The microorganisms continue working on the decomposing fruit and peels.
Temperature affects the rate of decomposition. Warm conditions generally encourage faster microbial activity, while cooler conditions can slow the process.
Because this is a homemade mixture, there will be differences between batches. The smell, color, thickness, and amount of remaining fruit material can vary.
Do not judge the quality of the fertilizer simply by how dark or strong-smelling it becomes.
Dilute the Finished Liquid
After the additional ten days, the mixture is ready to be diluted for garden use.
Do not apply the concentrated liquid directly to plant roots. Homemade organic liquids can vary significantly in strength, and a concentrated solution may be too strong for sensitive plants.
Dilute the liquid with clean water before applying it.
There is no single dilution ratio that works for every homemade batch because the nutrient concentration depends on the quantity and type of fruit, compost or manure, and other ingredients used.
Starting with a weak dilution is the safer approach, particularly for seedlings, young plants, and container-grown plants.
The diluted liquid should be applied to the soil around plants rather than poured directly over foliage.
Apply It Around Plants
The diluted fertilizer can be poured around the root zone of established plants.
Avoid soaking the soil excessively. Apply enough to moisten the soil without creating standing water.
The liquid can be used around vegetables, herbs, ornamental plants, fruit plants, and other established garden plants.
For young seedlings, use a weaker dilution and apply less liquid.
Container plants require additional care because their roots are confined to a small amount of soil. Nutrients and salts can accumulate more quickly in containers than in open garden beds.
If a plant is already stressed, newly transplanted, or showing signs of root problems, it is better to address those issues before applying homemade fertilizers.
Apply It to Garden Bed Soil
The diluted mixture can also be applied directly to garden bed soil.
Pour it evenly over the surface and allow it to soak into the upper layer of soil.
This approach is useful when the main goal is to return organic material and microbial activity to the soil rather than feed individual plants.
Garden soil contains bacteria, fungi, earthworms, and many other organisms involved in decomposition and nutrient cycling. Organic material provides resources for these organisms.
Adding compost and mulch remains a more reliable long-term method of increasing soil organic matter, but liquid organic amendments can be used as an additional practice.
Recent Posts
This garden bed has been growing vegetables throughout the summer, and now the soil needs some attention before we plant the next crop. We also had very heavy monsoon rain, and water stayed on the...
How We Renew Old Potting Soil Without Buying New Soil Every Season
Buying new potting soil every season can get expensive, especially when you have a lot of containers in your garden. And honestly, changing all that soil is a lot of work. You have to empty every...