
An old vegetable garden bed does not always need to be completely emptied and dug over before you plant again. If the bed is full of tired vegetable plants, weeds, and leftover plant material, you can often improve it by cutting the old plants down, keeping their roots in the soil, and adding fresh organic matter on top.
This method is especially useful when you do not have large amounts of compost or manure available. Instead of removing everything and starting again, you work with what is already in the bed and gradually add more organic material.
The basic idea is simple. Cut old vegetable plants close to the soil surface, remove unwanted weeds, add leaves and other suitable organic waste, sprinkle compost over the top, cover everything with mulch, and water the bed well.
Over time, the organic material breaks down and becomes part of the soil.
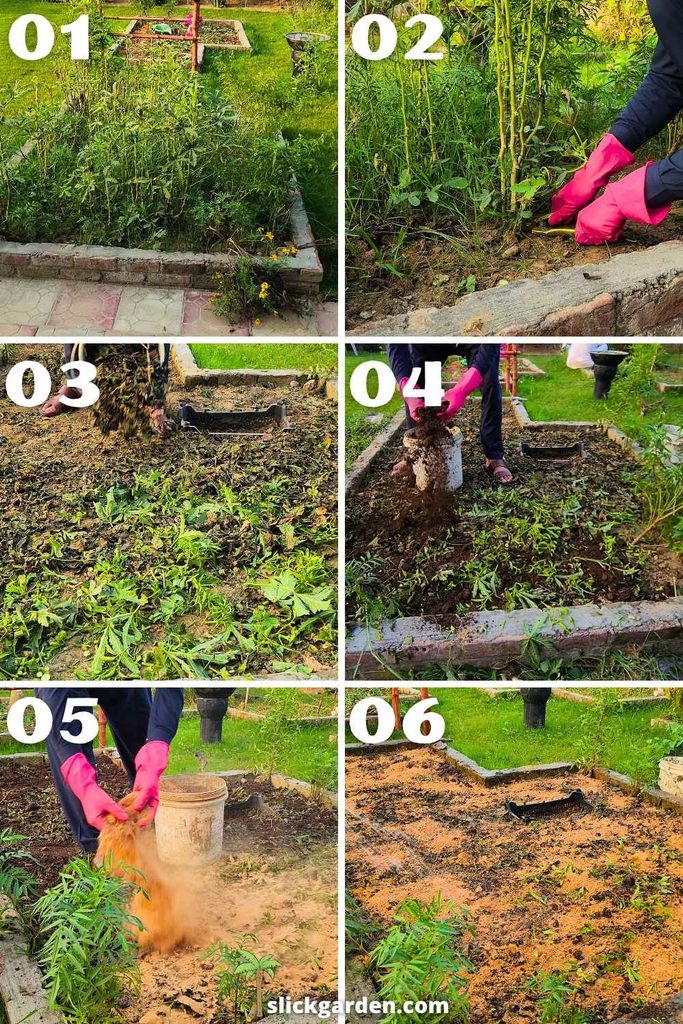
Cut Old Vegetable Plants Instead of Pulling Them Out
Once a vegetable plant has finished producing, the easiest thing to do is often to pull it out completely. But that also removes its entire root system from the soil.
Instead, cut the plant at soil level using pruning shears or a sharp knife. Leave the roots underground.
The roots left behind will eventually decompose. As they break down, they contribute organic material to the soil and leave small channels where the roots were growing. These spaces can help create a more open soil structure.
There is also no reason to disturb the entire bed just to remove roots from old vegetable plants. Digging everything over can break apart existing soil structure and disturb the organisms living in the soil.
Cutting the plants at ground level gives you a simple way to clear the bed while leaving the underground portion in place.
There is one important exception. If an old plant was badly diseased, particularly with a disease that can survive in plant residues, it is better to remove the affected material rather than leaving it in the bed. Do not add obviously diseased plants to your organic layer.
Remove Weeds Properly
After cutting down the old vegetable plants, deal with the weeds.
Weeds are different from old vegetable plants because many can quickly grow back if their roots are left behind. Some weeds can spread from small pieces of root, while others can continue growing from underground stems.
Pull or dig out troublesome weeds and remove as much of their root system as practical. Be especially careful with weeds that are already producing seeds.
You can leave the old vegetable roots in place because they were part of the crop you were growing, but you do not want aggressive weeds taking over the bed again.
Once the weeds are removed, rake the surface lightly if necessary. There is no need to turn the whole bed over.
Add Organic Material From the Garden and Kitchen
Now the bed is ready for fresh organic material.
You can use many materials that would otherwise end up in the trash. Fallen leaves, soft pruning material, vegetable scraps, fruit peels, and other plant-based kitchen waste can all contribute organic matter.
Fresh green material and dry brown material can be combined. If you have a lot of dry leaves, mix them with greener material. If you have fresh pruning waste, chop it into smaller pieces before adding it to the bed.
The smaller the material, the more surface area there is for decomposers to work on.
Avoid adding large amounts of cooked food, meat, dairy products, oily food, or anything that is likely to attract pests. Keep the material mostly plant-based.
Kitchen scraps should also be spread rather than dumped in one thick pile. A thin, even layer is easier to manage and breaks down more consistently.
You can also use soft garden weeds that have not developed mature seeds. Chop them up before spreading them across the bed.
Spread the Organic Material Across the Bed
Once you have collected the material, spread it across the entire garden bed.
Do not worry about making the layer perfectly even. The main goal is to cover the soil with a useful amount of organic material without creating a huge pile in one area.
Leaves, chopped stems, vegetable scraps, and other plant material will slowly break down. As this happens, nutrients and carbon from the organic matter become part of the soil system.
If the material is very dry, it can help to moisten it as you build the layer. Dry organic material can still decompose, but adequate moisture makes the process easier.
Try not to bury large amounts of fresh material deep in the soil. Keeping it closer to the surface allows it to decompose gradually while the existing soil structure remains mostly undisturbed.
Sprinkle Finished Compost Over the Organic Material
After spreading the fresh organic matter, add a thin layer of finished compost.
You do not need a truckload of compost for this method. Even a relatively small amount spread across the bed can be useful.
Finished compost contains already-decomposed organic matter and a diverse community of microorganisms. Adding it over the fresh plant material helps connect the fresh material with the biological activity already present in mature compost.
Spread the compost evenly rather than putting it in thick piles.
If you have homemade compost, make sure it is properly decomposed before using it. Finished compost should have a dark, crumbly appearance and an earthy smell rather than smelling strongly of fresh kitchen waste.
Compost is not being used here simply as fertilizer. It is also part of the organic layer that will help the fresh material begin breaking down.
Cover the Bed With Mulch
After the compost has been spread, cover the bed with mulch.
Sawdust can be used as a mulch, particularly when you already have access to clean, untreated sawdust. Avoid sawdust from painted, treated, or chemically contaminated wood.
You can also use dry leaves, chopped straw, shredded plant material, or other suitable organic mulch.
The mulch covers the organic material and protects the soil surface. It also helps slow down moisture loss, especially during hot and dry weather.
Sawdust is particularly useful as a surface mulch because it creates a fairly even layer. However, avoid mixing a thick layer of fresh sawdust directly into the soil. Keep it mainly on the surface where it can break down gradually.
As the mulch decomposes, it eventually becomes another source of organic matter.
Water the Garden Bed
Once all the layers are in place, give the bed a thorough watering.
The goal is to make the organic material and mulch properly damp without leaving standing water across the bed.
Moisture is important because decomposition slows down when organic material becomes extremely dry. At the same time, constantly waterlogged conditions can cause other problems, so the bed should remain moist rather than saturated.
After the first watering, check the bed occasionally. If the weather is hot and dry and the mulch becomes completely dry, give it some additional water.
In rainy weather, you may not need to water at all.
Let the Organic Material Break Down
Now the main work is done.
You do not need to keep turning the bed every few days. Leave the layers in place and allow them to break down naturally.
The old roots underground will decompose. The leaves and kitchen scraps will gradually disappear. The compost will mix into the organic layer, while the mulch will slowly break down from the surface.
How quickly this happens depends on the material, temperature, moisture, and local conditions.
Fresh green material usually breaks down faster than larger woody pieces. Chopped leaves disappear faster than whole branches. Warm, moist conditions generally encourage faster decomposition than cold or very dry conditions.
You may notice the layer becoming thinner over time. That is normal. The organic material is being broken down and incorporated into the soil system.
Recent Posts
Garden pests can quickly become a problem, especially when they start feeding on young leaves, new shoots, and tender stems. Aphids, small beetles, mites, ants, and other insects can damage plants...
Ants climbing up fruit trees can become a frustrating problem, especially when they keep moving between the soil, trunk, branches, and leaves. In many cases, ants are not directly damaging the tree,...