
Watering a garden may seem like a simple task, but doing it efficiently can make a big difference in plant health and water usage. Many gardeners spend money on sprinklers, irrigation systems, and watering tools when a much simpler solution can be made from materials already found around the home.
An empty plastic bottle, a short length of plastic pipe, and some tape are enough to create a practical garden sprinkler that delivers a gentle shower of water to plants. This easy project requires very little effort, costs almost nothing, and helps recycle materials that might otherwise be thrown away.
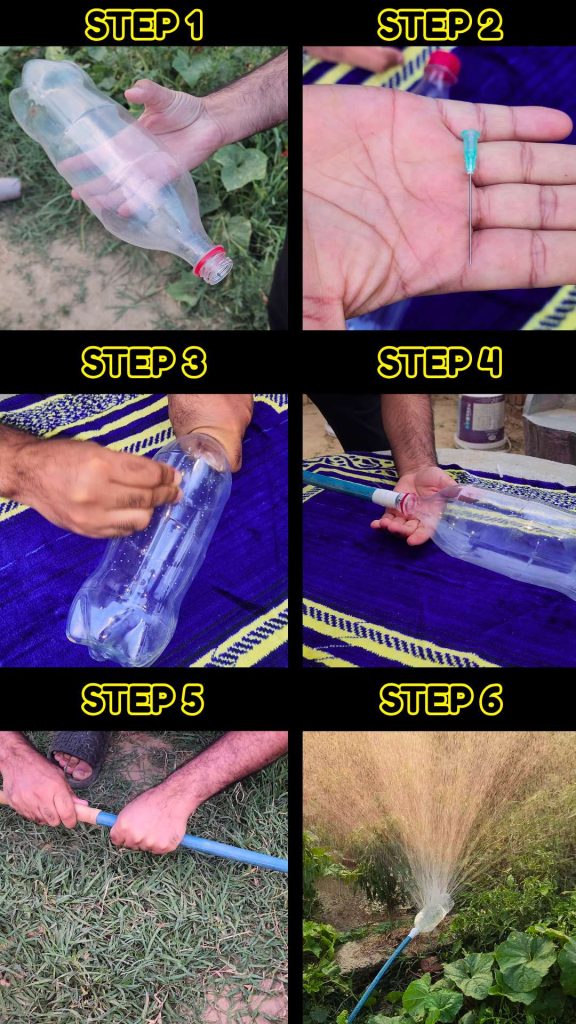
The idea is simple. Small holes are made on one side of a plastic bottle. The bottle is then attached directly to a plastic pipe connected to a water source. When water flows through the bottle, it sprays out through the holes, creating a shower-like effect that can cover a larger area than a regular hose.
Materials Needed
One of the best things about this project is that it requires only a few basic materials.
You will need an empty plastic bottle, a syringe needle, pin, or another sharp object for making holes, a piece of plastic pipe, tape, and access to a water source.
Most households already have these materials available. Even if they need to be purchased, the cost is extremely low compared to commercial sprinklers and irrigation systems.
Because the project uses recycled materials, it also reduces waste and gives a useful second life to a plastic bottle that might otherwise end up in the trash.
Preparing the Plastic Bottle
The first step is selecting a suitable bottle. A one-liter or two-liter plastic bottle works well, although other sizes can also be used. The bottle should be cleaned thoroughly to remove any remaining liquid or residue.
Once the bottle is clean, small holes should be made on one side. A heated needle, syringe needle, or pin can easily create these openings.
The holes should be relatively small and spaced evenly. A larger number of holes will create a wider spray pattern, while fewer holes will produce a stronger flow of water.
It is helpful to keep all the holes on one side of the bottle so the water can be directed toward a specific area of the garden.
Connecting the Bottle to the Pipe
After making the holes, the bottle cap is removed and set aside. The mouth of the bottle becomes the connection point for the plastic pipe.
The pipe should fit securely into the bottle opening. If the connection is slightly loose, tape can be wrapped around the joint to create a tight seal.
A secure connection is important because water leaks reduce pressure and affect the quality of the spray. Several layers of tape may be needed to prevent leaks completely.
Once the bottle and pipe are firmly attached, the other end of the pipe can be connected to a garden hose or another water source.
How the Sprinkler Works
The homemade sprinkler operates using simple water pressure. When the water valve is opened, water travels through the pipe and enters the bottle.
Because the bottle contains many small holes, the water is forced out through each opening. This creates multiple streams that spread out in different directions.
Instead of watering a single spot, the bottle distributes water over a larger area. The result is similar to a light rain shower.
The pressure can be adjusted by opening or closing the water valve. Lower pressure creates a softer mist, while higher pressure produces a stronger spray.
This flexibility allows gardeners to adapt the system to different types of plants and growing conditions.
Recent Posts
You don't need to buy a lot of compost or fertilizer to prepare a good garden bed. If you have leaves, kitchen scraps, and other plant waste, you can use them to improve your soil and feed future...
I had an old rice storage sack that I wasn't using anymore, so I decided to turn it into two small raised garden beds. I cut the sack in half, used some bamboo sticks to hold everything in place, and...